Author Topic: Treadmill Motor / Generator in Air ( PART 2 )  (Read 23605 times)

0 Members and 1 Guest are viewing this topic.

CmeBREW

  • Hero Member
  • *****
  • Posts: 615
Treadmill Motor / Generator in Air ( PART 2 )
« on: March 09, 2007, 02:05:33 AM »
Greetings all:

    More info on my 'PASSINGWIND 200X' Downwind DC turbine:


But before I start:

I only have 3 things to say breifly about safety here especially for beginners:


  1. Always PLEASE wear your safety glasses! I snapped a 3/8" drill bit during this project that shot accross the room like a bullet. I WAS wearing my glasses. Do not lose one of your PRICELESS eyes before you can truely appreciate this warning that we all keep hearing time and time again.
  2. Always view a flooded lead-acid battery as a gasoline filled bomb waiting to explode in your face with just one tiny spark. Always make a copper bus bar FIRST and hook up live wires on that NOT the battery terminals. My father's friend has permanent marks on his face and is legally blind because he failed to appreciate this fact!
  3. Stay a good distance away from a wind turbine when it is spinning! It could actually kill you if it hit you on the head or neck.


Ok. Back to fun stuff. The following pictures of this unorthodox down-wind turbine might give you some ideas. However, an upwind turbine with proper furling is still the better, safer, longer lasting, more controlled choice I think ,for beginners.


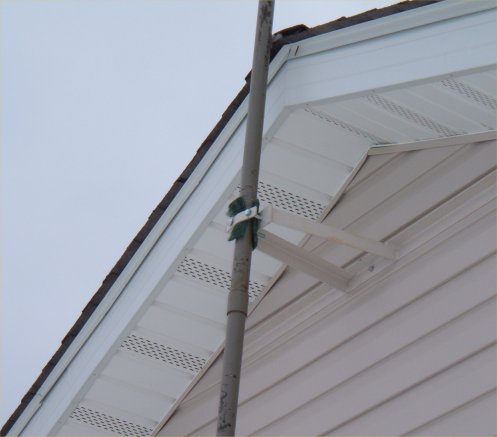
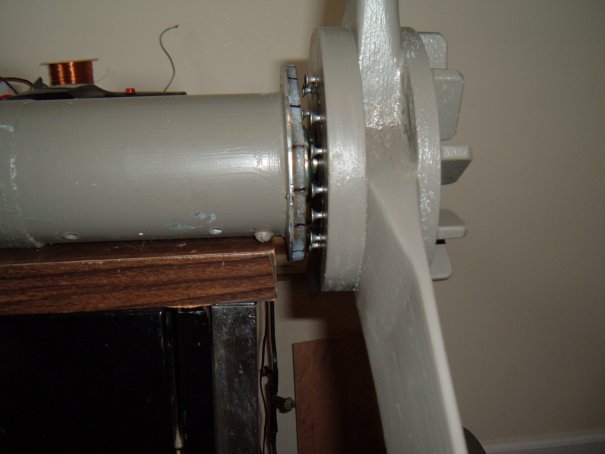
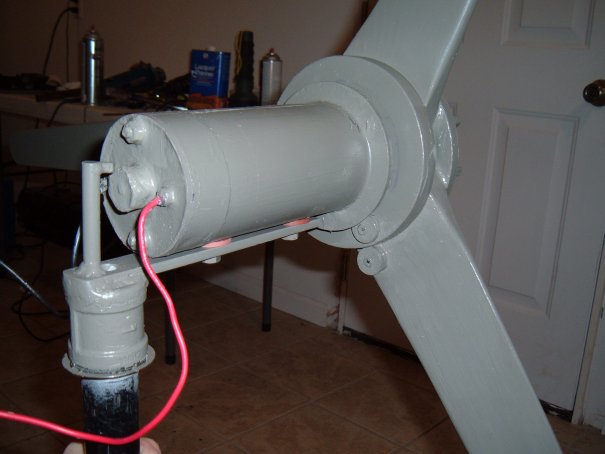
This is the support bracket i welded up from angle steel. I am going to get an old automotive rubber radiator hose ,cut it up in pieces, and add it to the support bracket instead of the scuffing pad. The overall vibration here is really not too bad.

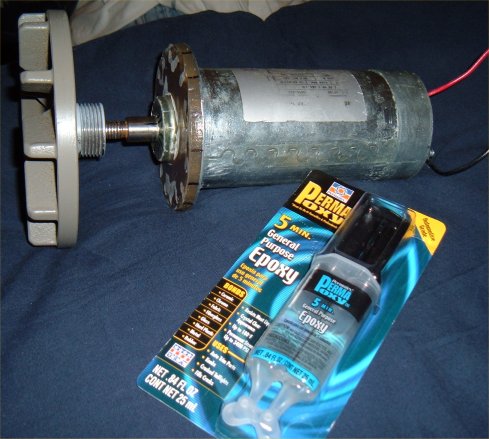
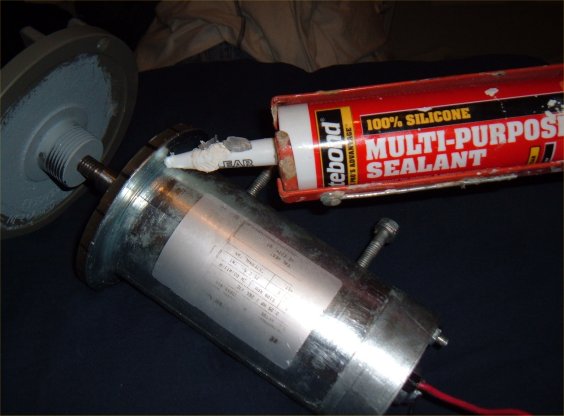
The following is how I water proofed the motor using general purpose 5-min. expoxy.

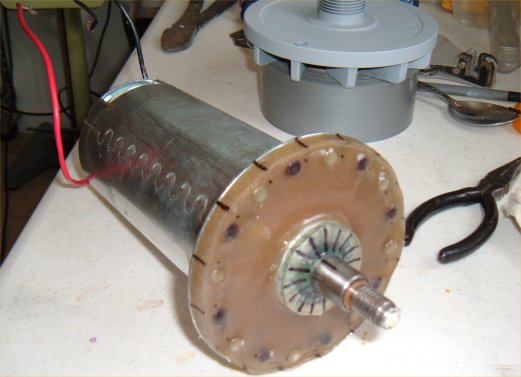
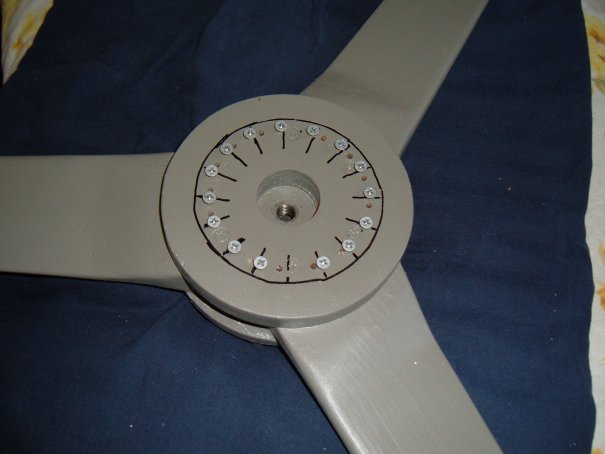
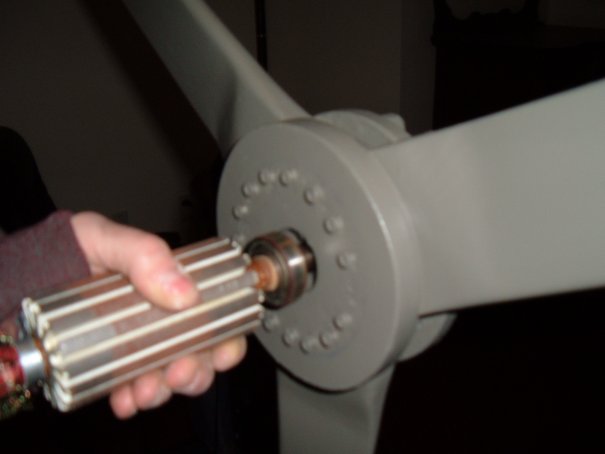
Also you will see how I made a 'MAGNETIC COG REDUCER' mechanism on the front of this treadmill motor to help reduce the cogging effects typical with all permanent magnet dc motors of this type.


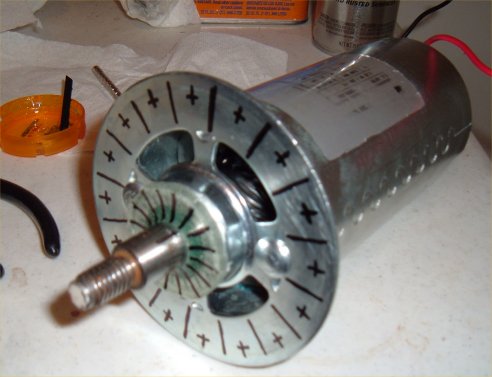
There are 16 fairly light cogs to this motor per revolution. What I did was mark these as 'cog lines' and then put small super-magnets inbetween the cog lines. Later, 16 normal wood screws are exactly placed on the back of the wood rotor which 'pulls' each of the 16 screw heads toward each of the 16 magnets. What this suppose to do is make 32 smaller, lighter (easier to turn) cogs, instead of 16 harder to turn cogs. This mechanism definitly did help and was easy to do.

Also here you can see how I sealed the front (and back) bearings by pouring 5 minute epoxy (never fiberglass resin- it is too thin and long setting) straight over the bearing with duct tape around it. The epoxy is very thick and it sets in only a few minutes.  Always carefully put GREASE on the 'crease' of the bearing and the shaft. This procedure has always worked for me without ruining a bearing.


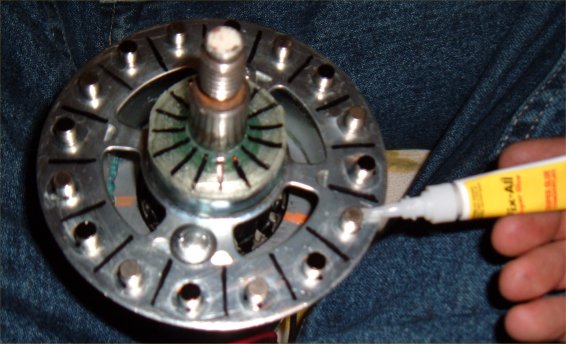
Here I super-glued the 16 tiny magnets down.


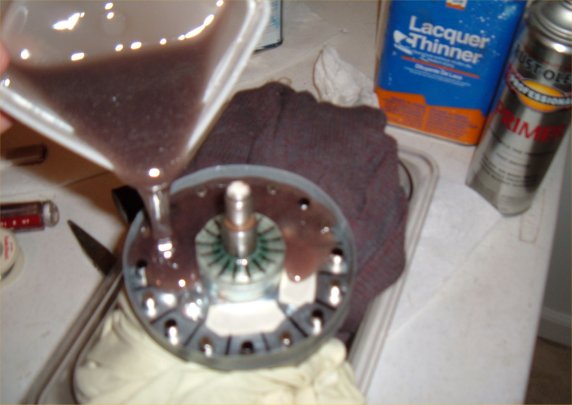
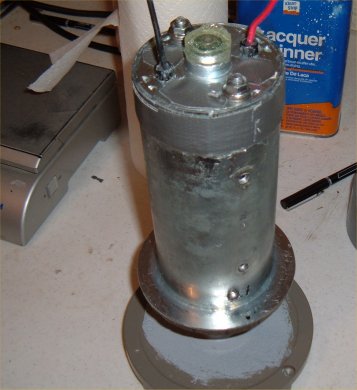
This is how i sealed the front (and back) of the motor, by putting duct tape over the holes and around the outer diameter and poured fiberglass resin. Actually, 20 minute epoxy would have worked too. It is much quicker. (spread the thick epoxy around with a disposable glue brush.)


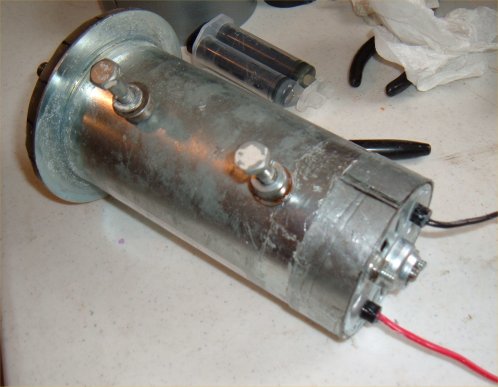
This is where I epoxied thin sheet metal around the back to cover over two big holes. I used plenty of duct tape to hold it in place. 20 min expoxy is best for this -especially in the hot summer months.

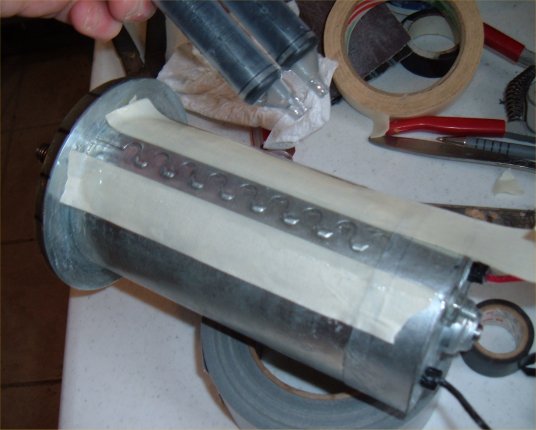
Here I just smeared the epoxy with my fingers over these lines.


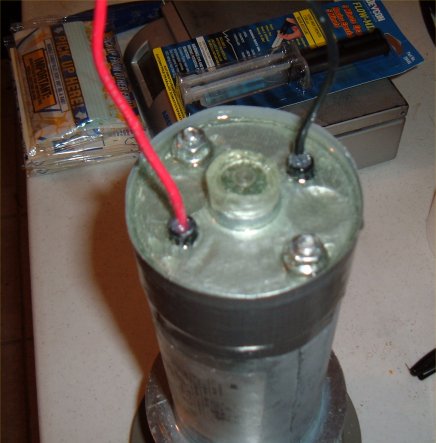
Do not epoxy over the 2 nuts here because you will want to take the motor apart again to replace brushes. Instead, put 2 normal washers down first. Then the epoxy will not go over the nuts.

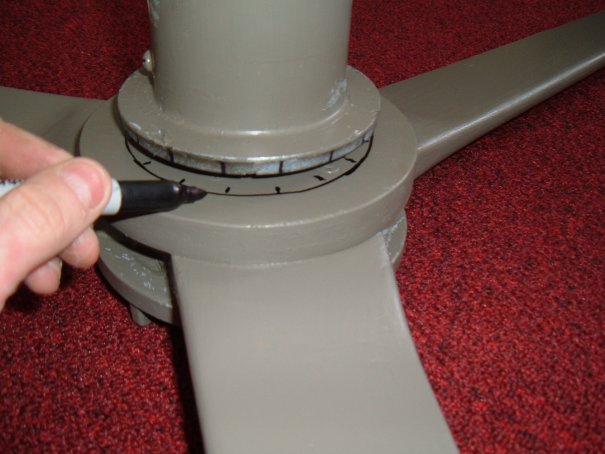
Now a few photos of how I made the magnetic cog reducer. Very simple really.


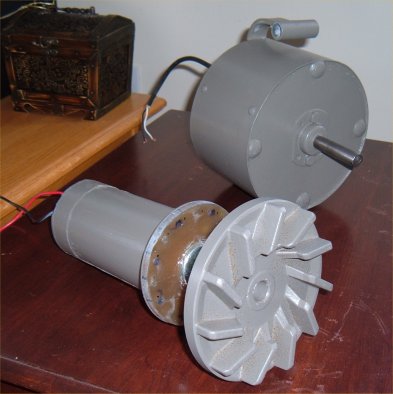
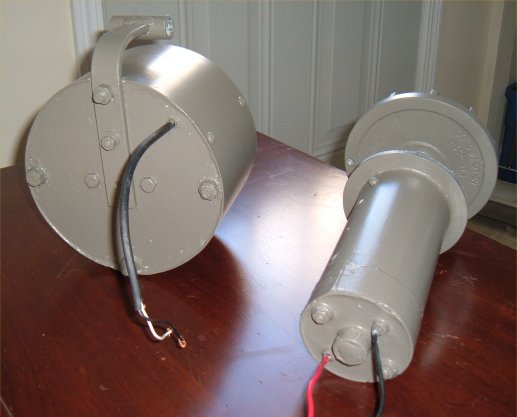
Here is both generators compleate and painted. The other one is more of a 'breeze alternator' (only 35 watts) I'll put it up in the summer.


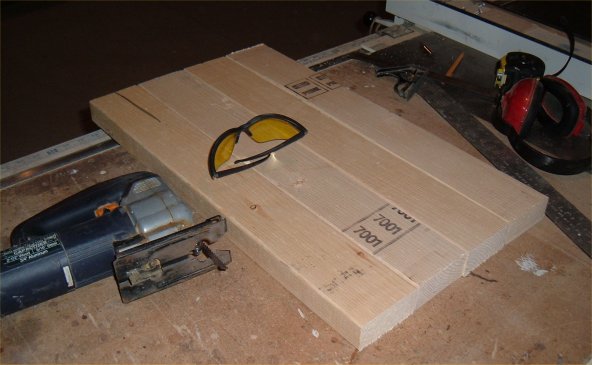
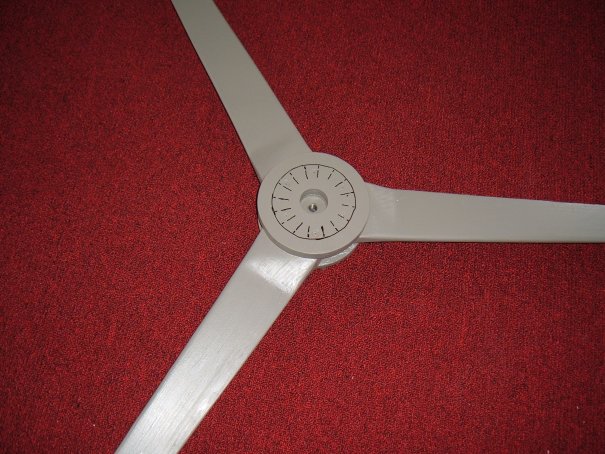
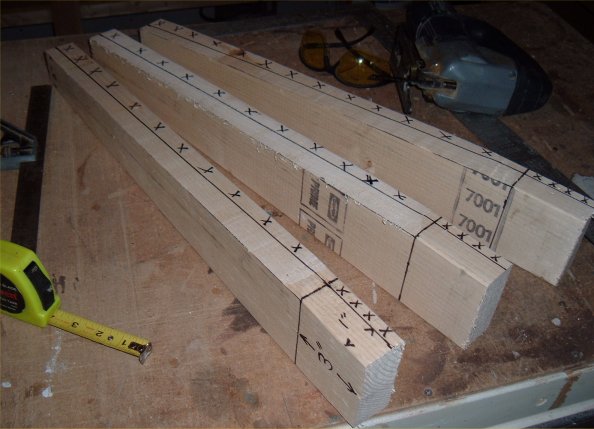
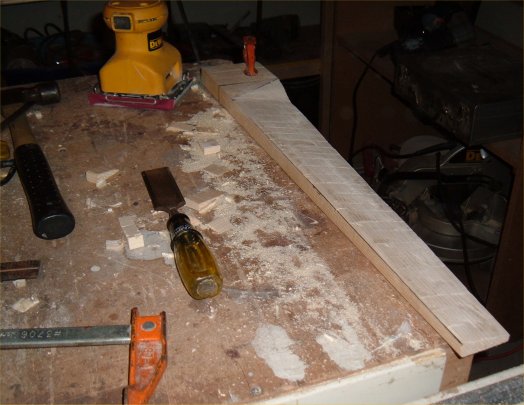
The following are how i made my very first set of blades. I used a typical $2 2x4 stud.  These are 2 feet long each.


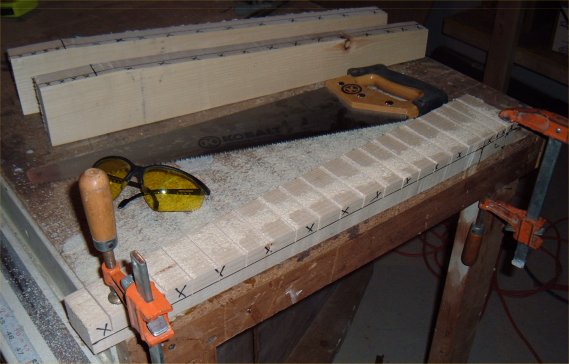
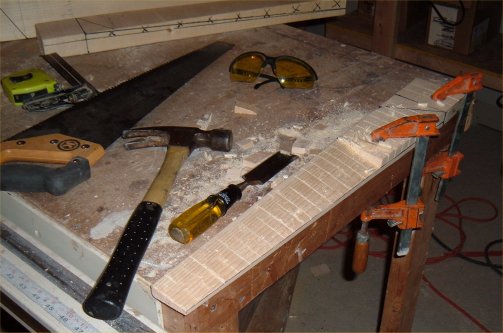
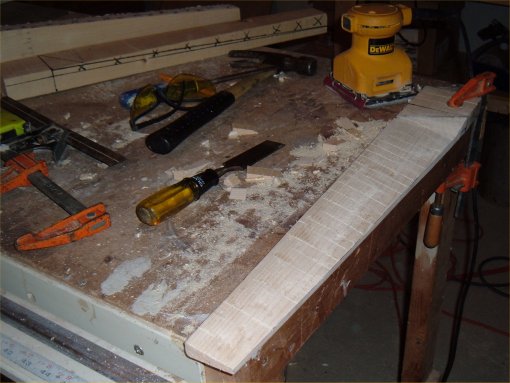
These blades are really quite easy to make. I only used very basic tools. A jigsaw, hammer and 1" wood chisel, and a manual hand saw and a finish sander. I never needed to use a table saw or anything else.


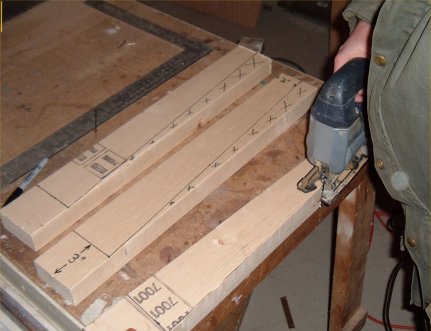
Very simple. I followed DAN B's simple 'BLADE PAGE' (sorry, I don't yet know how to insert link)


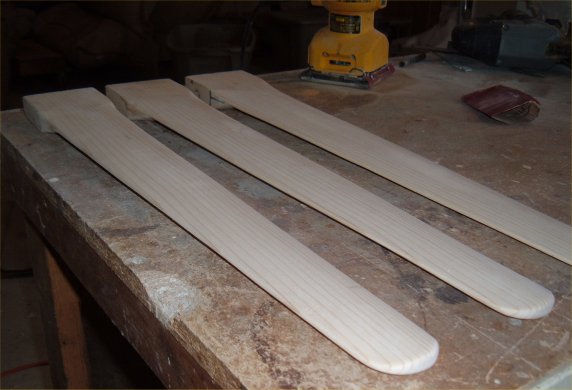
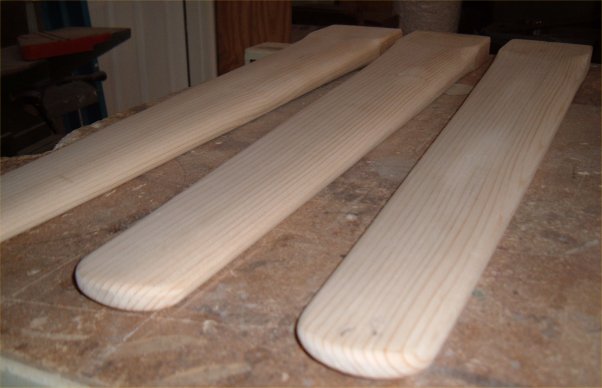
The angle at the root is 10 degrees down to about 7 degrees at the tip. Actually, after testing this turbine for a while it is overwelmingly clear to me that 4 blades would have been better (easier start up in 10mph wind) , and 12 degrees at the root down to about 10 degrees at the tip.


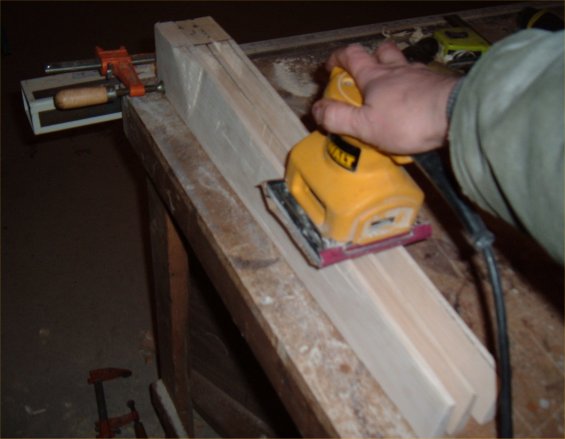
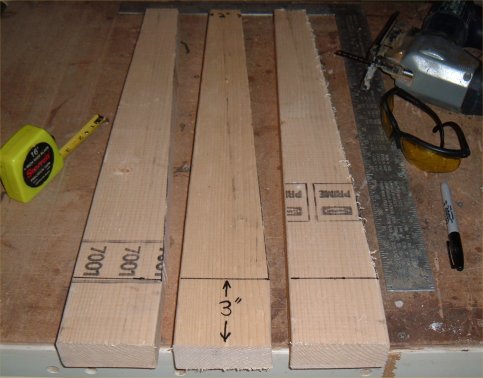
It is very important that the width be the same on all blades. This is how I accomplish this.


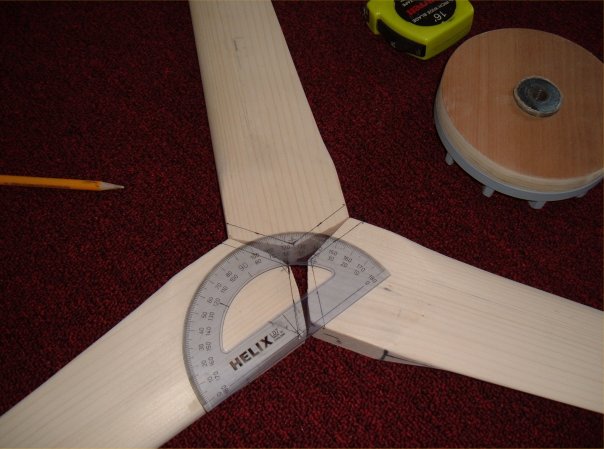
I had alittle problem with this. DAN B made it sound so easy. I cut the wrong angle with my miter saw here. It took 3/4" off the overall diameter of the rotor blades. I seriously must stink at geometry cause I'm still not certain. I marked the 120 degree lines with a marker and then jig sawed the damn thing out before the blades were ruined!

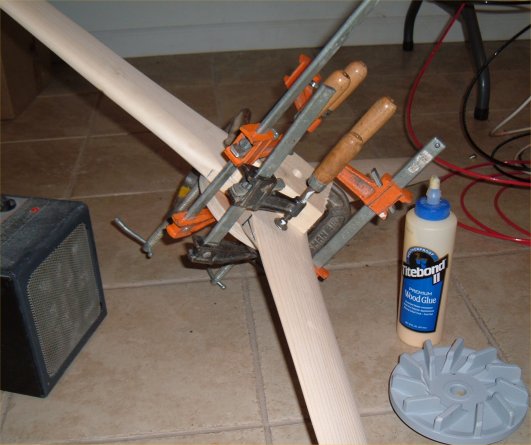
Here I glued it all up with WATERPROOF wood glue. I used 3/4" plywood (6"diam.)


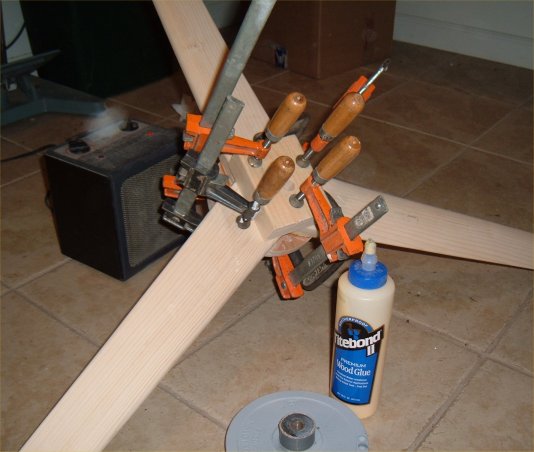
I then screwed the fan spinal to the blades.


This is the easiest way to balance these blades. I forgot to mention when making each blade, a postal scale is nice to weigh each blade as you do each proceedure to keep them as close as possible. To do a final balancing, use the armature from the motor away from the big ceramic magnets! Hold on to the two ball bearings with your fingers and you will easily see which blades you need to screw some washers to. I like to superglue them down and the screw. Try to keep these washer weight up near the root of the rotor. It is safer.

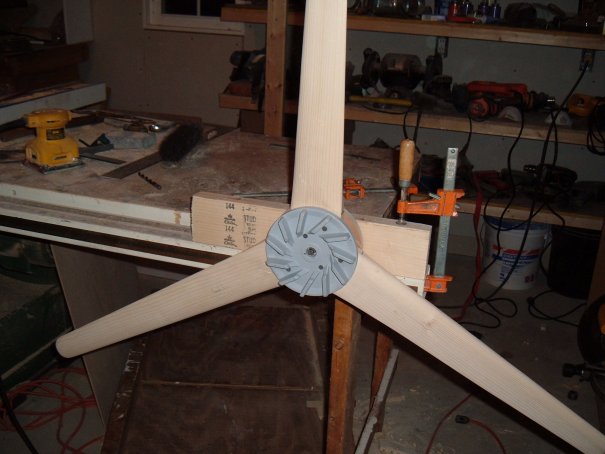
Here it is finished and balanced.

I thought I would state how much power I used recently to give beginners an idea of how much electricity they might expect from this treadmill motor/generator. During a very windy day (20-30mph), I had plenty of efficiency lighting (about 12 hours running a 13watt efficiency bulb/ equivalent to a 60 watt light bulb) -including my power inverter this equals about 18-20 watts for 12 hours straight.

Also I ran my 130 watt TElevision (27 inch) for a total of 4 hours that day. I forgot to mention that I use  2 'cheap' marine batteries for my bank.

On a 12-20 mph wind day I get about 2 hours of TV and 4 hours of efficiency lighting. In the near future I plan on buying a 65 watt efficiency Television and then I can watch twice that much TV from the wind!

I also run an efficiency fan that I made using this exact same treadmill motor at all times. (24 hours a day/ It is only 3-5 watts!!) I will show that amazing fan project tommorrow in the mechanical section. So watch for it!    \\

« Last Edit: March 09, 2007, 02:05:33 AM by (unknown) »

nothing to lose

  • Hero Member
  • *****
  • Posts: 1538
Re: Treadmill Motor / Generator in Air ( PART 2 )
« Reply #1 on: March 09, 2007, 12:02:11 AM »
"I don't yet know how to insert link"


To post a link the easiest way is to open the page in another browser window, highlight the URL of that page in the long skinny bar a top, Copy it with Ctrl key held down and pressing C key. Then click into the message where you want the link and hold down the Ctrl key and press V.

 On nearly every message site or e-mail system that works perfect, and no typing errors trying to post long strings of paths.

 Really just simple copy and paste is all it is and I'm sure you know how to do that fine :)

  The software takes care of making it an actaul link, 90% of forums. If it is not made into an actaul clickable link then it is posted as text like everything else, and you just copy it from the message and paste it into a browser window URL bar and hit enter and it works that way.


This is the link for your part 1 in this series, cut from another browser window and pasted in here for you.


http://www.fieldlines.com/story/2007/3/8/31258/26067


I would hate to try typing that, I would get something wrong.

« Last Edit: March 09, 2007, 12:02:11 AM by nothing to lose »

nothing to lose

  • Hero Member
  • *****
  • Posts: 1538
Re: Treadmill Motor / Generator in Air ( PART 2 )
« Reply #2 on: March 09, 2007, 12:48:11 AM »
Well looks like you did a really great job. Covered about every detail pretty well in building.


 Nice mounting bracket. I geuss you have several more below to hold the pipe from wobbling around? I think I read in other posts your adding guy wires also?


I do think perhaps I would not bothered sealing things up so well myself. But the location a genny will be flown has alot to do with that. Sealing it up is good to keep salty air out if near a Ocean or such, I'm not though.

 Unless there is a reason to seal one up, I would prefer to let air pass through it for better cooling myself. Seal up the bearings if needed but sealed bearings should be fine as is I think.


Neat Idea for the Anti-cogging device. I never tried to build one. I like that idea in general and it gives me an idea how to decog a motor and add a light I wanted in the rotor hub at same time.


Great work, really nice genny and blades, I hope it makes power for you for a long time to come.

« Last Edit: March 09, 2007, 12:48:11 AM by nothing to lose »

DanB

  • Global Moderator
  • SuperHero Member
  • *****
  • Posts: 2151
  • Country: us
    • otherpower.com
Re: Treadmill Motor / Generator in Air ( PART 2 )
« Reply #3 on: March 09, 2007, 08:17:00 AM »
Brilliant decogging effort there - I've thought of doing that in the past on some induction motor conversions I did but never got round to it.  I expect a fairly small investment in small magnets could go a long ways towards 'decogging' just about anything like this.  Nicely done - and excellent writeup!
« Last Edit: March 09, 2007, 08:17:00 AM by DanB »
If I ever figure out what's in the box then maybe I can think outside of it.

luv2weld

  • Sr. Member
  • ****
  • Posts: 308
Re: Treadmill Motor / Generator in Air ( PART 2 )
« Reply #4 on: March 09, 2007, 08:41:12 AM »
Great explanation and work! Instead of radiator hose on your support bracket, how about old inner tube or pipe insulation. They are softer, so less vibration is passed through. I use pipe insulation for everything!


Ralph

« Last Edit: March 09, 2007, 08:41:12 AM by luv2weld »
The best way to "kill time" is to work it to death!

CmeBREW

  • Hero Member
  • *****
  • Posts: 615
Re: Treadmill Motor / Generator in Air ( PART 2 )
« Reply #5 on: March 09, 2007, 08:46:32 AM »
Thanks DANB:

   Greatly appreciate you and friends tremedous amount of work with this website and experiments. The mag cog reducer idea just popped into my brain and does definitely work but I cannot give an exact percentage yet. One important thing to remember though is if you place the screws in relation to the mags incorrectly, you will make the cogging TWICE as bad as it was in the first place! I Marked the maximum cog lines first, put mags inbetween these lines, and then have the screws just to one side of the mags-it depends which direction the rotor will turn (in my case,counterclockwise,so the screws were on right side to the mags) Also you can adjust the wood screws until you get it just right and then super-glue them in. (mine was about 1/4" gap from the mags)

It has been an extremely exciting project.   -Thanks Dan and Otherpower!
« Last Edit: March 09, 2007, 08:46:32 AM by CmeBREW »

CmeBREW

  • Hero Member
  • *****
  • Posts: 615
Re: Treadmill Motor / Generator in Air ( PART 2 )
« Reply #6 on: March 09, 2007, 09:11:46 AM »
Thanks Luv2weld----You are right, that pipe foam insulation stuff would work even better. Also, I meant to say this before--I'll just say it here-- but when I said using "nylon nuts" in my main comments I meant nylon CORED nuts. They are still steel nuts. I just didn't want a beginner using all plastic nuts to hold up a dangerous wind mill!  -Thanks
« Last Edit: March 09, 2007, 09:11:46 AM by CmeBREW »

gotwind2

  • Sr. Member
  • ****
  • Posts: 383
  • ben[at]gotwind.org
    • Gotwind - The Renewable Energy Resource
Re: Treadmill Motor / Generator in Air ( PART 2 )
« Reply #7 on: March 09, 2007, 02:24:37 PM »
Sorry, I replied to Part 1 by accident, might need deleting.


Nice work CmeBREW

The anti-cogging idea is pretty innovative. I might try something similar on my dynohub, which cogs really badly, but generates 12v at only 60 rpm.

http://www.gotwind.org/Dynohub.htm


Also, what Scale/measurements did you use for your blades, are they a scaled down DanB design or your own?


Thanks and good luck.

Ben

« Last Edit: March 09, 2007, 02:24:37 PM by gotwind2 »

wooferhound

  • SuperHero Member
  • ******
  • Posts: 2288
  • Country: us
  • Huntsville Alabama U.S.A.
    • Woofer Hound Sound & Lighting Rentals
Re: Treadmill Motor / Generator in Air ( PART 2 )
« Reply #8 on: March 09, 2007, 04:43:48 PM »
You said that you are weather proofing with 5 minute epoxy

But 5 minute epoxy is not waterproof . . .
« Last Edit: March 09, 2007, 04:43:48 PM by wooferhound »

CmeBREW

  • Hero Member
  • *****
  • Posts: 615
Re: Treadmill Motor / Generator in Air ( PART 2 )
« Reply #9 on: March 09, 2007, 05:12:42 PM »
Hello Wooferhound:

I am no Genuius on epoxy or 'waterproofing' but I had thought I read from the group that epoxy was more water resistant than fiberglass resin. If it isn't , then what is???  Hopefully, it will be good enough and last awhile.
« Last Edit: March 09, 2007, 05:12:42 PM by CmeBREW »

wdyasq

  • Hero Member
  • *****
  • Posts: 1324
Epoxies
« Reply #10 on: March 09, 2007, 06:33:59 PM »
I was told by a major epoxy formulator/fabricator "5 minute epoxy" is not really an epoxy.


The 'waterproofness' of a resin has a lot to deal with how they are formulated, i.e. what is added to the basic resin.


Nice work.


Ron

« Last Edit: March 09, 2007, 06:33:59 PM by wdyasq »
"I like the Honey, but kill the bees"

vawtman

  • Hero Member
  • *****
  • Posts: 1425
Re: Epoxies
« Reply #11 on: March 09, 2007, 07:16:13 PM »
Ron ,For bonding long cure epoxies are what you look for.For sealing lots of stuff out there.

  Love to trip that horsie.
« Last Edit: March 09, 2007, 07:16:13 PM by vawtman »

wdyasq

  • Hero Member
  • *****
  • Posts: 1324
Re: Epoxies
« Reply #12 on: March 09, 2007, 08:00:15 PM »
I'd want to know the use of the resin - 'WTF are your trying to do?' From there one might get an idea. I tend to use products made by major suppliers and either known by me or a trusted friend to be a good product. Curing time, allergic reaction, hardness, temperature sensitivity, adhesion to materials and several other factors are considered.


Techniques used are those proven and have previous testing/experience. All of this is combined to make a good guess at something with the hope I got everything right and won't need to redeaux the project. MANY times a prototype is built just to get a technique right or test a theory on method or strength of doing a project.


But, then again, I'd rather not do a job or project than get someone hurt or killed. I err on the side of sanity and tend to respect the success, and failures, of others as a guide.


Ron

« Last Edit: March 09, 2007, 08:00:15 PM by wdyasq »
"I like the Honey, but kill the bees"

nothing to lose

  • Hero Member
  • *****
  • Posts: 1538
Re: Epoxies
« Reply #13 on: March 12, 2007, 05:25:33 PM »
Ron,

You have good point abot epoxy if mounting blades to a hub with epoxy, or glueing the genny to the tower 100' up, neither would I do with expoxy though of course.


BUT when all you want to do is shed direct rain to keep water out, WHO CARES??

Heck wrap an inner tube around it and hold in place with large hose clamps, not like it's any saftey issue!

« Last Edit: March 12, 2007, 05:25:33 PM by nothing to lose »

HenryVG

  • Newbie
  • *
  • Posts: 24
Re: Treadmill Motor / Generator in Air ( PART 2 )
« Reply #14 on: March 23, 2007, 10:26:12 AM »
Wow is this an exciting project. Perfect for a mast-mounted sailboat genny that can be stowed and put up at anchor! Could you post the specs on the blades? Length, stations, etc. I'll have one of these flying this summer.


And does this also mean that one could cast a set of the mini-magnets in a conventional axial-flux stator and harvest a small current on the blade-side rotor? I can just see a few LEDs peeking through wooden blades all over the world, making those utilitarian wind generators into kaleidoscopes of colored lights...

At least then the "But windmills kill birds becasue they can't see them at night" folks will have to come up with something else. Maybe "Spinning lights cause epilepsy in bats"...

« Last Edit: March 23, 2007, 10:26:12 AM by HenryVG »

CmeBREW

  • Hero Member
  • *****
  • Posts: 615
Re: Treadmill Motor / Generator in Air ( PART 2 )
« Reply #15 on: March 23, 2007, 04:49:46 PM »
Thanks HenryVG,

      Neat Idea about the boat.(Wish i had a boat!) I don't know boating but if you do make one I personally would make it an UPwind generator (with tail control) so that it would furl out of the 30MPH+ winds and stay QUIET and safe. (since it would be right above your head and possibly disturb the people sleeping in their boats??) Also, one thing I forgot to mention in the main post is that you cannot shut down the windmill I made by simply 'shorting' together the two wires and wait out a thunderstorm. Even with it shorted it spins pretty much out of control with anything above 30mph. (and of course it would fry the brushes pretty quick doing this- I finally realized)

Most of the blade dimensions are in the photos pretty much--simple 2x4 blades---3 and a half inches wide (1 in.thick)on hub side---down to 2" wide (about half an inch thick) at the tip.(10 or 12 degree slope angle at the root(hub) side--gradually down to about 8-10 degree slope angle at the tip) I just followed the basic principles of DANB's 'Blade Page' on this website--and they really spin great. Yesterday was very windy and I got just over 500 watt hours over a 12 hour period. (Not going to lower my electric bill but plenty of TV watching ,lights and an efficiency fan)  I would still make 4 blades instead of 3 though, to capture low 10mph winds.(They can really add up to 2 or 3 hours of efficiency lighting on all those many,MANY low wind days)

That LED idea would be cool to try--but I don't know much about LED's and keeping them from blowing out from the higher voltages they would encounter. I can't imagine a voltage regulator spinning 1500rpm on the rotor??? But it would be really cool to see that if the LED's could keep from burning out.  -Have fun on your boat!  
« Last Edit: March 23, 2007, 04:49:46 PM by CmeBREW »

CmeBREW

  • Hero Member
  • *****
  • Posts: 615
Re: Treadmill Motor / Generator in Air ( PART 2 )
« Reply #16 on: April 02, 2007, 08:23:58 PM »
Thought I could mention one more thing about controlling this small windmill in very high winds before this post goes away. We have had several VERY windy days so far this spring. (40-50mph+) What I do now is, I hook one of those little 12vdc car heaters (200watts) directly (NOT thru the batts) to this windmill in these high winds and it controls it very well-- after the batteries are full.  You have to run a separate wire to the little fan in it though, or the voltage drop (down to around 6-7 volts) at the heater will blow out the transistor in the brushless fan. (which I unfortunetly did) I had to temporarily rig another little 12vdc fan (2watt) on the top.


Later, I will make a better set-up with more heating elements. I'm going to do many 'on-off' switching type experiments, to try and get more heat. Its pretty cool - I actually get some decent little heat coming out of that little $15 200watt heater in high winds.  I just got my xantrex C-60 controller - so this little heater will be the dump load for it  now. I can't wait to hook it up, since its been a pain in the neck always watching the battery volts and turning on my TV in the middle of a windy night! When the 12vdc heater is hooked to the generator directly the blades turn only about 120rpm in about a 20mph wind. (under 20mph they stop) They turn only about 300rpm in a 30mph wind. But at about 35mph-40 they really take off and spin up fast to about 800-1000rpm (guessing) and then heat comes out of the heater until the high gust goes back down below 30mph. But it is still noticably controlled. It don't spin too much out of control like before. Thought I would just mention these recent facts. I can finally sleep at night.

Also, one more thing about this Down-wind type generator I made. It has a very difficult time making a complete 180 degree turn in the lower winds. This has happened several times now- where I had to go on my roof and turn it 180 degrees around. Sometimes, the wind blows all day from the main direction, but at night there is NO wind, and the next day the wind starts up in exactly the opposite direction. My Yaw axis (pole inside the bigger pole) is not as easy to turn as I would like. 4 blades would certainly help it in the low wind turns, Or a 6 foot rotor would have alot more leverage with a bigger, better generator. Of course, after the rotor is turning it easily stays with the direction of the wind. Also, it seems to me that furling a downwind generator is extremely difficult other than the more difficult variable pitch blades.

You can make it furl up or sideways - but it would take a spring and damping air cylinder which I'm not going to even mess with.(sounds like a headache to me) Rather,  I'm going for the variable pitch blades on my next bigger alternator.(6')

Later friends!
« Last Edit: April 02, 2007, 08:23:58 PM by CmeBREW »