Author Topic: test coils, epoxy  (Read 4919 times)

0 Members and 1 Guest are viewing this topic.

kitestrings

  • Hero Member
  • *****
  • Posts: 1376
test coils, epoxy
« on: January 26, 2012, 02:48:56 PM »
Greetings,

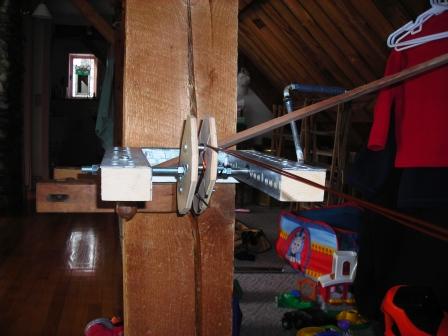
Moving    s  l  o  w  l  y,    but in the same direction, I wound another test coil.   I made some changes to winder.  It is a bit heavier and split now so I can remove the coils pretty quickly.  The head end can also be rotated if needed to get the strans to lay in tighter.  I also built a spool holder/wire tensioner.  It seemed to work pretty well, though I continue to find little tricks, as with any new skill-set (practice makes perfect).  Attached are some pics.  This coil is wound with 2x #14 enameled wire; 53 turns.  It is very close to Mitch’s detailed drawings.  Here's the run down on our assumptions:

magnet size (inches)-   
length:   3.0
width:   1.5
thickness     .75
   
volts:   58.0
#poles:   16
rpm:   95
rps:   1.58
telsa   0.70
#coils / ph:   4
average emf:   4.0
sine wave form factor:   1.1
rms volts / ph:   4.4

Surface Area of Magnets:               
   l  x   w  =   sq in  =      
   3.0   1.5   4.5      
      x   =   sq cm  =      
      6.4516   29.03      
               
               
Total Flux / Pole:      telsa x area (sq cm/10)      mWb   
                            0.70                        2.03   
               
         
rms volts/ph = DC Volts / 1.73 / 1.4 =            RMS Volts / ph   
58   1.732050808   1.414213562                            23.68   
            line volts   
            41.01   
Speed is:   95   rpm         
   1.58   rps         
frequency = pn / 2  (where p = #poles, n = rps)               
rps   x  #poles      /   =      freq (Hz)   
1.58   16   2      12.67   
               
               
line Volts  /   rms/ph  /    (tot flux / pole /   1,000 / )   freq  =   #turns/ph
23.68   4.40   2.03   1,000   12.67   209
               
      #turns/ph /      coils/ph    = turns/coil
      209.0      4   52.3


The somewhat higher cut-in voltage is to allow a bit of 'room 'above the normal charging voltage (48V nominal bank) to allow the Classic to work as recommended by halfcrazy.

We're planning to individually vacuum cast the coils - similar to the Bob Shau approach some my remember - all of the connections will be external.  Neilho made a the insulator/terminal holder(s).  It uses a material called ultem with a brass stud.  We have marine grade compreesion ring terminals that will attach the connecting wires and terminal boots that then snap fit over the insulator.  Similar to a right-angle spark plug fitting (sorry, i didn't get a picture).


Anyhow, the next step is to suspend the coil between the magnet rotors and spin it up, then make any adjustments needed.

I'd appreciate any input.  Specifically, I'm looking for a recommendation on high temp epoxy (~250 deg F, but rough estimate) with the desirable properties (strong, reasonably work/set time, thermally conductive, UV resistant, etc.).  I attempted to reach Bob S., but so far haven't heard.  I don't know if he still visits the site.  Others may have favatorites?

kind regards,

~kitestrings


-edit JW- fixed errors with images (above)
« Last Edit: January 27, 2012, 05:14:43 PM by JW »

electrondady1

  • SuperHero Member
  • ******
  • Posts: 3120
  • Country: ca
Re: test coils, epoxy
« Reply #1 on: January 27, 2012, 09:57:38 AM »
very nice coils,

but watch out for the toys dad !

rickysmartz

  • Newbie
  • *
  • Posts: 26
Re: test coils, epoxy
« Reply #2 on: January 27, 2012, 10:51:03 AM »
Hi Kitestrings,
I think Bob used vacuum forming for his individual coils, and vinyl ester resin with ATHC powder and chopped strand. They were a real achievement and technically excellent but perhaps beyond most hobbyists. The vinyl ester is your man and has good working properties, high mechanical strength, and with the ATHC it has good thermal properties too, melting above what will destroy the enamel on your winding wire (assuming grade 2, 200*C) which will happen first ; )  I think he has details on his diary of the build.
Richard

rickysmartz

  • Newbie
  • *
  • Posts: 26
Re: test coils, epoxy
« Reply #3 on: January 27, 2012, 10:52:00 AM »
Oh, and vinyl ester is MUCH cheaper!
R

TomT

  • Newbie
  • *
  • Posts: 20
Re: test coils, epoxy
« Reply #4 on: January 27, 2012, 03:15:49 PM »
Since he is doing individual coils. Would a battery powered vacuum pump like the ones they sell at grocery stores work for this application.
Or would it not be strong enough ?

Flux

  • Super Hero Member Plus
  • *******
  • Posts: 6275
Re: test coils, epoxy
« Reply #5 on: January 27, 2012, 04:31:26 PM »
I suspect that vinyl ester would be better than epoxy unless you can obtain very expensive epoxy intended for VPI ( vacuum and pressure impregnation). Vinyl is fairly fluid and should flow well. There is the conflict about filler, adding ATH or marble flour or other filler will undoubtedly give better thermal conductivity, but I am not sure you will get much in by vacuum impregnation, the resin will needed to be very fluid.

The ideal approach may be to vacuum impregnate the coil and then use a second stage to give the weather protection and rigidity and it is here that ATH and chopped strand will come into its own.

If you have to do it in one stage then I think the overall strength is more important than the penetration of the resin absolutely between turns. Whether it is worth the vacuum impregnation really depends on the facilities available. it is not a simple process and the commercial vacuum pumps go right down to the 0.1 mm Hg or lower. There may be some gain from an indifferent vacuum pump but I wouldn't choose that route.

If you don't want to go the full route then an indifferent vacuum pump may still be useful to remove the gas from the mixed resin, hand mixing includes a lot of gas that sometimes leads to bubbles and blow holes.

I suspect the success or failure of individual coils depends on how well you can support them more than any other factor. Good strength in the covering resin and good mounting are probably far more important than the actual penetration within the coil. An easy but messy solution to that is to wet wind the coils and I have done that with polyester. They hold together nicely and solve the usual problem of springing when removed from the winder.

Not having tried individual coils I can't really comment much, it seems too much hard work for me. Fine for the burn out brigade, but as I have never had a stator burn out using mppt I couldn't justify the extra work. For direct connection and poor furling then being able to repair a stator may have its merit.

Flux

kitestrings

  • Hero Member
  • *****
  • Posts: 1376
Re: test coils, epoxy
« Reply #6 on: January 30, 2012, 03:33:42 PM »
Thanks for the responses.

Quote
watch out for the toys dad !

Yes, the day I wound this coil it was sub-zero F, so I decided to move inside among the lego creators.  They're quick to offer help.  If I can just keep them from running into there blades 'til it's done...

" alt="" class="bbc_img" />

Is there any issue with vynl ester loosing strength in the upper limits of its workable range?  If my math is right 100+ deg F over ambient in the higher loading conditions is possible.

Quote
technically excellent but perhaps beyond most hobbyists

And well outside of my expertise.  Fortunately, Neilho brings a whole new realm of experience on this area and focus on detail.

Regarding the logic for individual coils, I'd say the main reasons are:

better cooling
longevity - there seems to be a a fair number of examples of stator cracking, signs of weather deterioration, perhaps due, in part, to expansion and contraction
no unexposed wire connections
consistency - all coils will be identical
ability to replace one or more coils without taking the machine down

We hope not to join the ranks of the 'burn out brigade', but even a rub due to a bearing failure pretty much means down time (machine down) for the convesional design.  I'm sure we'll learn all the unintended downsides as well.

thanks again,

~kittestrings


jlt

  • Sr. Member
  • ****
  • Posts: 368
Re: test coils, epoxy
« Reply #7 on: January 30, 2012, 03:52:51 PM »
I second Fluxes response . And I would like to add my own The device to hold all the coils individually would be very complicated to build.

      Make the coils with as much wire as possible  to keep the resistance low.


      jlt

« Last Edit: January 30, 2012, 03:57:56 PM by jlt »

kitestrings

  • Hero Member
  • *****
  • Posts: 1376
Re: test coils, epoxy
« Reply #8 on: January 30, 2012, 05:10:35 PM »
Quote
The device to hold all the coils individually would be very complicated to build.

Jltt,

Difficult, but not impossible ;).  As we stand now there will be two holes on the outside to fasten the coils to the stator support ring, then a single, smaller socket head allen srew to a ss ring at the center.

" alt="" class="bbc_img" />

I make the coil resistance at about .072 ohms/coil; .29/ph; .58 line.

~kitestrings

rickysmartz

  • Newbie
  • *
  • Posts: 26
Re: test coils, epoxy
« Reply #9 on: January 31, 2012, 09:31:13 AM »
Kitestrings,
Will a stainless steel ring in the center not cause eddy current problems and extra magnetic drag? I thought it was important to keep
all ferrous material out of the way of the magnet path; granted SS is only 10% magnetically active but still. Could you use a piece of
thick(ish) fibreglass board instead? or aluminium?
Richard

dinges

  • Hero Member
  • *****
  • Posts: 1294
  • Country: nl
Re: test coils, epoxy
« Reply #10 on: January 31, 2012, 10:03:04 AM »
Will a stainless steel ring in the center not cause eddy current problems and extra magnetic drag? I thought it was important to keep
all ferrous material out of the way of the magnet path

Not just ferrous materials, but all metals should be kept out of the way of the rotating magnets due to eddy currents. Eddy currents are also in issue in non-ferrous materials such as aluminium, as can easily be observed by rubbing a NdFeB-magnet against a piece of thick aluminium and feeling the drag. It feels as if stirring honey with a spoon - the infamous eddy current losses.

Quote
granted SS is only 10% magnetically active but still. Could you use a piece of
thick(ish) fibreglass board instead? or aluminium?

See previous remark: eddy currents are also an issue with the non-ferrous metal aluminium. Or stainless steel.

For eddy currents, it doesn't matter whether a magnet is attracted to the material or not. What's more important is the electrical conductivity. Copper is another non-ferrous material but a very good conductor (aluminium is only slightly worse), and eddy currents are an issue with solid pieces of copper as well. Again, easy to check for yourself, by rubbing a neo-magnet over a piece of thick copper.
“Research is what I'm doing when I don't know what I'm doing.” (W. von Braun)

Flux

  • Super Hero Member Plus
  • *******
  • Posts: 6275
Re: test coils, epoxy
« Reply #11 on: January 31, 2012, 10:08:42 AM »
Any conducting material  within the rotating magnetic field will suffer eddies, it doesn't help by using something non magnetic.

If this is inside the fringe field of the magnets it won't matter, but the field fringes a fair way beyond the edge of the magnets. Some sort of location on the sides of the coils may be all that is needed if the outside is fixed well.  Not sure if groove and tongue is a purely English idea but something like that would probably hold them. You could adapt the mould to cast it in.

Flux

kitestrings

  • Hero Member
  • *****
  • Posts: 1376
Re: test coils, epoxy
« Reply #12 on: January 31, 2012, 11:31:51 AM »
Quote
the field fringes a fair way beyond the edge of the magnets.

Flux,

There won't be anything within the inner - or outer perimeter of the coils, but how close is too close?

I'd actually made early models assuming T&G (it's ca common term here as well), but we were concerned it might make removal from the mold harder.  Maybe have to reconsider that, or somehthing like it.  We'd also talked early on about doweling/pinning (coil sides), or a spline to a center ring.
" alt="" class="bbc_img" />


On another, earlier question.  I was just trying to get a feel for how much vacuum 0.1 mm Hg is.  If I understand correctly, in measurements in the US are often made in inches of mercury below atmospheric pressure.  We operate a maple sugaring vacuum system that is rated at about 25" Hg, but that translates to 635 mm Hg.  Can this be correct?  I must be missing something.

~kitestrings


RP

  • Hero Member
  • *****
  • Posts: 722
  • A dog with novelty teeth. What could go wrong?
Re: test coils, epoxy
« Reply #13 on: January 31, 2012, 12:20:35 PM »
He means 0.1 mm absolute pressure. 

For some reason here in the US vacuum is measured in inches Hg below 1 atmosphere for some purposes like automotive for instance.  For engineering and science it's in mm Hg absolute (Torr).

1 atmosphere is 760mm mercury so it's -759.9mm

 A refrigeration or lab person would probably call it 100 microns or 100 millitorr

kitestrings

  • Hero Member
  • *****
  • Posts: 1376
Re: test coils, epoxy
« Reply #14 on: January 31, 2012, 02:14:01 PM »
I'm sure Neil will follow all this better.  If you say tighten it to 20#' I have a feel for what it is; in this case the units had nothing I could relate to.

So,  .1 mm Hg (Torr) is the equivalent of 29.92" Hg in "US terms" if I'm understanding you?

~ks

Flux

  • Super Hero Member Plus
  • *******
  • Posts: 6275
Re: test coils, epoxy
« Reply #15 on: January 31, 2012, 02:40:39 PM »
I don't know how far the fringe field will be a problem, there is still a significant filed at the thickness of the magnet away. it probably wouldn't cause much drag in the odd bit of metal but it would still be significant in a solid ring.

There is some effect on the stator mountings of a normal axial and although the drag is not worth worrying about some find it disturbs the balancing unless you use stainless bolts or studs.

Try to keep your outer coil mounts well clear of the magnets if you use metal. If you can use glass epoxy board or something then no problem. Stainless has more resistivity than mild steel and if you have to use metal it is a good choice. Aluminium would need to be well away due to its good conductivity.

Strange that you use T & G when I thought you might not and then you measure vacuum in a crazy way. Unless you define standard atmospheric pressure it varies and whenmeasuring high vacuum ( do you call it low vacuum) seems very strange. Yes i was using absolute pressure as RP explained.  In my day in industry it was milliTor but now the Europeans have messed it up with Pascals ( dreadful unit to deal with for pressure but not so bad for vacuum).

I agree that T & G would make it tricky to remove from the mould, most likely not so bad with vinyl ester but epoxy has a mind of its own when it comes to mould release unless you can chrome plate it. Dowels into a Glass fibre ring at the centre would seem a good way.

kitestrings

  • Hero Member
  • *****
  • Posts: 1376
Re: test coils, epoxy
« Reply #16 on: January 31, 2012, 03:50:19 PM »
Thanks to all for the responses.  Got me thinking to revisit other methods of fastening, or possibly a fiber ring, and maybe a bit more clearance to the outer fasteners if we can afford it.

We do say high vacuum, but we have some strange ways of measuring things in this country, that's for sure.  Why just the other it was "wicked cold", and most folks would say - when asked how far - that it's about 45-min's to Burlington.

kind regards,  ~ks

DanG

  • Hero Member
  • *****
  • Posts: 1122
  • Country: us
  • 35 miles east of Lake Okeechobee
Re: test coils, epoxy
« Reply #17 on: January 31, 2012, 05:36:25 PM »
http://www.saveseeds.org/tools/tool_vacuum_pack.html

Even a semi-decent vacuum will do 90% of the work, we're just trying to eliminate long cavities affecting multi-strand wire loops that would allow vibration and heating to chafe the wire's enamel coating (over time). I'm not saying a home-made vacuum pump is a sure thing but even coaxing a few bubbles out would be one in the win column, I am not talking about degassing the resin or worried about any microscopic air smears left once pressure is restored.