Author Topic: Fiberglass battery trays  (Read 4607 times)

0 Members and 1 Guest are viewing this topic.

dlenox

  • Sr. Member
  • ****
  • Posts: 352
    • PowerDashboard monitoring/logging software for RE systems
Fiberglass battery trays
« on: January 28, 2008, 02:17:05 PM »
All,


I had been looking for a while and it seems that most of the battery trays/chests made are for commercial use, and pricing is out of my range.


So - I designed and built my own.  I worked with my good friend Paul Schreiner (of PS Composites) and we designed and made a mold for my battery trays.


The tray dimensions are basically 24" x 31" and can hold up to six #31 sized batteries. We also designed the trays to have the capacity of slightly over 2 gallons of capacity, this way if one or more batteries rupture the battery acid is contained.


Here are a couple pictures of one of the trays:


I decided to have mine colored green (as this is a green project) but Paul can make them any color you want - even metal flake! Next on my job list is to make a simple wood chest and a pexiglass top to contain the batteries.


I will be using two trays, and building a simple wood chest and pexiglass top to contain them.  In addition I will have the chest vented using a fan.


These trays are a good starting point for building a chest, if you are interested in purchasing any give Paul a call, his phone number is on his website.


I have no affilliation with PS Composites - Paul is a good friend of mine.


Since winter has been in the WV mountains I have been busy working on getting the back-end electronics and wiring installed for my wind turbine project.


Over the last month or so I got the Xantrex XW-6048 inverter installed.


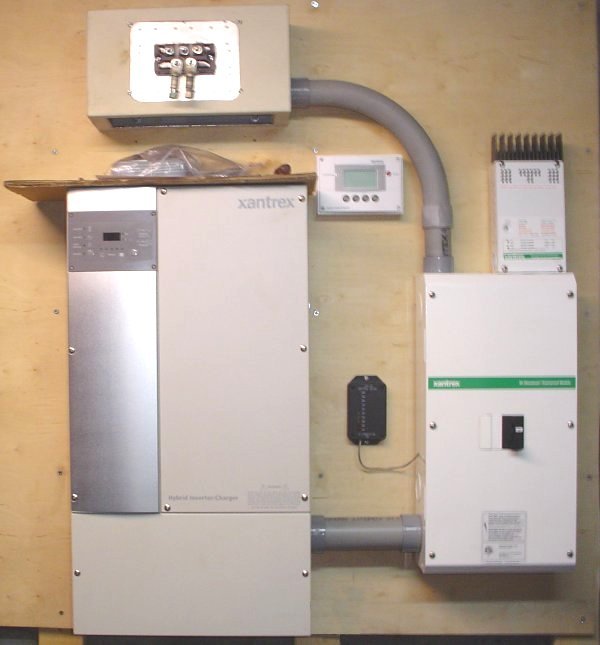
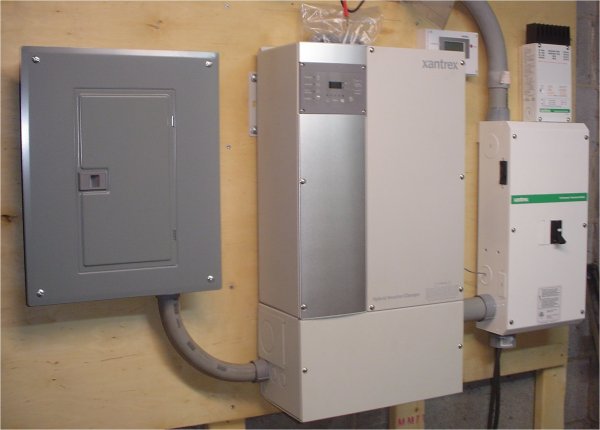
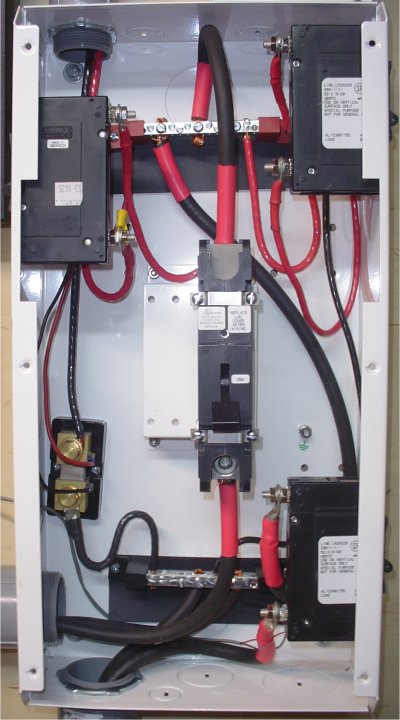
Along with wiring up the DC250 dc distribution box, as well as installing the auxillary AC panel, you can see that I also added a (-) and (+) buss bars to make wiring connections easier and neater,  these buss bars are made by Outback and have insulated stand-off's as well as a plastic barrier


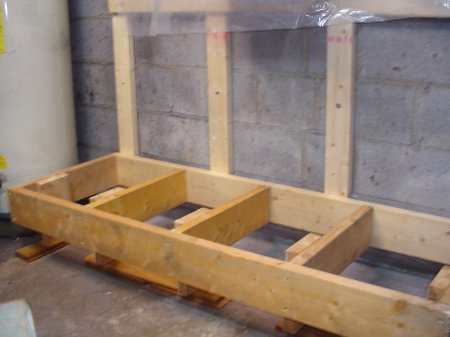
As well as made a platform which will hold the batteries/battery trays.


I also came up with an easy/consistant way in which to solder up the lugs onto heavy #2 cable, and made up all of the battery interconnects and cables. You can save yourself a bunch of money by making up your own cables.


The cable that I am using for the battery inter-connects is a #2 S/O stranded copper wire, it is very flexible and bends easily, it is widely available as cable that is used for welding, our local Tractor Supply carries it. When making your cables you want them to be as short as possible, but you also don't want the cables pulled straight and tight either, leave an inch or so extra to give them a little slack.


If you do decide to make your own I have learned that there are two kinds of soldering flux available, one which is an aggressive flux that states that it should not be used with electrical connections. It looks like the 'standard paste flux' is not an agressive flux and should work fine for use here, so be sure to read the label that is on the flux so that you use the right one!


With some experimenting I discovered that if you applied soldering flux to the inside of the lug (and on the cable) along with 5 lengths of solder (about .050" diameter) that it works out quite well. Four lengths did not seem to be enough solder to properly do the job.


The first photo below shows the lug filled with solder, it is held in place using some vise-grips:


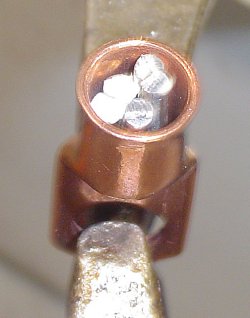
Next using a propane torch heat the lug until the solder melts this should only take about 10-15 seconds, if it takes longer then you are not using enough heat. Once the lengths of solder have melted into a pool, remove heat (mainly so you don't burn your finger tips) and put the prepped end of the cable into the lug but do not push in yet! You have to apply more heat to the side of the lug, you need to do this so the lub and the cable can get to the proper temperature. After about 10-15 seconds or so push down on the cable twisting it into the hot bath of solder inside the lug. Once the cable is in, continue to heat for another couple of seconds so that the solder works it's way all through the cable strands and then you're done!


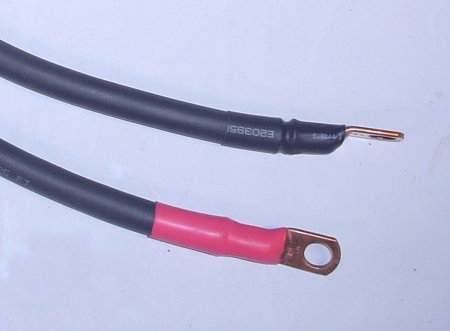
Cool and wash off the excess residue of flux and clean the surfaces with a rag, finish off the cable ends by using some lengths of the proper colored heat-shrink tubing:


To be continued...

Dan Lenox

« Last Edit: January 28, 2008, 02:17:05 PM by (unknown) »

TomW

  • Super Hero Member Plus
  • *******
  • Posts: 5130
  • Country: us
Re: Fiberglass battery trays
« Reply #1 on: January 28, 2008, 07:33:14 AM »
Dan;


Nice writeup! I like the battery tray idea. Solves multiple issues with batteries. Thermal break from floor, non conductive and spill containment. A custom top cover with vent and cabling knockouts would be sweet as an upgrade.


Cheers.


TomW

« Last Edit: January 28, 2008, 07:33:14 AM by TomW »

dlenox

  • Sr. Member
  • ****
  • Posts: 352
    • PowerDashboard monitoring/logging software for RE systems
Re: Fiberglass battery trays
« Reply #2 on: January 28, 2008, 08:17:01 AM »
Tom,


Yes, I believe that Paul Schreiner has this in mind as well.


The first phase was for him to get the battery trays so that they could be made/shipped.


I have talked to him about modular side panels along with a pexiglass top cover for the second phase.  But this may depend on demand, the idea was to make it all modular so that those that just wanted trays could get them without the added cost of the sides/top.


Initially I will be making my sides out of plywood but have found some sources for flat fiberglass sheets.  Again the whole idea is to make the entire chest break down into flat panels to make shipping easier, otherwise shipping could quickly become excessive.


Dan

« Last Edit: January 28, 2008, 08:17:01 AM by dlenox »

fcfcfc

  • Sr. Member
  • ****
  • Posts: 252
Re: Fiberglass battery trays
« Reply #3 on: January 28, 2008, 09:49:04 AM »
Hi Dan: That Xantrex inverter happens to be the one I was looking at. It is a charge inverter at 48VDC I believe, 6KW. Originally I was going to go with a higher voltage inverter like a (160-500VDC) Fronius job for PV arrays, but I would then be forced into 16+ batteries all in series instead of 8 in a series parallel arrangement for 48VDC. I am still kicking around which way to go and since the gen isn't built yet I am not "locked" in. I do like the smaller wire sizes of the higher voltages and lower losses. I don't know, still 50/50. Let us know how you like your setup once complete...


.....Bill

« Last Edit: January 28, 2008, 09:49:04 AM by fcfcfc »

spinningmagnets

  • Hero Member
  • *****
  • Posts: 600
Re: Fiberglass battery trays
« Reply #4 on: January 28, 2008, 10:09:11 AM »
dlenox, thank you very much for posting the great pics. When it comes time for me to spend money, I want to copy an existing set-up that the owner is happy with.


After your system has cycled a few months, please post a list of your components, your loads, and if you would've changed anything if you had to do it over. Very professional looking installation!

« Last Edit: January 28, 2008, 10:09:11 AM by spinningmagnets »

dlenox

  • Sr. Member
  • ****
  • Posts: 352
    • PowerDashboard monitoring/logging software for RE systems
Re: Fiberglass battery trays
« Reply #5 on: January 28, 2008, 03:06:22 PM »
Tom,


In addition the break-down case that I am designing will also have the ability to retain sheets of insulation around all outside edges, a pexiglass top so you can peek inside without having to open top, and a hinged/removeable top that is easy and quick to remove without tools.


Dan Lenox

« Last Edit: January 28, 2008, 03:06:22 PM by dlenox »

kitestrings

  • Hero Member
  • *****
  • Posts: 1376
Re: Fiberglass battery trays
« Reply #6 on: January 28, 2008, 09:56:38 PM »
Dan,


Nice.  I like the trays, and generally the approach and attention that you're paying to this part of the system.  It is sometimes overlooked.  I know I've seen ventilation fan/controls for this application - Independent Power & Light, Backwoods Solar, (?) probably others carry them.  We used maple-sugaring tubing and fittings to vent our batteries.  Seems to work and the price was right.


The wiring layout is really tidy.  I noticed that the shunt appears to be on the positive lead.  Mine is an Outback, but I'm pretty sure that it is on the negative lead between the batteries and the inverter.  Curious that they'd be different.


Now, I'm always careful to use rosin-core and flux cleaner on my smaller electrical/electronics projects.  But dang, I'm betting that I've used the wrong (same old Dad's paste) flux on my cables all these years.  Glad you pointed that out.


Thanks for shairng and best of luck with your project.  -kitestrings

« Last Edit: January 28, 2008, 09:56:38 PM by kitestrings »

dlenox

  • Sr. Member
  • ****
  • Posts: 352
    • PowerDashboard monitoring/logging software for RE systems
Re: Fiberglass battery trays
« Reply #7 on: January 29, 2008, 06:04:23 AM »
kitestrings,


funny you mentioned about the shunt, you are right I also noticed that most appear to be connected across the negative lead.


I don't think that it matters as basically all it does is creates a voltage differential across itself.  I would like to hear from others about this.


Since I have until the spring before I can bring the blades and tail up to the top of the tower and we are in the throws of winter here, I guess that I have been obsessing about the back-end system.  May be a bit of overkill but I guess that you can not be too safe with the type of power that we are talking about here.


The battery case that I will be making will use a PowerVent fan for the ventilation.


Dan

« Last Edit: January 29, 2008, 06:04:23 AM by dlenox »

TomW

  • Super Hero Member Plus
  • *******
  • Posts: 5130
  • Country: us
Re: Fiberglass battery trays
« Reply #8 on: January 29, 2008, 06:33:58 AM »
Dan;


One thing I found while getting computer monitoring set up for the system is that when the shunt is in the negative lead you can use a simple single pole double throw switch [A--off--B] or relay and read either battery voltage or shunt voltage. It helps eliminate issues from ground loops and the need for more poles on the switching. One meter lead on neg shunt terminal other can go to other side of shunt to read mv dropped across the shunt or to battery + to read bank voltage. Much simpler than switching all the leads and the trouble that can create.


There may be some issues with the battery voltage reading being off a few millivolts doing this but thats no big deal, IMHO.


Just one reason I did it here.


Cheers.


TomW

Cheers.


TomW

« Last Edit: January 29, 2008, 06:33:58 AM by TomW »

dlenox

  • Sr. Member
  • ****
  • Posts: 352
    • PowerDashboard monitoring/logging software for RE systems
Re: Fiberglass battery trays
« Reply #9 on: January 29, 2008, 07:04:16 AM »
Tom,


thanks for clarifying, at this point it is easy to correct!


thanks kitestrings for noticing this!


Dan

« Last Edit: January 29, 2008, 07:04:16 AM by dlenox »

dlenox

  • Sr. Member
  • ****
  • Posts: 352
    • PowerDashboard monitoring/logging software for RE systems
Re: Fiberglass battery trays
« Reply #10 on: February 16, 2008, 03:27:59 PM »
uploaded new version of dc distribution box, fixed mis-wiring of shunt, now it is connected on negative side.


Dan

« Last Edit: February 16, 2008, 03:27:59 PM by dlenox »