Author Topic: Jerry's dual rotor pix update  (Read 1276 times)

0 Members and 4 Guests are viewing this topic.

Jerry

  • Hero Member
  • *****
  • Posts: 1519
Jerry's dual rotor pix update
« on: January 27, 2006, 04:49:41 AM »
Got a littel more progress today.


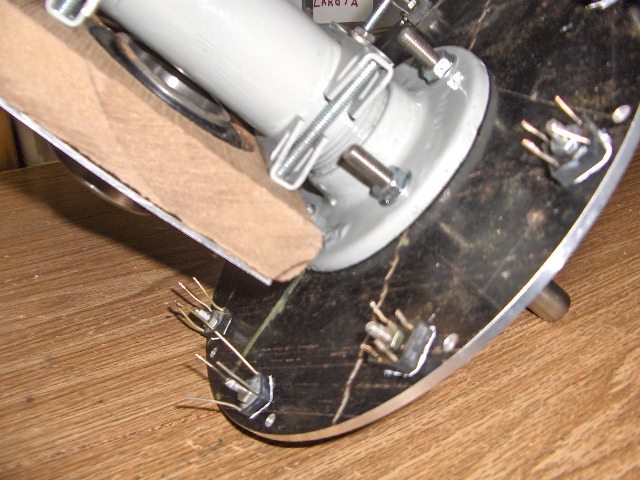
This is back side of stator support plate with small 6 amp diode bridges mounted. They are hard to see against the black aluminum plate.


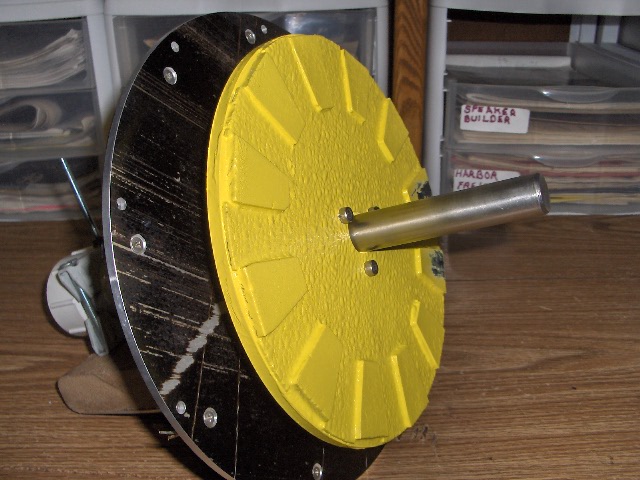
Here is the stator in front of the back rotor. See a couple bad paint spots.


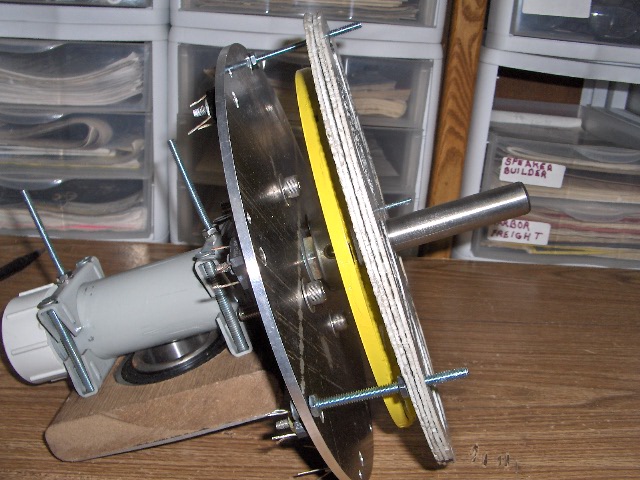
This is how stator will be supported from backing plate. Theres just a few loose screws now for this picture. There will be 9 after completion.


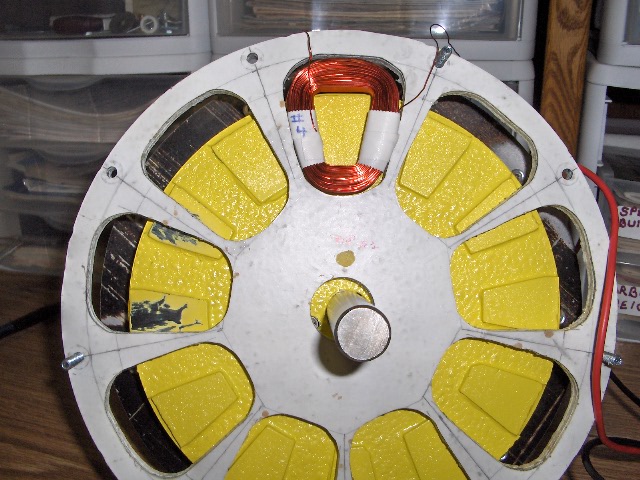
Front veiw of rotor and stator. You can see coil and magnet relationship.


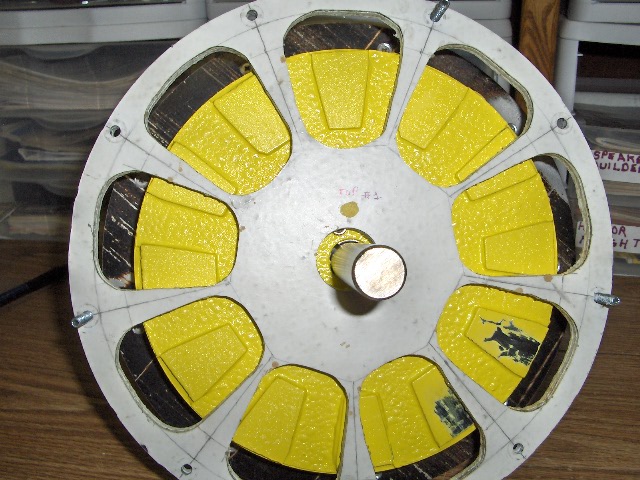
One coil inserted loose in stator.


           OK back to work.


                           JK TAS Jerry

« Last Edit: January 27, 2006, 04:49:41 AM by (unknown) »

Jerry

  • Hero Member
  • *****
  • Posts: 1519
Re: Jerry's dual rotor pix update
« Reply #1 on: January 26, 2006, 10:17:18 PM »
In The above pix the rotor sets quite aways from the backing plate. It will actuly be setting very close in the final assembly. I did the paper clip test on the back side of the rotor.


I got it right the paper clip just falls of the back side. No flux leakage here. The magnets are .2" thick and the steel rotor plates are .25" thick.


I placed a 1/2" piece of plywood between the 2 rotor plates for transportation purpesess from my store to home tonight. It was a bear to get them apart. that was 1/2" apart. These rotors will be about 3/8" apart after assembly. Very strong flux path.


I did spin the rotor very slowly with that one coil and one rotor and measured about 3 volts. So far things are lookin good.


                        JK TAS Jerry

« Last Edit: January 26, 2006, 10:17:18 PM by Jerry »

para t8

  • Newbie
  • *
  • Posts: 49
Re: Jerry's dual rotor pix update
« Reply #2 on: January 27, 2006, 11:01:30 AM »
lookin good jer,i hope mine comes out looking half that nice,the test too.i had to make a new coil winder.things are going slow with all the time igot i dont understand.i got a cam.now i got to wate for the first of the month to get some more parts.i like the paint job it will look good when your done.its neat that you put your genn.on your shop.do the jenn.power your shop?   may the wind be in your blades and the sun in your panles.  para t8
« Last Edit: January 27, 2006, 11:01:30 AM by para t8 »

BigBreaker

  • Sr. Member
  • ****
  • Posts: 302
Re: Jerry's dual rotor pix update
« Reply #3 on: January 27, 2006, 11:23:56 AM »
Transporting magnetized rotor plates is a dangerous business.  I like your use of plywood.  I have thought about making a simple caddy out of 2x4 that each rotor would bolt into.  It would keep hands and fingers away from the high flux areas of the plates.  Just imagine your fingers getting between two rotor plates (plywood or not).  That's enough to get VERY careful!
« Last Edit: January 27, 2006, 11:23:56 AM by BigBreaker »

theTinker

  • Full Member
  • ***
  • Posts: 104
Re: Jerry's dual rotor pix update
« Reply #4 on: January 27, 2006, 12:14:28 PM »
 they are very nice shaped magnets, the yellow rotor looks great too. ive checked out ur other works, quite the experimenter
« Last Edit: January 27, 2006, 12:14:28 PM by theTinker »

richhagen

  • Hero Member
  • *****
  • Posts: 1599
  • Country: us
Re: Jerry's dual rotor pix update
« Reply #5 on: January 27, 2006, 12:39:45 PM »
Looks great so far.  I see you are building the stator similar to Hiker's old one with a wood frame to support the coils.  I am watching with interest.  Rich Hagen
« Last Edit: January 27, 2006, 12:39:45 PM by richhagen »
A Joule saved is a Joule made!

Jerry

  • Hero Member
  • *****
  • Posts: 1519
Re: Jerry's dual rotor pix update
« Reply #6 on: January 27, 2006, 07:10:19 PM »
Thanks guys. Gona try to pour the stator tommorow? That is if the good lord wilin and the creek don't rize?


I've had thoughts of making a second satator with 14ga. wire and using the conventional wireing scheem for an A B compairison.


                      JK TAS Jerry

« Last Edit: January 27, 2006, 07:10:19 PM by Jerry »

windstuffnow

  • Hero Member
  • *****
  • Posts: 1065
  • Country: 00
Re: Jerry's dual rotor pix update
« Reply #7 on: January 27, 2006, 09:47:07 PM »
  Looks nice Jerry !   Aren't you running outa' roof room for mounting these?  I lost count of the turbines you had mounted on your shop... what are you up to now... 10... 15... more?


  I get bored looking at the old ones spinning and end up replacing them all the time although I'll most likely put up a couple more this summer...


Looks like your having fun!


.

« Last Edit: January 27, 2006, 09:47:07 PM by windstuffnow »
Windstuff Ed

Tom in NH

  • Full Member
  • ***
  • Posts: 191
Re: Jerry's dual rotor pix update
« Reply #8 on: January 29, 2006, 05:41:01 AM »
Nice looking, Jerry. I'm excited because I'm about to get started on a similar unit, and I'll be able to refer to yours as a guide. A couple questions.


  1. Should I paint over my neo magnets? Does the paint affect the magnetic flux in any way? What about painting the rotor on which the magnets are attached? That is, should I affix the magnets on a painted surface or on bare metal? I can see how paint will greatly protect the metal from the weather, but I'm also wondering if the paint will reduce the flux somehow. What say you and the other experts?
  2. It looks like your rotor has a bushing and set screw arrangement on the spindle and the bushing is screwed to the rotor plate. Is that correct? If so, that's exactly the way my metal fabricator is building mine. He tried welding the bushing to the rotor without success. Couldn't hold it straight and the rotor wouldn't spin true. Are screws a better way to go? Does the bushing sit on top of the rotor, or does it fit inside the rotor center hole? Any opinions as to effectiveness of one or the other?
  3. 3 volts on a slow spin is impressive. How many turns and what size wire? What do you expect your final output will be under various conditions?


Thanks for sharing. I'm inspired.

-tom
« Last Edit: January 29, 2006, 05:41:01 AM by Tom in NH »

para t8

  • Newbie
  • *
  • Posts: 49
Re: Jerry's dual rotor pix update
« Reply #9 on: January 29, 2006, 09:47:55 AM »
jerry,i did get mixed up between your projects,but i got all the parts to build,if posabule ill put the parts together and make one good one{if i can}got pix.on a disc im going to try to attach them to my comments if it works {g.}told me another way of doing it haven't try it yet.dose your turbines power your shop?     para t8

 
« Last Edit: January 29, 2006, 09:47:55 AM by para t8 »