Author Topic: First motorconversion; the start  (Read 5631 times)

0 Members and 1 Guest are viewing this topic.

dinges

  • Hero Member
  • *****
  • Posts: 1294
  • Country: nl
Re: First motorconversion; the start
« Reply #33 on: June 16, 2006, 12:41:46 PM »
Check ok. See mail.
« Last Edit: June 16, 2006, 12:41:46 PM by dinges »
“Research is what I'm doing when I don't know what I'm doing.” (W. von Braun)

SparWeb

  • Global Moderator
  • Super Hero Member Plus
  • *****
  • Posts: 5452
  • Country: ca
    • Wind Turbine Project Field Notes
Re: First motorconversion; the start
« Reply #34 on: June 16, 2006, 01:25:30 PM »
Dinges,


I thought I would borrow a picture from Zubbly, who is in the process of modifying a 7.5 HP Baldor motor, to illustrate something to you.  He's probably busy working on it right now.


Search for his posting on his progress on this conversion: he's leading the way for us, IMHO.  The flats on this rotor, made from scratch, securely locate the magnets and facilitate their alignment.


On close examination, the flats of this rotor show no skew.  To machine the part with skew would be very difficult, without an expensive bill from a CNC operator.  I can only assume that he's going to arrange skewing in some other fashion.


A possible improvement on the rotor would be to machine two arrays of flats, one end offset several degrees from the other.  It would work with the drawing you posted above.  Magnets 1/2 as long could be fitted, bonded, and/or screwed down.


I eagerly await Mr. Z's next posting.


PS: I found a plastic vernier caliper at the local hardware store.  What I lose in accuracy, I gain in freedom to measure around these neos without crashing things together all the time!

« Last Edit: June 16, 2006, 01:25:30 PM by SparWeb »
No one believes the theory except the one who developed it. Everyone believes the experiment except the one who ran it.
System spec: 135w BP multicrystalline panels, Xantrex C40, DIY 10ft (3m) diameter wind turbine, Tri-Star TS60, 800AH x 24V AGM Battery, Xantrex SW4024
www.sparweb.ca

SparWeb

  • Global Moderator
  • Super Hero Member Plus
  • *****
  • Posts: 5452
  • Country: ca
    • Wind Turbine Project Field Notes
Re: First motorconversion; the start
« Reply #35 on: June 16, 2006, 02:09:52 PM »
Something else I thought I'd share with you:  Look for the software package FEMM.  It's free to download, includes a tutorial that takes 1 hour, and by creating line drawing DXF's in Autocad, you can create models quickly to import into FEMM.  You can import a section-view of your rotor into FEMM and see how different magnet arrangements affect the field strength.  It's not truly 3-dimensional, so it won't tell you about skewing.

« Last Edit: June 16, 2006, 02:09:52 PM by SparWeb »
No one believes the theory except the one who developed it. Everyone believes the experiment except the one who ran it.
System spec: 135w BP multicrystalline panels, Xantrex C40, DIY 10ft (3m) diameter wind turbine, Tri-Star TS60, 800AH x 24V AGM Battery, Xantrex SW4024
www.sparweb.ca

vawtman

  • Hero Member
  • *****
  • Posts: 1425
Re: First motorconversion; the start
« Reply #36 on: June 16, 2006, 02:24:55 PM »
Steve hes skewing the stator
« Last Edit: June 16, 2006, 02:24:55 PM by vawtman »

dinges

  • Hero Member
  • *****
  • Posts: 1294
  • Country: nl
Re: First motorconversion; the start
« Reply #37 on: June 16, 2006, 03:08:26 PM »
Thanks for the info, will look into the software package. But the need is at the moment gone; the rotor will be made differently, with many small, round magnets, like Zubbly used to do. Have just finished the preliminary drawings/sketches. The sad thing is though, that I've only got two magnets I can choose from: 15x8mm and 12.7x6mm. Of the first, I can fit 48 ones in. Of the latter, I can fit 84. The first has slightly more magnetic volume and should give slightly more output (620W, vs. 580W for the 84 smaller magnets). This is all assuming that Zubbly's law (150W/cubic inch) holds up for me. The motor itself should be able to deliver 2.2kW. 600W output seems a little low to me, but 800W would be fine; 1kW would be excellent.


And yes, I know why you now have a plastic caliper... Think I'll buy one too. If only to prevent my calipers turning into little magnets.

« Last Edit: June 16, 2006, 03:08:26 PM by dinges »
“Research is what I'm doing when I don't know what I'm doing.” (W. von Braun)

dinges

  • Hero Member
  • *****
  • Posts: 1294
  • Country: nl
Re: First motorconversion; the start
« Reply #38 on: June 16, 2006, 04:43:55 PM »
Update: design for the rotor has just been changed. Will be using 72 magnets, round 15mmx8mm. According to Zubbly's law (150W/cubic inch) this should give me 930W power. Will see how well that law holds up for me.


Magnets are skewed at 10degrees (360deg/36slots=10deg). Not yet visible in the drawing, but the center will be made from steel, and an outer ring (around the magnets) of aluminium. Pockets will be milled after the aluminium ring has been crimped on. That way I get flat pockets in the steel, so the magnets will sit tight, whilst the sides of the magnets are supported by the aluminium, so the flux won't be shorted. Magnets will be loctited in place. (how much oversize do you think the pockets should be, if my magnets are 15mm? I should be still able to push the magnets in, without them acting as a piston with loctite applied.)


And I wonder whether it's not a problem that the N and S poles are so close toghether on the rotor.


« Last Edit: June 16, 2006, 04:43:55 PM by dinges »
“Research is what I'm doing when I don't know what I'm doing.” (W. von Braun)

dinges

  • Hero Member
  • *****
  • Posts: 1294
  • Country: nl
Re: First motorconversion; the start
« Reply #39 on: June 16, 2006, 04:55:01 PM »
Hmmm...


I just measured the original rotor from that motor, and it's skewed only 3 degrees... Much less than my proposed stator, see picture above. Yet my design is fully according to the rule that skewness = 360/#slots.


Does anyone have an explanation for this difference?

« Last Edit: June 16, 2006, 04:55:01 PM by dinges »
“Research is what I'm doing when I don't know what I'm doing.” (W. von Braun)

dinges

  • Hero Member
  • *****
  • Posts: 1294
  • Country: nl
question to ZUBBLY
« Reply #40 on: June 16, 2006, 05:27:44 PM »
Zubbly,


I just remeasured my 3phase motor. It has 36 stator slots, so according to the rule the magnets should be skewed 10degrees.


However, the original rotor (which has 40 'slots' or whatever they are called) are skewed at about 3 degrees! This is much less than the 10 degrees?! Or, does it have to do with the 40 and 36 ribs, that this also reduces cogging and they can therefore get away with a much smaller skewing angle?


Also, in your explanation (zubbly2.pdf) on skewing magnets, it shows that the first and last magnet of the rotor should sit over 2 different stator ribs, which are NEXT to eachother.


However, when I skew the magnets at 10 degrees, the first and last magnet (of one single row, not one single pole) sit over very different stator ribs, which are NOT next to eachother...


I have no practical knowledge of motors, so the question is, which rule prevails: the 10degree skewing, or the fact that first and last magnets should sit over stator ribs that are eachother's immediate neighbours?


I think that with your usual rule of 10 deg. skewing you see very little cogging, but maybe you are also very severely limiting output. Because at the same time, a single coil could see both a N and a S pole on the same stator rib, thus causing voltage cancellation.


Please let me know if the above was clear, because I see a big contradiction in the theory. Or I just haven't understood it all.


Peter.

« Last Edit: June 16, 2006, 05:27:44 PM by dinges »
“Research is what I'm doing when I don't know what I'm doing.” (W. von Braun)

oztules

  • Hero Member
  • *****
  • Posts: 1477
  • Country: aq
  • Village idiot
Re: First motorconversion; the start
« Reply #41 on: June 16, 2006, 05:31:41 PM »
Peter, I tend to agree with your assessment that the motor is rated at low voltage for delta, and high voltage for star. The connections will be in the terminal box, and likely only six wires will emerge from the stator into the box. These will probably have three busses that connect all horiz or vert.. Safely say that delta/ star = low voltage (220)/high voltage (380)


If they were to change the wiring from series to parallel then it would be double the voltage ie 220-440  but here clearly 220x1.73=380v.... this should ring a bell.


...............oztules

« Last Edit: June 16, 2006, 05:31:41 PM by oztules »
Flinders Island Australia

zubbly

  • Sr. Member
  • ****
  • Posts: 371
Re: To Zubbly:
« Reply #42 on: June 16, 2006, 05:55:17 PM »
hi dinges,


i have made mistakes before.  shooting for a micro airgap is great for performance, but really increases the odds of getting a mechanical scrub do to slight imperfections in machining or just getting the mags not exactly at the perfect spot.


for using the 2x1x1/2 mags, here is what i do. take one of the mags, lay it on the stator lams squarely. accurately measure the gap between the mag and lams.


add the thickness of 2 mags (1 inch). remove one inch from the diam of the rotor very accurately in a lathe.


if that gap between the mag and stator was lets say .025 inch, add another .020 to it. this is for added clearance to make sure you get the rotor in and there is no scrubbing of the rotor and lams. so you would machine flats on the rotor of .045 inch deep. the flats i just did on my 7.5hp were .065 deep.


when the rotor is assembled and inserted into the stator, you will have much more clearance in the middle of the mag and much less at the edges of the mag. basically, it is the averaging clearance that we are striving for.


lastly, it is my opinion that we do not need a 10-15 thou clearance between rotor and stator as the mags really focus their strength at the laminations well.


zubbly

« Last Edit: June 16, 2006, 05:55:17 PM by zubbly »

dinges

  • Hero Member
  • *****
  • Posts: 1294
  • Country: nl
Re: question to ZUBBLY
« Reply #43 on: June 16, 2006, 06:22:57 PM »
I've made a quick explanation of the problem. Two cylinders of different length. In both cases the right face is rotated 36 degrees (1/10 of a circle; don't mind the exact value, it's just to make things more clear).


It's immediately obvious that the skewing angle depends a LOT  on the length of the cylinder (length of the stator). For the same 36 degree rotation, the short cylinder ends up with much more skewness than the long one!


The problem is that the rotation in one face (36 degrees, or usually in conversions, 10degrees) is transferred into a completely different plane! And this is wrong, as it can lead to completely different skewing angles depending on length of the stator, as can be seen in the drawing below.


Zubbly, perhaps you could check it out with your conversions, but if you place one particular magnet above one particular stator rib, you will see that, at the other end of the rotor, the magnet that is on the same line will end up SEVERAL stator ribs AWAY from the original stator rib, not just one rib difference, as is the goal in those anti-skewing measures, I believe. I think this (severely?) limits outputvoltage (& power).


Curious as to your opinion, since I don't have 30 years experience in motors.


"100%" src="http://www.otherpower.com/images/scimages/3538/explanation_skewness.wmf">

« Last Edit: June 16, 2006, 06:22:57 PM by dinges »
“Research is what I'm doing when I don't know what I'm doing.” (W. von Braun)

dinges

  • Hero Member
  • *****
  • Posts: 1294
  • Country: nl
Re: question to ZUBBLY
« Reply #44 on: June 16, 2006, 06:24:23 PM »
I've made a quick explanation of the problem. Two cylinders of different length. In both cases the right face is rotated 36 degrees (1/10 of a circle; don't mind the exact value, it's just to make things more clear).


It's immediately obvious that the skewing angle depends a LOT  on the length of the cylinder (length of the stator). For the same 36 degree rotation, the short cylinder ends up with much more skewness than the long one!


The problem is that the rotation in one face (36 degrees, or usually in conversions, 10degrees) is transferred into a completely different plane! And this is wrong, as it can lead to completely different skewing angles depending on length of the stator, as can be seen in the drawing below.


Zubbly, perhaps you could check it out with your conversions, but if you place one particular magnet above one particular stator rib, you will see that, at the other end of the rotor, the magnet that is on the same line will end up SEVERAL stator ribs AWAY from the original stator rib, not just one rib difference, as is the goal in those anti-skewing measures, I believe. I think this (severely?) limits outputvoltage (& power).


Curious as to your opinion, since I don't have 30 years experience in motors.


« Last Edit: June 16, 2006, 06:24:23 PM by dinges »
“Research is what I'm doing when I don't know what I'm doing.” (W. von Braun)

SparWeb

  • Global Moderator
  • Super Hero Member Plus
  • *****
  • Posts: 5452
  • Country: ca
    • Wind Turbine Project Field Notes
Re: First motorconversion; the start
« Reply #45 on: June 17, 2006, 08:52:47 PM »
!Slap! to the forehead - you're right.  How could I forget?

« Last Edit: June 17, 2006, 08:52:47 PM by SparWeb »
No one believes the theory except the one who developed it. Everyone believes the experiment except the one who ran it.
System spec: 135w BP multicrystalline panels, Xantrex C40, DIY 10ft (3m) diameter wind turbine, Tri-Star TS60, 800AH x 24V AGM Battery, Xantrex SW4024
www.sparweb.ca

SparWeb

  • Global Moderator
  • Super Hero Member Plus
  • *****
  • Posts: 5452
  • Country: ca
    • Wind Turbine Project Field Notes
Re: (But I ain't Zubbly)
« Reply #46 on: June 17, 2006, 10:24:46 PM »
If it's a choice between two rules of thumb:

"first and last magnets aligned over adjacent slots",

and

"skew the rotor by 10 degrees to de-cog",


I'd go with A)


Comparing the rotor of your motor to mine, yours has a smaller diameter, but is 2x

as long.  The rotor I will convert is 5.5" in diameter and 2" long.  The same skew

angle should be used on your rotor and mine.  The resulting helix angle would make

yours look very different than mine, but that's not what we're after.


Permit me, then to refer to first principles (A collective sigh from the non-geeks

out there; I can hear you).  But I know you're a mechanical engineer, so I'm sure

you will relish this. :^)


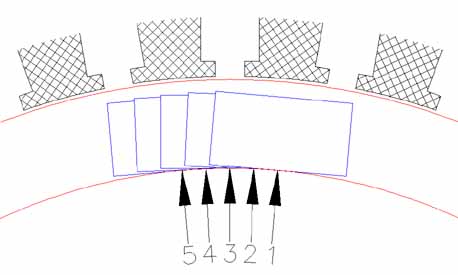
In the first view, five (5) magnets are arranged on the rotor in a skewed fashion.

The stator teeth are visible above.  I assumed that there are 36 teeth in the stator.  

The rotation between #1 and #5 is 10 degrees.  Mag #1 is currently aligned with

the top stator tooth, Mag #5 with the tooth to the left.  Both are as close to

the stator tooth as they're going to get, and their magnetism would keep them

there, because the are attracted to the iron teeth.  Mag #3 is in between teeth,

so it could go either way.  Mag's #2 & #4 are attracted to opposite teeth;

their pulls cancel each other out.


In the next drawing, the rotor has rotated by 5 degrees.  The magnet closest to

a stator tooth is #3.  Mags #1 and #5 are between stator teeth.  Mags #2 and #4

are attracted to the same tooth as #3, but on opposite sides, so their pulls

cancel out again.


I haven't shown intermediate positions, but when I tried them in CAD, and measured,

I found that magnets tended to pull to one tooth more than another.


When you look at it from a "Potential energy" point of view, then the first

position has the lowest PE, this is where the motor will prefer to cog to.  

The second position also is a low point of PE, but not as low as the first.  

Intermediate positions had a preference for one tooth or another, but two

magnets are still cancelling each other's cog, like in the other two points.


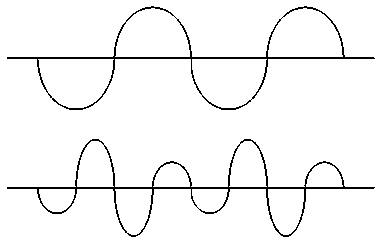
Picture a sine wave with a harmonic in it that makes one valley lower than the

next valley.  Compared to the original sine wave, with higher peaks, less

energy is required to get over each peak.  It takes now less torque to start the rotor.


Therefore, this skewing is not so much "DE-cogging", but "LESS-cogging".


I hope this helped.


If there is any arrangement of magnets that further improves on this geometry,

then it would be of benefit to investigate.

« Last Edit: June 17, 2006, 10:24:46 PM by SparWeb »
No one believes the theory except the one who developed it. Everyone believes the experiment except the one who ran it.
System spec: 135w BP multicrystalline panels, Xantrex C40, DIY 10ft (3m) diameter wind turbine, Tri-Star TS60, 800AH x 24V AGM Battery, Xantrex SW4024
www.sparweb.ca

dinges

  • Hero Member
  • *****
  • Posts: 1294
  • Country: nl
Re: (But I ain't Zubbly)
« Reply #47 on: June 17, 2006, 10:49:56 PM »
Thanks Steven, it confirms what I was thinking myself. Nevertheless, Zubbly's skewing method has proven to work, whereas my smaller angle hasn't proven itself yet. But I think theoretically you & I are correct here. It's all a matter of projection, it depends from what direction you look at the rotor. An angle of 10deg in one projection can not be simply transferred to another projection. But I'm not sure if this is what Zubbly was actually doing, that's why I keep hammering on this to get it clarified. Maybe I'm annoying, so be it.


I've made another drawing that explains it as good as I can. It's similar to yours.


http://www.otherpower.com/images/scimages/3538/explanation_for_zubbly.jpg


http://www.fieldlines.com/comments/2006/6/18/11456/6477/2#2


Peter.

« Last Edit: June 17, 2006, 10:49:56 PM by dinges »
“Research is what I'm doing when I don't know what I'm doing.” (W. von Braun)

oztules

  • Hero Member
  • *****
  • Posts: 1477
  • Country: aq
  • Village idiot
Re: (But I ain't Zubbly)
« Reply #48 on: June 18, 2006, 02:10:52 AM »
Peter,


you are cunningly running this thought in two threads. I had not read this one till now.:)


The problem with your description of your angle definition, is that it relies on the length of the rotor. The shorter the rotor, the steeper the angle in your reference (3.5 deg). A shorter rotor would be more deg, longer would be less.


In Zubblies definition, it doesn't matter what length the rotor is, his definition defines the start and end points with a radial deg measurement. So his 10 deg is relevant for all rotors in a 36 slot config, regardless of the rotor lenghth. Your 3.5 deg is dependant on rotor length, and as such is pertinant only to your motor in its use.


Have fun with this conversion, and don't get too bogged down in definitions. It is clear you understand the concepts involved, so I expect a successful outcome here.


.......oztules

« Last Edit: June 18, 2006, 02:10:52 AM by oztules »
Flinders Island Australia

John

  • Newbie
  • *
  • Posts: 26
Re: First motorconversion; the start
« Reply #49 on: June 19, 2006, 01:32:38 AM »
I am using Firefox browser and the .wmf files don't display for me. Does anyone else have this problem?


John

« Last Edit: June 19, 2006, 01:32:38 AM by John »

ghurd

  • Super Hero Member Plus
  • *******
  • Posts: 8059
Re: First motorconversion; the start
« Reply #50 on: June 19, 2006, 08:53:16 AM »
Yes! Both IE & Firefox.

Tried other ways too. Can't get some of them.

G-  Not a computer guy...

« Last Edit: June 19, 2006, 08:53:16 AM by ghurd »
www.ghurd.info<<<-----Information on my Controller

dinges

  • Hero Member
  • *****
  • Posts: 1294
  • Country: nl
Re: First motorconversion; the start
« Reply #51 on: June 19, 2006, 11:15:13 AM »
Sorry about that. Since the .wmf files showed up normally in my IE browser I thought it wouldn't be a problem. Thought it was a standard windows filetype.


In the mean time, I've found out how to convert them with Irfan to .jpg and resize them (cut the margins off) so they won't require such a wide screen. So this will have been the last time I've posted in the .wmf format


Not much of a computer guy either...

« Last Edit: June 19, 2006, 11:15:13 AM by dinges »
“Research is what I'm doing when I don't know what I'm doing.” (W. von Braun)