Author Topic: CNC and Motor Conversation  (Read 9636 times)

0 Members and 4 Guests are viewing this topic.

WXYZCIENCE

  • Sr. Member
  • ****
  • Posts: 355
CNC and Motor Conversation
« on: June 24, 2006, 12:59:09 AM »
I am driven to an accelerated rate. This is the motor.  
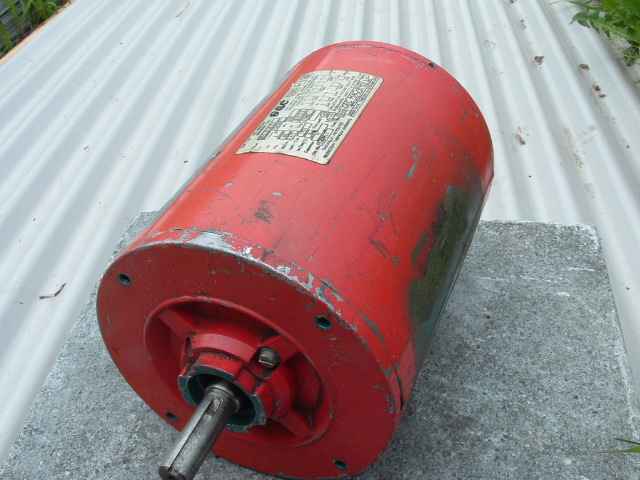

Looks like any ordinary 1&1/2 hp , but this one is fried, cooked to perfection.

Taking it apart was a breeze, I used the Zubbly no nonsense approach and
chiselled the burnt windings off.
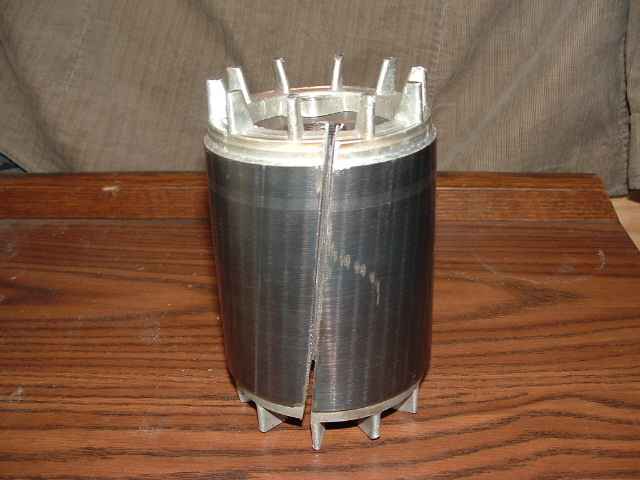


Rather than machining the rotor down I elected to remove the laminations and use the old shaft.
I cut the lams with a thin kerf blade and then slid them off of the shaft.
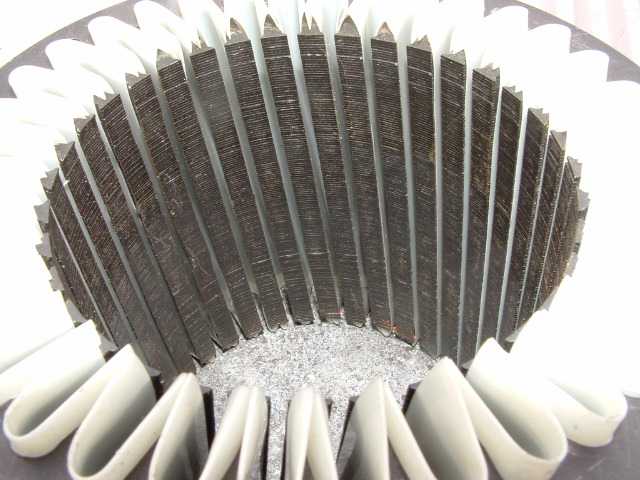


The stator is skewed ten degrees and I have installed the (Dacron-Mylar-Dacron .01") insulators.
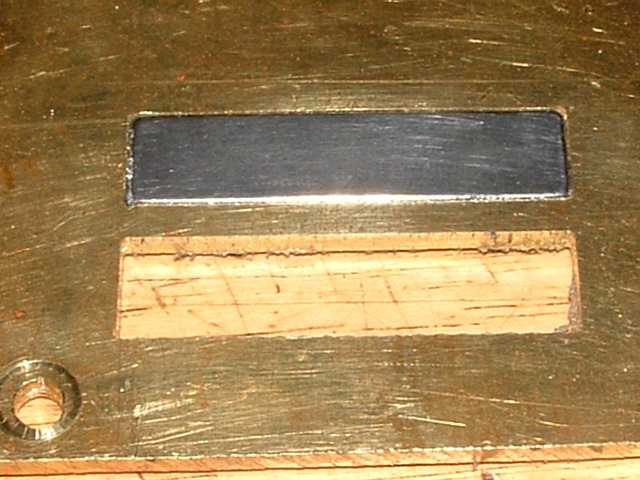


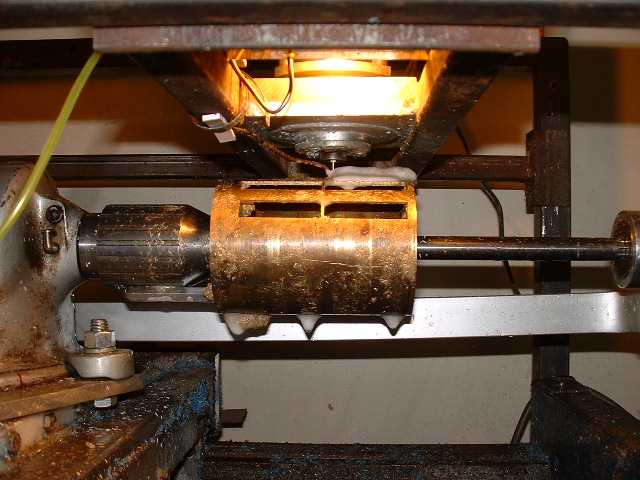
Here is the first test cuts with the WXYZ Machine. The magnet fits good the second attempt.
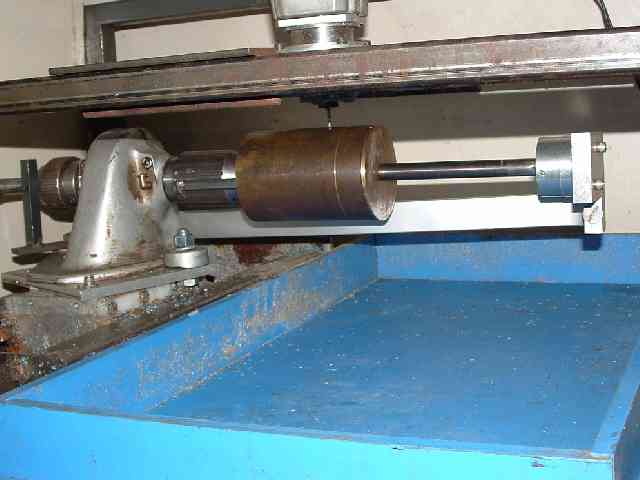


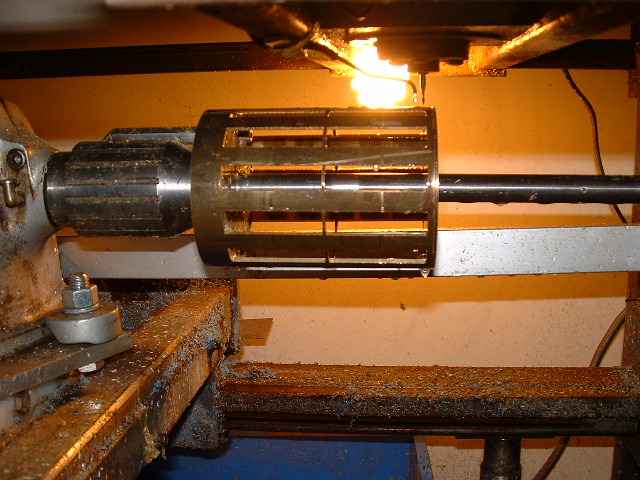
My blank cage is mounted on the horizontal indexer that was added to this old work horse last week. The indexer is geared to give me a resolution of 36 divisions.
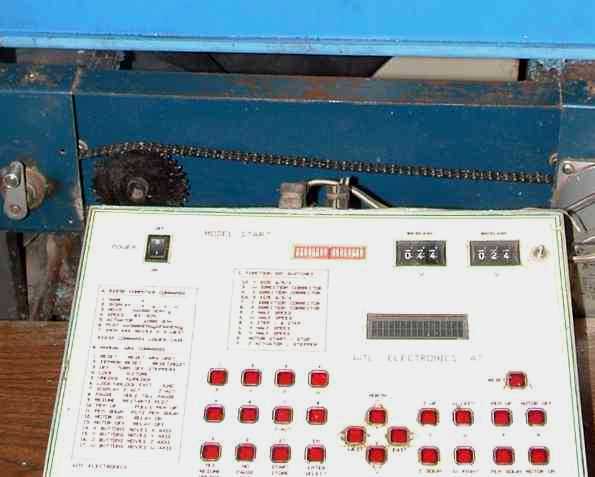


This is the A7 CNC Controller, one of Bill's early models. The backlash thumb-wheels are on the top right of the unit.

The Cut Begins.
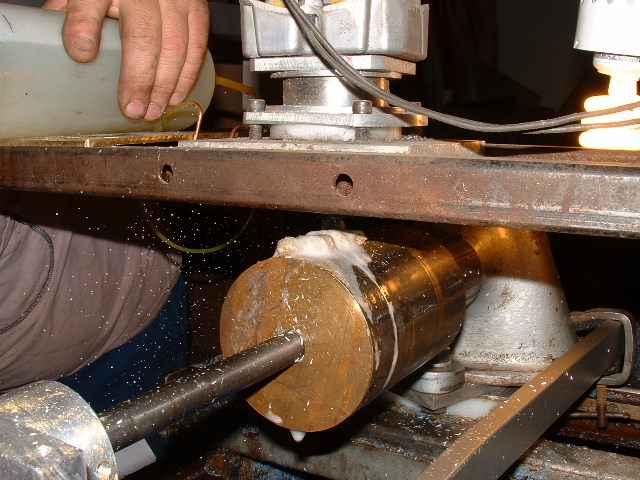


The Cut Ends

It takes almost two hours to cut the 24 magnet holes. Slower than I could, but it pays in the long run on the cost of cutter blades. They are dual flute 1/16" solid carbide, running at 50,000 rpm. I use 25 ml of standard dish soap to 1 litre of water as the cutting fluid to cool the cutter.
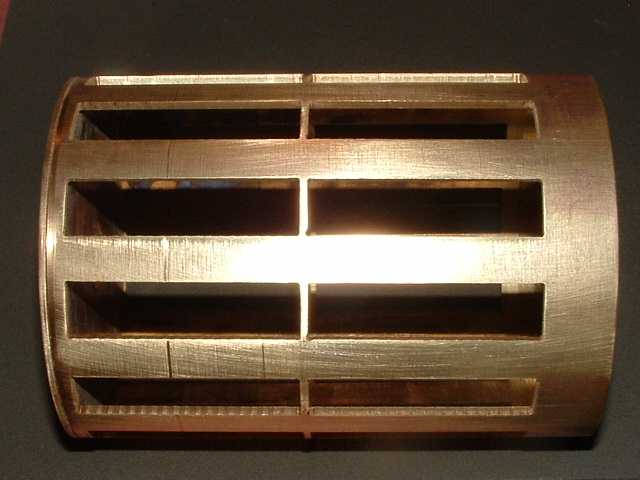


The brass pipe had it's start in life several hundred feet under the ground, as it was in it's past life a deep well pump casing. Recycled to live on.
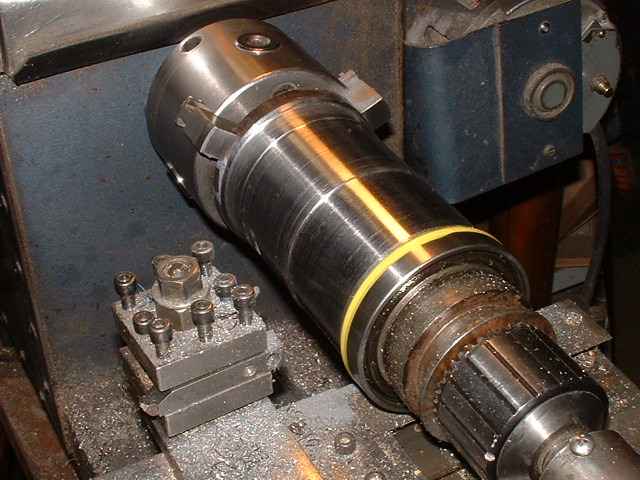


The new rotor is being machined to hold the 24, 2" x .5" x .385" N40 neodymium magnets.

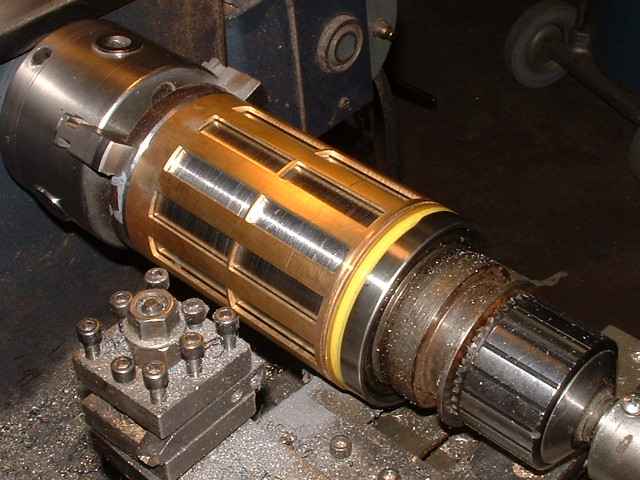
The cage is now placed over the steel rotor.

This is an ongoing project and I will continue to post updated photos.


This last picture is in keeping with my approach to this R.E. stuff.

I sometime feel like this little guy. Well fed and happy.


Enjoy
« Last Edit: June 24, 2006, 12:59:09 AM by (unknown) »

zubbly

  • Sr. Member
  • ****
  • Posts: 371
Re: CNC and Motor Conversation
« Reply #1 on: June 23, 2006, 08:19:34 PM »
hi WXYZCIENCE!


that is one beautiful piece of machine work on the cage. and fantastic job on the skewing.


what will you be using to secure the mags into the cage with? epoxy comes to mind. you could also put a few small swags alongside the mags on the brass.


anxiously waiting for your next post on progress.


zubby

« Last Edit: June 23, 2006, 08:19:34 PM by zubbly »

Countryboy

  • Sr. Member
  • ****
  • Posts: 269
Re: CNC and Motor Conversation
« Reply #2 on: June 23, 2006, 08:32:03 PM »
It takes almost two hours to cut the 24 magnet holes. Slower than I could, but it pays in the long run on the cost of cutter blades. They are dual flute 1/16" solid carbide, running at 50,000 rpm.


Hmm.  That's 0.00001 inch chip load per tooth per rev.  100-300 times slower feed than is proper for brass.  At those kinds of slow feeds, you will actually decrease cutter life, not extend it.  


Then again, who cares about extending the life of a $3.00 cutter if it takes 2 hours to do a 20 minute job?


Just out of curiousity, why did you use a 1/16 endmill?  An 1/8th or 1/4 would have allowed you to complete the job faster.  Did you use the 1/16 endmill so you would have a 1/32 radius in the corners?  Even then, you could have cut the hole with a 1/8 or 1/4, and then used the 1/16 to finish the corners, but that would have been 2 tool changes.  You could have also used a larger endmill to go a little further at the corners - the sides of the holes would still have held the magnet in place ok.


I don't mean to sound too critical, but as a machinist I notice these kinds of things.  I'm glad the cage worked out for you.

« Last Edit: June 23, 2006, 08:32:03 PM by Countryboy »

willib

  • SuperHero Member
  • ******
  • Posts: 2414
  • Country: us
Re: CNC and Motor Conversation
« Reply #3 on: June 23, 2006, 09:37:35 PM »
that is an awesome  machine you have there.

i noticed the bubbles and wondered , soapy water  thatl work.

countryboy he could have used a larger (1/8") endmill and just file the corners.

not haveing a machine like that available you get used to the old fashioned way of doing things.

like laying out the slots , using a drill in the corners ,then a small coping saw, then a file . that would be the way i would have to do it...
« Last Edit: June 23, 2006, 09:37:35 PM by willib »
Carpe Ventum (Seize the Wind)

jimjjnn

  • Hero Member
  • *****
  • Posts: 511
Re: CNC and Motor Conversation
« Reply #4 on: June 23, 2006, 09:51:06 PM »
Wish I could do that kind of work Looks like fun and a few brews while the mill is cutting. I could care less about the time as I could be doing something else than watching the mill.


Great job and keep posting with pics.

« Last Edit: June 23, 2006, 09:51:06 PM by jimjjnn »

Countryboy

  • Sr. Member
  • ****
  • Posts: 269
Re: CNC and Motor Conversation
« Reply #5 on: June 23, 2006, 09:52:33 PM »
Hi willi,

  The old fashioned ways still get the job done.  Using an oversized drill bit in the corners would eliminate filing too.

  They make tiny cutters that look like miniature circular saw blades for cutting slots.  You could always put a slotting blade in a drill, and rig up a jig so your blade cut where you wanted to cut the slots out too.  That would save a lot of sawing by hand.

  As easy to cut as brass is, a jig saw would work pretty well too on a thin piece like this.


  Where there is a will there is a way.  (Or is it, where there is a willibur, there is a way.)

« Last Edit: June 23, 2006, 09:52:33 PM by Countryboy »

WXYZCIENCE

  • Sr. Member
  • ****
  • Posts: 355
Re: CNC and Motor Conversation
« Reply #6 on: June 23, 2006, 11:01:13 PM »
Countryboy, my first tool was delivered to me in a cake by my Mom. I just absolutely love working on this machine. I feel like a rocket scientist when I am pushing the buttons. I even have a lab coat. Besides I get paid by the hour :-) Jokes aside. The machine in question is ten years old and is like an old work horse. The walking and drilling speed is where it take the time. Actual cutting speed is a whole lot faster. I don't do to much end milling with this machine. Thanks for your insight and input. Joe
« Last Edit: June 23, 2006, 11:01:13 PM by WXYZCIENCE »

Countryboy

  • Sr. Member
  • ****
  • Posts: 269
Re: CNC and Motor Conversation
« Reply #7 on: June 23, 2006, 11:25:33 PM »
my first tool was delivered to me in a cake by my Mom.


You may claim to be well fed and happy, but sooner or later Momma is gonna get tired of bringing cakes to you.  You're supposed to use the file...unless you enjoy remaining behind bars all these years.  LOL

« Last Edit: June 23, 2006, 11:25:33 PM by Countryboy »

WXYZCIENCE

  • Sr. Member
  • ****
  • Posts: 355
Re: CNC and Motor Conversation
« Reply #8 on: June 24, 2006, 02:17:20 AM »
Willib, I have tried all kinds of cutting fluids, the soap and water works the best and it is cheap. I can always find some under the sink in the kitchen. The old machine was built with a drill press, 4" bandsaw and files. Using this old machine, I cut half of the parts on my latest model. Joe
« Last Edit: June 24, 2006, 02:17:20 AM by WXYZCIENCE »

dinges

  • Hero Member
  • *****
  • Posts: 1294
  • Country: nl
Re: CNC and Motor Conversation
« Reply #9 on: June 24, 2006, 02:51:48 AM »
When I read your story about building a motor conversion and saw that monkey in the final picture, a thought crept up on me (it happens, every now and then ;) :


"Monkey see, monkey do."


Don't be fooled by his dumb look and holding a banana. He's paying great interest and absorbing your every move so he can build his own motorconversion too, one day.


Looking forward to hearing results from this machine. Skewing the laminations looks great. If you have any more pictures on how you did it mechanically, I'd be interested. I know Zubbly already explained, but you can't have too much information :)


Your first conversion and already a rewinding involved. Soon, you'll be ranking up there with the big boys :)  


Peter.


PS: how about starting a contest where & when the monkey was manufactured, with the prize being, for example, that motor conversion?

« Last Edit: June 24, 2006, 02:51:48 AM by dinges »
“Research is what I'm doing when I don't know what I'm doing.” (W. von Braun)

WXYZCIENCE

  • Sr. Member
  • ****
  • Posts: 355
Re: CNC and Motor Conversation
« Reply #10 on: June 24, 2006, 03:19:07 AM »
Peter, I took the long screws that came with the motor and piled the stator plates up on the four screws. My motor was cooked good so the lams came apart real clean. I then placed the whole stack on a piece of plywood with 4 holes in it. I now can turn the whole setup left or right. I measured the skew and it was 10 degrees exactly when the screws became tight. I placed a wide band around the stator pile and clamped them. I will drill new holes for the long screws. I will also split the case, this will allow me to slip it over the stator after the winding are installed. Then I will clamp it and re-weld the case. The insulating Dacron had to be cut with the same skew to make it fit correctly, this was also by trial and error. Joe.
« Last Edit: June 24, 2006, 03:19:07 AM by WXYZCIENCE »

WXYZCIENCE

  • Sr. Member
  • ****
  • Posts: 355
Re: CNC and Motor Conversation
« Reply #11 on: June 24, 2006, 03:38:56 AM »
Zubbly, I put the magnets into the stator last night. It is not as easy to do as my mind told me it would be. I had 50 of them. Now I have 54 of them. Mistake #238461 : Don't set two of them within arms length of each other. I can just imagine if they were real strong ones. This is my first attempt at large motor conversions. The magnets fit   tight and I had to make sure they placed in flat or the would not fit. I will use a lock-tight and I like you suggestion of the swags. Joe
« Last Edit: June 24, 2006, 03:38:56 AM by WXYZCIENCE »

vawtman

  • Hero Member
  • *****
  • Posts: 1425
Re: CNC and Motor Conversation
« Reply #12 on: June 24, 2006, 08:47:22 AM »
Very nice skew job Joe


Im having so much fun messing with these that if Sparky pans out im gonna try to remove the mags on the 5hp and convert it 12pl.


1965 Hongkong LOL

« Last Edit: June 24, 2006, 08:47:22 AM by vawtman »

WXYZCIENCE

  • Sr. Member
  • ****
  • Posts: 355
Re: "Simple Balancing Act"
« Reply #13 on: June 24, 2006, 10:34:24 AM »
I made this balancing device to static balance the rotor. It is made from two golf course reel mower cutter blades. The table-saw makes a good base and the ruler is a level adjustment shim. The 1" cold rolled drill shaft levels the parallels. By adding small magnets to the rotor I find and mark the heavy and light sides. Metal is then removed or weights added. This works good if the unbalance is small.

« Last Edit: June 24, 2006, 10:34:24 AM by WXYZCIENCE »

willib

  • SuperHero Member
  • ******
  • Posts: 2414
  • Country: us
Re: "Simple Balancing Act"
« Reply #14 on: June 24, 2006, 11:51:55 AM »
Joe you might try a pair of ball bearings to balance this .

this way it does not have to be perfectly level.

just a thought ..
« Last Edit: June 24, 2006, 11:51:55 AM by willib »
Carpe Ventum (Seize the Wind)

rotornuts

  • Hero Member
  • *****
  • Posts: 537
Re: CNC and Motor Conversation
« Reply #15 on: June 24, 2006, 02:24:32 PM »
Countryboy, 50 000 rpm is around 800 SFPM with a .0625 endmill, not exactly out of control for solid carbide in brass. After that I'm sure rigidity and DOC dictated feed. I can't see running more than a half thou per rev. with that setup so the feed would seem about 20 times too slow but the real question is did it work?


I for one am very impressed. Excellent work Joe.


Mike

« Last Edit: June 24, 2006, 02:24:32 PM by rotornuts »

richhagen

  • Hero Member
  • *****
  • Posts: 1599
  • Country: us
Re: CNC and Motor Conversation
« Reply #16 on: June 24, 2006, 06:12:08 PM »
The results are good and that is what counts the most.  Even if the speeds and such are out of whack.  I am certain that I am not accurate on the rpm and feeds for the stuff I cut.  It is great to know the right speeds and feeds, (whats the right rpm and feed for a 1/8 inch endmill in soft pine, or aluminum) but most of us have different skills and speeds.  That is one of the great things here.  I learn from people who have different skills than I.  The only thing I can't figure out, well, not the only, is where folks like XYZ, Zubbly, and many others get the time to do all of these wonderful projects that they share with us.  It seems it takes me three months to build one thing, Ed and others do about one a week it seems.  Rich
« Last Edit: June 24, 2006, 06:12:08 PM by richhagen »
A Joule saved is a Joule made!

WXYZCIENCE

  • Sr. Member
  • ****
  • Posts: 355
Re: CNC and Motor Conversation
« Reply #17 on: June 24, 2006, 08:41:30 PM »
Cutting speed on all of my machines is as you say dependant on many factors. Slot milling is what I do most. The speed is related to the experience that has been gained over the years. If I break a cutter half way through the job it is not the cost of the cutter that is hard on me. It is the time that it takes to replace and restart the job.   I include program loading, material setup, cutting time and positioning. My z bed is very slow on this machine but it has worked well for me for many years. I also have no feedback loops, it is bare-bone simple. I run the axis speed at less than half what I could. My success rate for most parts is very high. Joe        
« Last Edit: June 24, 2006, 08:41:30 PM by WXYZCIENCE »

RP

  • Hero Member
  • *****
  • Posts: 722
  • A dog with novelty teeth. What could go wrong?
Re: "Simple Balancing Act"
« Reply #18 on: June 24, 2006, 10:43:08 PM »
We've used the same technique at work to balance high speed spindles (parallel rails).  The advantage over bearings is the esentially zero static friction so it's much more sensitive than a ball bearing.  AIr bearings would be good but I don't have any in my junk box.  :-)
« Last Edit: June 24, 2006, 10:43:08 PM by RP »

Countryboy

  • Sr. Member
  • ****
  • Posts: 269
Re: CNC and Motor Conversation
« Reply #19 on: June 24, 2006, 11:31:23 PM »
Hi Rich,

  Ending up with a good usable part is the main thing.


For cutting most aluminums, you want about 165 SFPM with a high speed steel cutter.  (1980 surface inches per minute)  


  1. /8 cutter is 0.125 times 3.14 equals 0.3925 inches per rev.
  2. /0.3925 = 5045 RPM


I'd use about 0.0005-0.002 feed per tooth per rev.  (I'd feed at .001 per tooth, and slow it down if I kept breaking bits.)


I wouldn't recommend using an endmill to cut soft pine.  I'd buy a 1/8 inch router bit, with cutting edges designed for wood.  

I don't have a book with speeds and feeds for woods.  I'd recommend calculating what speed (surface feet) a planer or table saw cuts at, and go from there.

« Last Edit: June 24, 2006, 11:31:23 PM by Countryboy »

richhagen

  • Hero Member
  • *****
  • Posts: 1599
  • Country: us
Re: CNC and Motor Conversation
« Reply #20 on: June 25, 2006, 01:08:25 AM »
Thanks for the information.  I have saved the text as a reference for my next aluminum parts.  I've actually done quite a bit of routing with a two fluted carbide end mill with what to me seem like pretty good results.  I plan to switch to an indexible bit for future work.  Rich
« Last Edit: June 25, 2006, 01:08:25 AM by richhagen »
A Joule saved is a Joule made!

iFred

  • Sr. Member
  • ****
  • Posts: 470
Re: CNC and Motor Conversation
« Reply #21 on: June 25, 2006, 10:02:47 AM »
Very nice work and very nice machine.. can I borrow it? LOL


I'll ask a silly question here, why not skew the cuts so the magnets are on a skewed angle as well? It would have reduced the cog, I think. Maybe Zubbly can answer this one.


Keep up the good work WXYZ!  

« Last Edit: June 25, 2006, 10:02:47 AM by iFred »

WXYZCIENCE

  • Sr. Member
  • ****
  • Posts: 355
Re: "Simple Balancing Act"
« Reply #22 on: June 25, 2006, 10:53:33 AM »
RP, you are correct I add a 1/4 x 1/8 round neo to one that is balanced and it is sensitive enough to see the difference. I change the spacers to balance flywheels and shorter shafts. The used golf course cutter blades are hardened and they are very flat. Joe.
« Last Edit: June 25, 2006, 10:53:33 AM by WXYZCIENCE »

oztules

  • Hero Member
  • *****
  • Posts: 1477
  • Country: aq
  • Village idiot
Re: CNC and Motor Conversation
« Reply #23 on: June 25, 2006, 05:19:11 PM »
He has skewed the stator plates instead. (as per Mr Zubbly's latest conversion)


It would also cause horrid gap problems if you were to skew straight mags on a cylinder.


.............oztules

« Last Edit: June 25, 2006, 05:19:11 PM by oztules »
Flinders Island Australia

dinges

  • Hero Member
  • *****
  • Posts: 1294
  • Country: nl
Re: CNC and Motor Conversation
« Reply #24 on: June 25, 2006, 05:29:04 PM »
Don't know about the horrid gap problems. You'd just have to increase spacing a little, so that the edges (corners) of the magnets wouldn't touch the stator. I think it would be very doable, in fact, I've seriously considered it myself for a while for the 3HP conversion I'm working on. It's the mechanical fixing of these large magnets (2"x1"x.5") that made me decide not to go this route. I don't trust epoxy or loctite for this application. With many small, round magnets, one has relatively large surface area (for glue) with relatively small magnetic volume (which is a downside, I admit).


Though there would be another method of skewing, I think. If you have a 4pole motor, don't put the magnets on 0deg; 90 deg; 180 deg; 360 deg. But instead, for example 0 deg; 80 deg; 180 deg; 260 deg; 360 deg. That should solve the cogging too (I think! haven't tried; also, the exact amount of offset depends on the amount stator gaps!), without a need for skewing of either stator or magnets. Note that this is just an idea (not my own anyway) and I have never tried it or seen it tried!


Peter.

« Last Edit: June 25, 2006, 05:29:04 PM by dinges »
“Research is what I'm doing when I don't know what I'm doing.” (W. von Braun)

Flux

  • Super Hero Member Plus
  • *******
  • Posts: 6275
Re: CNC and Motor Conversation
« Reply #25 on: June 26, 2006, 01:05:37 AM »
Yes the stagger spacing method does work. In theory you would need balance weights to correct the balance, but at low speed I am not sure it would be necessary.


Unless you machine flats on the shaft it is fairly easy to shift the magnets with this method to find the best position.


This seems a better way than skewing rectangular magnets on a rotor, the increased air gap to clear the corners does mean using more magnet material.


With proper curved magnets and a uniform air gap, magnets 1/4" thick should be adequate. You will likely need 1/2" thick for skewed rectangular ones.

Flux

« Last Edit: June 26, 2006, 01:05:37 AM by Flux »

WXYZCIENCE

  • Sr. Member
  • ****
  • Posts: 355
Re: CNC and Motor Conversation
« Reply #26 on: June 26, 2006, 01:28:26 AM »
The air 403 used arc magnets but there is a 3/8" space between the first and last 12 magnets. There was no skew. I will get some pics of the guts and post them later. The air gap is also very wide. It had very little cog. Joe.  
« Last Edit: June 26, 2006, 01:28:26 AM by WXYZCIENCE »