Author Topic: Solar Panels Phase 2 underway  (Read 1516 times)

0 Members and 1 Guest are viewing this topic.

craig110

  • Full Member
  • ***
  • Posts: 158
Solar Panels Phase 2 underway
« on: July 09, 2006, 12:50:43 AM »
My solar panel project, phase 2, has gotten to the point where it might be of interest to others.  (Phase 1 was just a few panels for emergency power use, which you'll see better in a picture below.)  In this phase, 20 60w Kenaka thin-film panels are being flush-attached to part of our roof.  (All in parallel as these are being fed into an MX60 and then to a GVFX3648 and even putting them in serial-pairs would exceed the max input voltage of the MX60.)  This first picture is a view of the entire work area showing the support bars in place and one panel attached as a test:


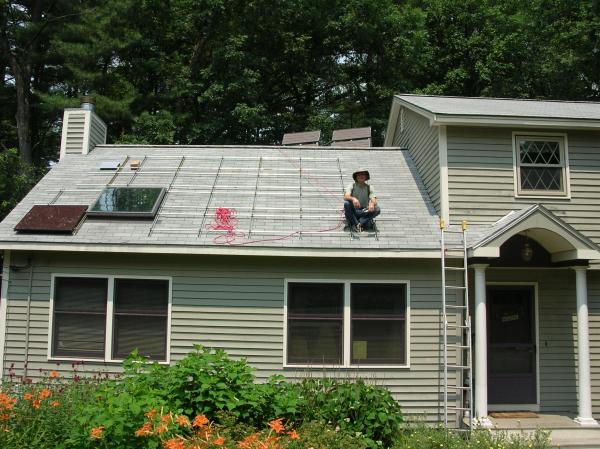
What you can't really see in this picture is that the rope that is coming down to your's truly is attached to a full body harness.  This section of roof is at a 45 degree angle and there is no way I'd work on it without a safety rope.  (Especially in the corner by the first panel where a foot in one direction leads to the driveway over two stories down, one foot at a diagonal lands me in the feed wires to the house, and one foot towards the camera is a one story drop to the ground.  Too bad that has to be the first panel to go in.)


As mentioned above, 20 panels will be going in.  There are four rows of five panels in each; two rows of which are interrupted by the skylight and two rows that will be higher on the roof than the skylight.  In the two lower rows, there will be one panel to the left of the skylight and four to the right.  The upper rows will start just slightly to the left of the skylight and will have five panels in a row.  Looking at the right side of the roof, note how the upper two rows end further to the left than the bottom two rows do.  The early morning shadow from the house part on the right impacts the upper rows more than the bottom ones, so this "shift-left" in the upper two rows minimizes any shadow impact.


In this next shot, you can get a better feel for the pitch of the roof (look at the house in the distance and you'll see that I wasn't holding the camera level) and see what I'm using for the support bars.


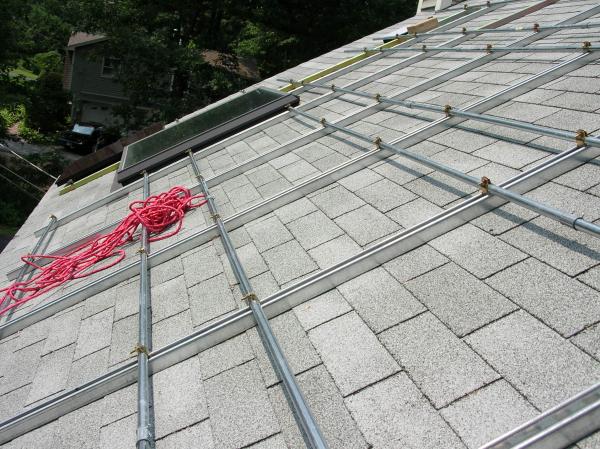
The vertical pieces (referring to their orientation on the roof, not in this picture) are "Superstruts" which are U-shaped channels with lips along the edges that their pipe clamps grab onto.  The horizontal pipes are 3/4 inch EMT piping.  This gives nice flexibility in the horizontal placement of the panels, but there is one "gotcha" that I had to be aware of: the pipe clamps.  The upper part of the pipe clamp sticks up and the panels go over top of them with plenty of clearance.  However, the edge of the panels - which have to be down by the EMT pipe to be attached - can't be in line with the pipe clamps.  So, lots of measurements taken and planning on exactly where the rows of panels will start so that no edge of a panel comes too close to a pipe clamp.  Ditto with the placement of the EMT connectors: I sized the right and left sides of the horizontal runs so that the connectors would not be right under the edge of any panels.


This next shot gives you a sense of the view from the "killer corner" (as I call it ;-) and shows the one panel that has been connected.


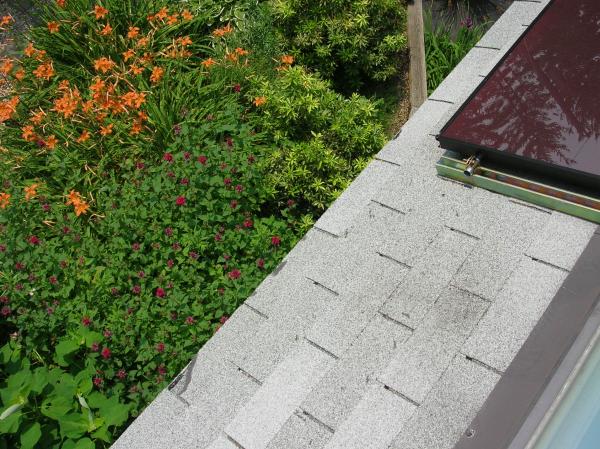
If you look real close, you'll see that there isn't much room between the roof surface and the bottom of the panel edges.  The gap between the roof surface and the body of the panel is about 3.5 inches so the air will flow well, but when I was planning it I forgot that the gap at the edge of the panel, where my hands have to do the attachment work, is about an inch less.  Ouch.  In hindsight, I'd use a bigger gap to make the installation go easier.  (And speaking of the 3.5 inch gap, I'm toying with the idea of installing spritzing hoses in this gap given the results of the other poster's test (sorry, forget his name right now) showing the improvements of keeping the panels cooler.)


Now, a humorous story about this plants.  The dark red flowers (those to the left of the picture's center and between the day lillies and the house) are monarda.  This plant is noted for attracting hummingbirds, among other things, and we do see a few each summer.  Well, yesterday I was working right where I took this picture at and looked down to see a hummingbird sipping nector!  Besides being the best view I've had of a hummingbird in a long time, there was a funny moment when the hummingbird twice turned 45 degrees sideways and upwards and watched me for about 10 seconds each time.  He (she?) was probably as curious, or at least weary, of seeing me "up there" as I was happy at seeing the bird down below!


Anyone, one last picture for now.  I mentioned that these panels are phase 2 and that phase 1 was a few panels for emergency power.  Well, here they are:


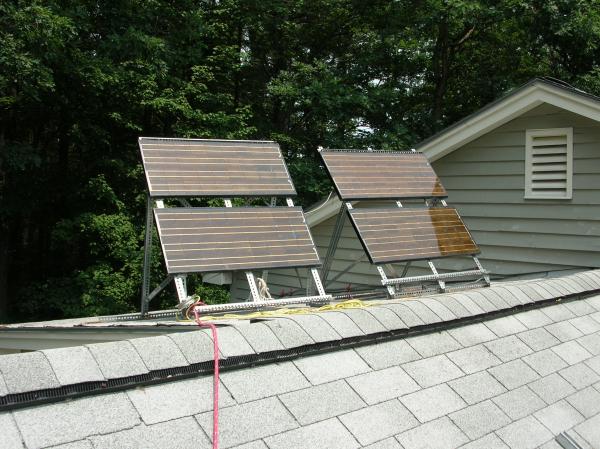
More than just normally being for emergency power (portable microwave, rechargeable lights, etc.), I've decided to have some fun and just ignore the grid for this work. Any part of phase 2 that needs power, such as drilling the pilot holes for the roof lag screws, cutting supports, soldering wires, etc., will get its power from these little panels.


By the way, looking beyond these panels you'll see why I've mentioned in other comments that I have a few too many trees to install a windmill.  :-(


I'll add updates as the work progresses.


Craig

« Last Edit: July 09, 2006, 12:50:43 AM by (unknown) »

henjulfox

  • Full Member
  • ***
  • Posts: 109
Re: Solar Panels Phase 2 underway
« Reply #1 on: July 08, 2006, 07:20:09 PM »
Looks nice!


Superstrut bolted to the roof (lots of sealant I hope), EMT clamped to the superstrut. How do you attach the panels to the EMT?


-Henry

« Last Edit: July 08, 2006, 07:20:09 PM by henjulfox »

craig110

  • Full Member
  • ***
  • Posts: 158
Re: Solar Panels Phase 2 underway
« Reply #2 on: July 08, 2006, 07:33:07 PM »


Definitely lots of sealant was used!  After I drilled the pilot hole, I shot sealant into the hole with a big glob (oh, half inch thick by an inch in diameter) left on top, pushed a washer down into the glob, put the channel on top of that and then filled the channel's oval that I'm going to bolt through with yet more sealant before putting the bolt / washer / lock washer into the hole.  It is the same technique that I used when installing the phase 1 panels back in March and in the "moonsoon weekend" that New England had a month ago with our area getting 11 inches of rain in a few days, I didn't have any water coming inside at all.


I attach the panels to the EMT with four "one hole straps" which are basically semi-circular pieces that wrap around the pipe and bolt to the panel.


Craig

« Last Edit: July 08, 2006, 07:33:07 PM by craig110 »

henjulfox

  • Full Member
  • ***
  • Posts: 109
Re: Solar Panels Phase 2 underway
« Reply #3 on: July 08, 2006, 09:54:03 PM »
Thanks for the info. I'm looking at mounting some panels of my own...

I see the challenge in geting some of those straps bolted on. I'm guessing you'll be leaving gaps between the panels to give you working room? That would also keep the panels cooler.

-Henry
« Last Edit: July 08, 2006, 09:54:03 PM by henjulfox »

craig110

  • Full Member
  • ***
  • Posts: 158
Re: Solar Panels Phase 2 underway
« Reply #4 on: July 10, 2006, 04:40:20 AM »
Hi Henry,


Yes, the straps are a bit of a challenge.  When I install each panel I'll have good access (which is a relative word, of course) to three of the four straps.  What I'm going to do is first tighten down the strap in the no-access corner to the point where it is hard to slide the panel on the EMT.  Then I'll slide the panel in place, which means touching its neighbors, and fully tighten the other three corners.  Yes, ideally I'd like for them to be touching as sometimes, heat is good.  (Please look about you and revive the readers that just fainted.  ;-)  I live in New England where removing snow in the winter is more of a concern than the heat in the middle of the summer is.  When I'm done installing these 20 panels, I'm going to rewire the four phase 1 panels to powering a heating cable along the bottom edge of the panels.  That should help keep the snow melted right at the bottom and then the solar heating moving up the panels from there should melt everything off.  If I do have to have a gap due to the straps, I'll at least only have the gap in the vertical direction so that the panels can still touch on the way up the roof.


Craig


« Last Edit: July 10, 2006, 04:40:20 AM by craig110 »

Slingshot

  • Full Member
  • ***
  • Posts: 231
Re: Solar Panels Phase 2 underway
« Reply #5 on: July 10, 2006, 02:50:44 PM »
Craig,


Will there be some sort of "walking room" between columns or rows?  If you have to replace or service one panel that happens to be in the middle of your array, can you access and/or remove it without major disassembly of unaffected stuff?

« Last Edit: July 10, 2006, 02:50:44 PM by Slingshot »

craig110

  • Full Member
  • ***
  • Posts: 158
Re: Solar Panels Phase 2 underway
« Reply #6 on: July 10, 2006, 03:30:33 PM »
No, sad to say.  If I put that much room between the panels, they wouldn't fit.  It will be a pain to try to replace a panel in the middle of the set, but I've accepted that.  One thing I'm doing to mitigate this is that the wires from each panel individually come out to junction boxes that are not under the panels.  That way, I won't have any "buried" connectors to worry about coming loose.


Craig

« Last Edit: July 10, 2006, 03:30:33 PM by craig110 »

craig110

  • Full Member
  • ***
  • Posts: 158
Re: Solar Panels Phase 2 underway
« Reply #7 on: October 27, 2006, 11:45:22 AM »
Well, phase 2 is (with one trivial exception that I'll mention below) finished.  Here are some pictures for your viewing pleasure:


The one remaining part of this phase involves using the power from the four small panels behind the main set to keep the main ones clear of snow.  I have insulated nichrome wire that I'm going to attach along the bottom edge of the main panels on the presumption that shy of a large snowstorm, the nichrome will melt the snow along the very bottom of the panels which the sun will then heat and melt the rest of the panels.  Any recommendations on attaching the nichrome to the visible side of the panels' front edge?  I don't want to clip the nichrome to the underside of the edge since that won't be as effective at getting this small strip of snow melted.


(And yes, I'll be handling the water coming off the panels so that it doesn't form an ice dam at the very edge of the roof.)


Thanks!


Craig

« Last Edit: October 27, 2006, 11:45:22 AM by craig110 »

craig110

  • Full Member
  • ***
  • Posts: 158
Re: Solar Panels Phase 2 underway
« Reply #8 on: January 15, 2007, 05:20:40 PM »
My wife and I are sitting here, each on our laptops checking things out on the 'net.  Lights are on.  We can cook.  The house is nice and warm.  Oh, I should add that we're in the middle of an ice storm and the grid has been down for over 9 hours.  Grid-tied panels with battery backup is nice.  :-)
« Last Edit: January 15, 2007, 05:20:40 PM by craig110 »

craig110

  • Full Member
  • ***
  • Posts: 158
Re: Solar Panels Phase 2 underway
« Reply #9 on: January 17, 2007, 06:07:16 PM »
Ah well, spoke a bit too fast.  Yesterday afternoon our furnace, trying to keep up with temps in the 20s, exhausted the batteries.  It was a cloudy day and so the panels didn't help much.  Today, we didn't have power for most of the day, but at least it was a nice clear sunny day so the panels could keep the furnace's blower going.  Looks like I either need to expand the battery bank or get a wood-burning stove so that the batteries don't have to keep the furnace going during an outage.
« Last Edit: January 17, 2007, 06:07:16 PM by craig110 »