Part 1 of this diary gave the overview and design objectives of this project. It may be seen here:
http://www.fieldlines.com/story/2006/8/13/7541/74242
I felt that the construction should begin with the coils since it was anticipated that the actual finished size of them would deviate a bit from the drawings because of winding issues. Sure enough, they came out a little different and since they impact placement on the stator and that, in turn, impacts magnet placement and magnet rotor size, it seemed logical to proceed this way. I notice that many begin with the magnet rotor and I wonder how they handle these issues.
Coil Design
A major factor in determining alternator performance and matching to the rest of the system is alternator efficiency. In turn, coil design has a major impact on efficiency and lack of proper design is probably responsible for many of the numerous failures we see reported on this board.
Low efficiency shows up as excessive heating of the coils and eventual failure at high output levels. Coil heating issues are two-fold. First, is the amount of heat (and attendant temperature rise) generated in the first place and the other is getting rid of that heat to keep the temperature rise below the wire insulation breakdown point.
I like Flux's approach to improved alternator efficiency and matching by increasing the cut-in speed and employing a boost converter to recover low-wind energy. Increasing the cut-in speed (which isn't critical) allows us to decrease the number of coil turns, which allows a larger wire size to be used to decrease coil resistance and losses.
The coils for this 12 volt system have only 13 turns. This was calculated to give a cut-in speed of 100 rpm which is a 12 mph wind speed for my 16' air rotor. Anything between 10-14 mph should be fine since the energy peak for this site is 16 mph.
I decided to use the commonly available 2x1x.5" N42 magnets to keep costs down. Each of the 16 magnet poles on each rotor consists of three of these arranged in a `T' formation, which approximates a wedge shape. A total of 96 magnets and 96 in^3 are used. The magnet surface area for each pole is 6 in^2. The magnet 0.5" thickness dictates a coil thickness of the same amount to allow a reasonable air gap of 0.75". Nothing need be added for casting. The size of the composite magnet `T' dictates the hole size of the coil.
Given the rough dimensions of the coil, it now remains to select the wire size and winding format. Since transfer of heat from the interior of the coil to the outside surface is by conduction, it is obvious that a very high copper density is desirable, with minimal dead air space between adjacent wires and layers. Dead air is a very poor thermal conductor. To this end, square wire is indicated and is used here and since it has about 20% more copper for a given size, it also has 20% lower resistance. Square wire isn't perfect however, having radii on the corners. It's also a bit expensive.
Crossover of wire in the winding process also introduces an air space, so it was decided to use only one turn per layer since few turns are needed. This produces a spiral coil with no helical component, so no crossovers. To reduce eddy current potential, multiple parallel wires are indicated - the in-hand (so called ) winding. Seven strands of #14 square wire results in a coil thickness of 0.48" satisfying that requirement.
Allowing for insulation thickness, corner radius and a bonding agent results in a copper density of 92%. Compare this to the 60-70% obtained by many. Heat transfer should be significantly improved.
The stator design calls for the coils to also serve as structural elements. This calls for not only high density, but that the coils are well bonded together to approximate a solid block of copper. A few epoxy types were tested and JB Weld provided the best bond to the wire insulation. It also has iron powder filler that should improve its thermal conductance. So, not only does it bond the coil, it also fills in the dead air spaces to improve heat transfer.
I was advised that JB Weld is somewhat magnetic because of the filler. I didn't think the thin layer used would be an issue and indeed, a completed coil exhibits no detectable attraction to a neo.
The Winding Jig
To obtain uniformity and because winding 7x #14 seemed a bit daunting, a winding fixture was needed. Here's what I came up with. It's about 3' long by 9" wide.
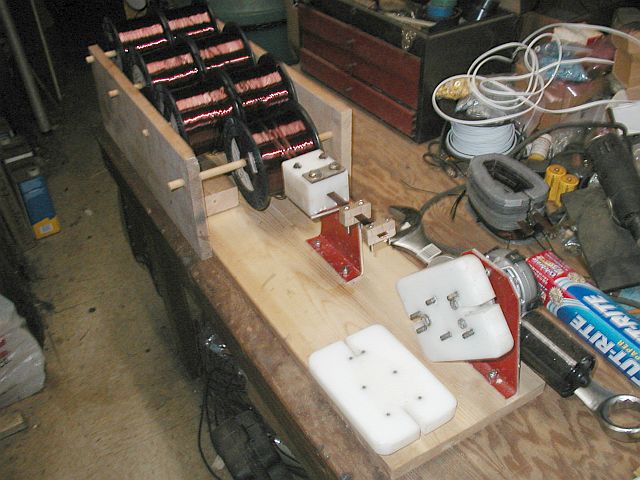
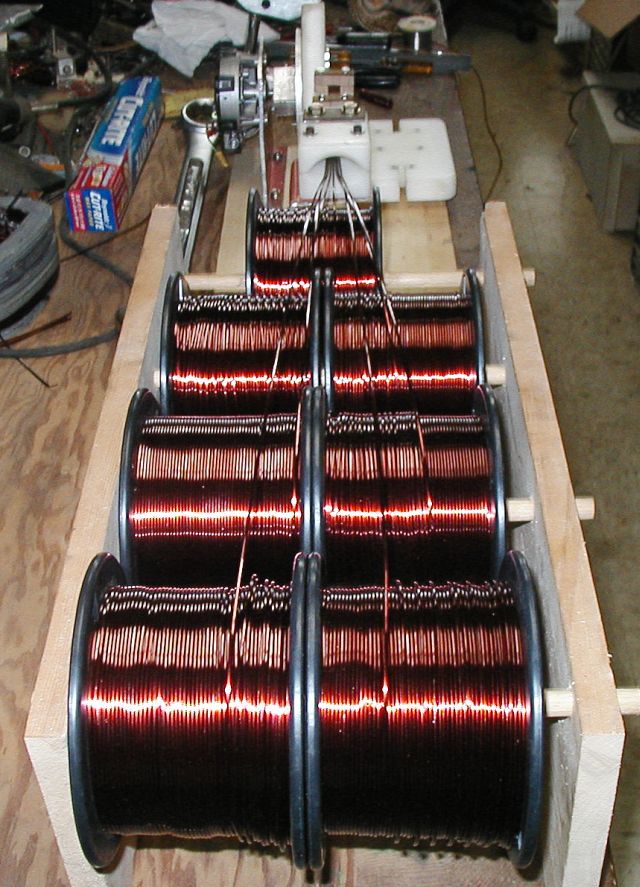
You're looking at over $600 worth of #14 square but not all will be used on this one machine.
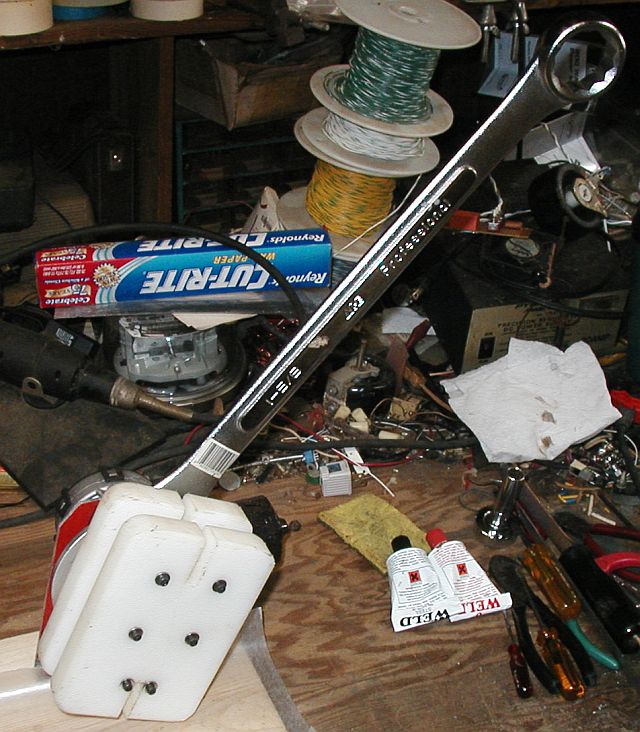
I originally planned to power and automate the winding process but I grossly underestimated the necessary winding tension needed for 7x #14. It became clear on the first test that the 120 watt DC motor, although well geared down, wasn't up to the task of supplying the necessary torque. So, I had to resort to the Armstrong method shown here. Believe me, the long handle is necessary.
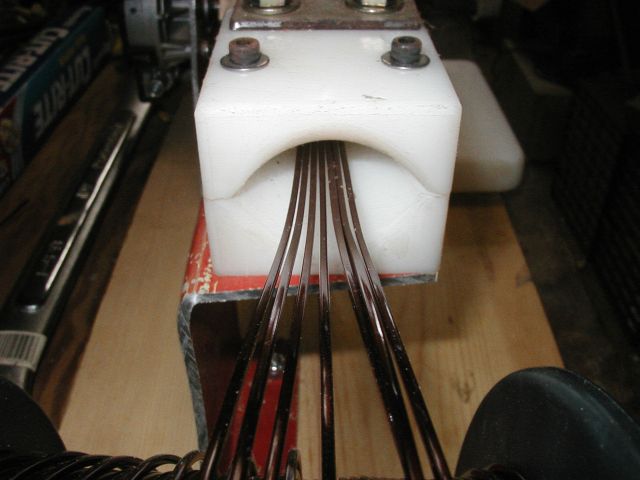
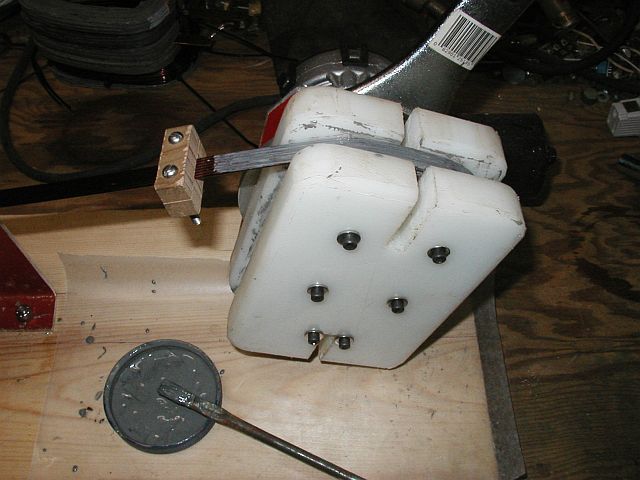
This is the input end of the collimator/tensioner. It's made from two pieces of 0.94" HDPE.
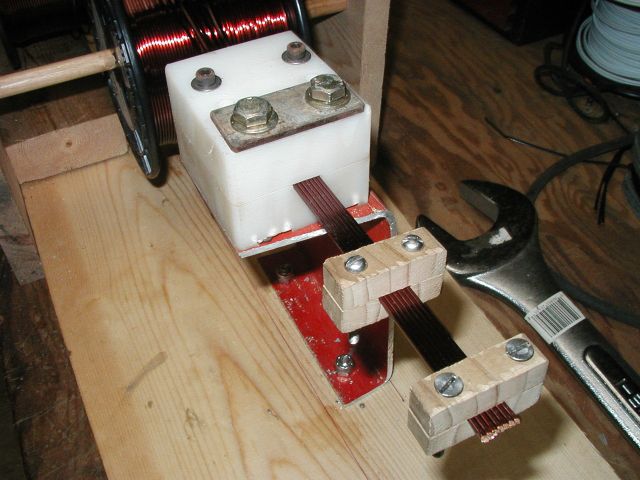
This is the output end of the tensioner. Tension is adjusted by the two large bolts. Also shown are two notched clamps to hold the wire while preparing the end.
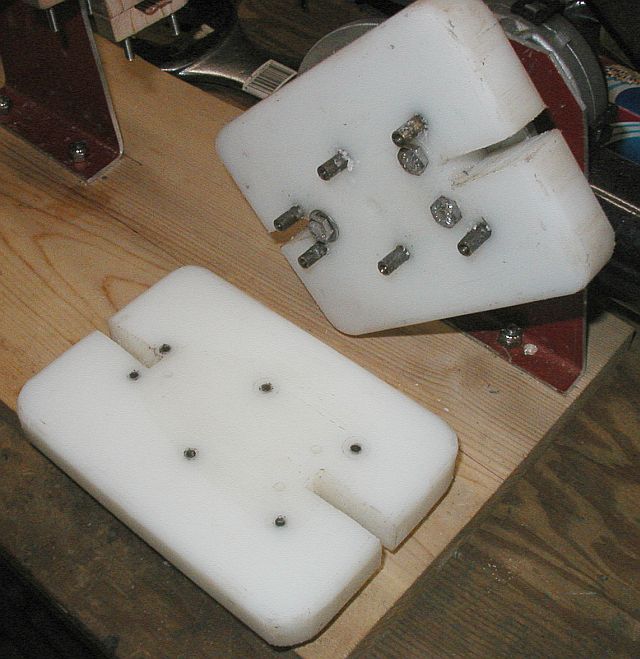
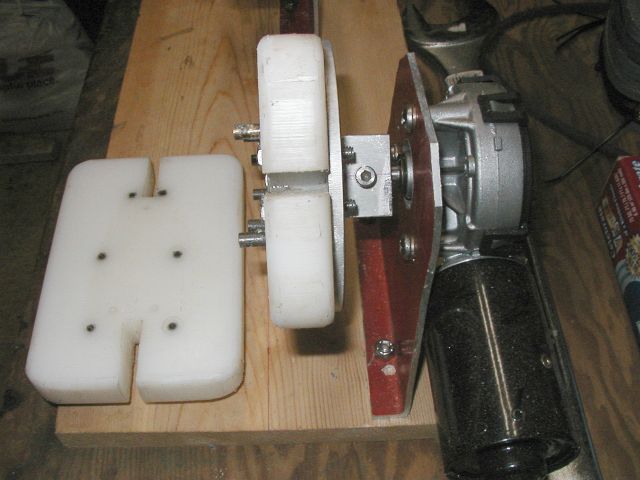
This is the coil mandrel also made from HDPE. The coil corner posts are 0.25" brass threaded standoffs. They are coated with melted candle wax to prevent epoxy from sticking. The fixed half is bolted to an aluminum faceplate, which is on the gearbox shaft. Even though found unsuitable, the motor/gearbox was used unpowered to provide braking torque. Who says a worm drive won't rotate backwards? The slots allow fastening cable ties while assembled if necessary.
The Winding Process
Winding a coil turned out to be pretty time consuming, needing about an hour. Only one per day could be done because of the epoxy cure time
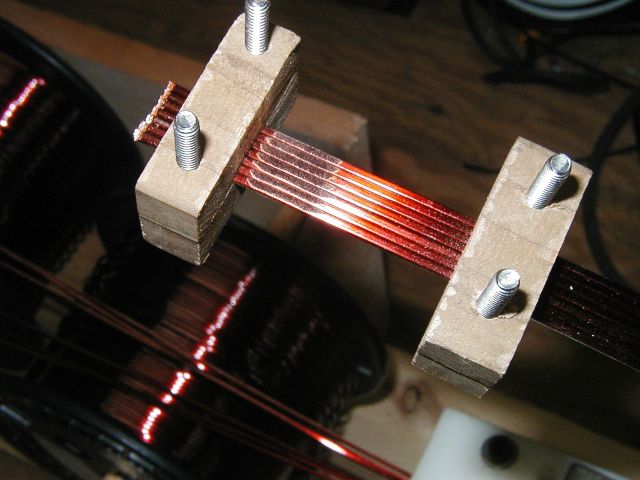
The start end is first prepared by grinding off insulation with a Dremel tool. It's much easier to prepare this solder joint at this point rather than after completing the coil since it's on the inside.
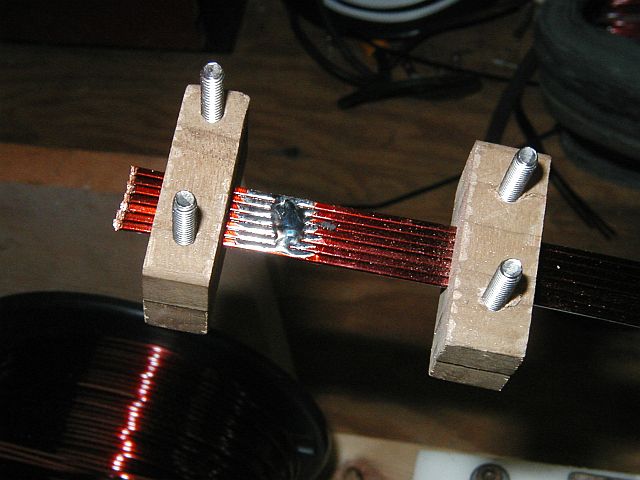
The wire is then tinned and a solder bridge left to keep things together. The wire will then be cut on the left side of the solder area.
The prepared end is bent around the start corner post. It's bent farther than it will end up so that it can hold position under the necessary winding torque. The removable half of the mandrel will now be installed.

We're now ready to get some exercise. The epoxy is mixed, adding a little acetone to thin it for easier application. From here on, the major problem is maintaining adequate and equal tension on the wire. Frequent back-tensioning of individual spools is necessary to equalize them. If this was to be a production system, I'd certainly find a better way. I have to do only 12.
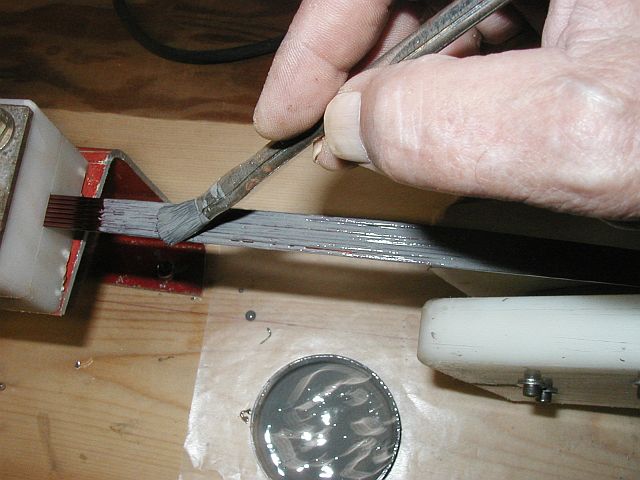
Epoxy is brushed on as we go. It adds substantially to the time since only 6" can be applied at a time. The weight of the handle/wrench plus the gearbox keep it tensioned during the process.
Turns are counted through the mandrel slots. This is the end point. A clamp is installed and the tensioner is tightened right down. Again, the handle weight maintains tension. It's left in this position for 24 hours.

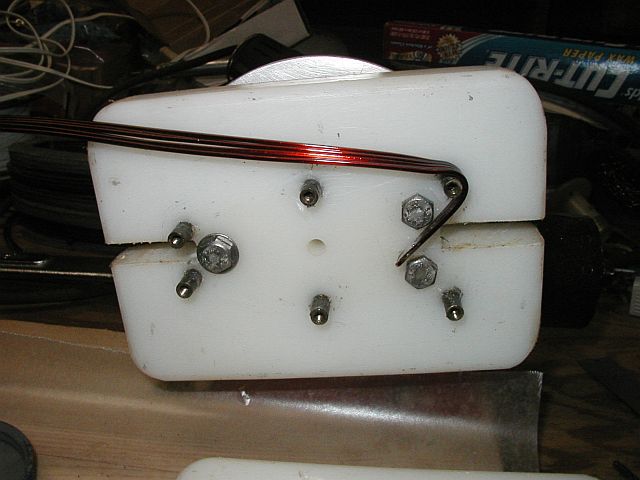
The ready to pop off coil. I'm glad that pretty doesn't count for much. As a precaution, a cable tie will be put around the start and finish (it comes off later).
The Results
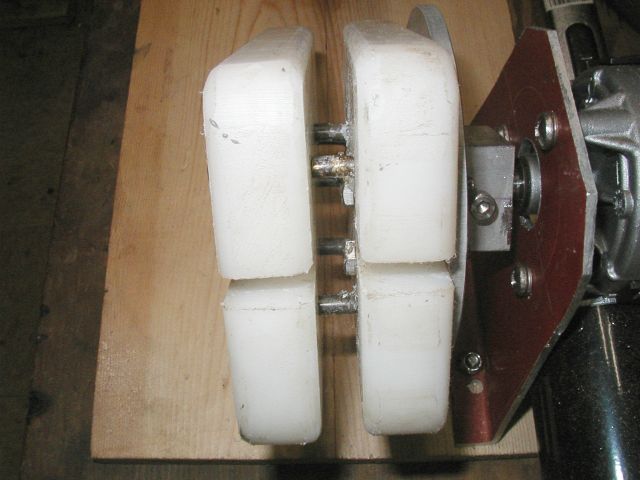
I now have a coil with a near-rectangular cross-section and as dense as I know how to make it. It has a measured resistance of 4.6 milliohms and a measured inductance of 17.5 uH. It's outside dimensions are 4"x6".
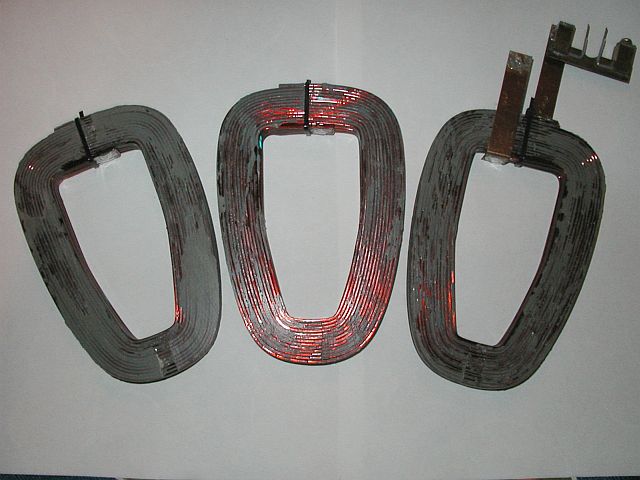
The one on the right has connection links of 0.5"x0.04" copper. The gadget at the upper right is a calibrated shunt for measurement purposes.
Coupling these with a different stator design (no casting) and forced air cooling, I don't expect to burn up a stator.
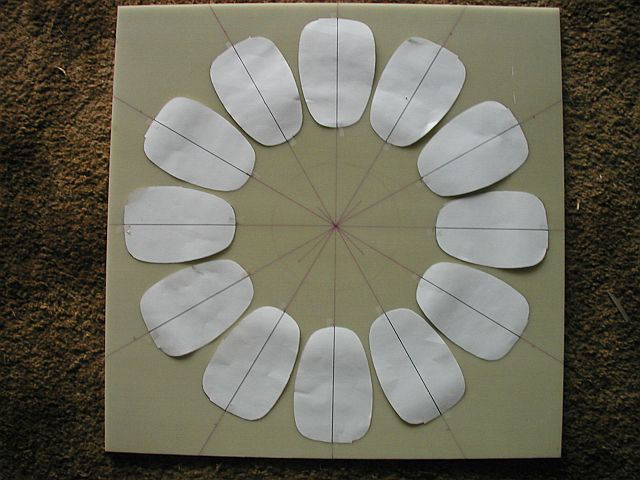
The next installment will be the stator. Here's a bit of a teaser. The stator mounting plate is 2'x 2'x 0.25" G-10/FR4 FRP. Amazing stuff!