Author Topic: What Not To Do  (Read 4861 times)

0 Members and 1 Guest are viewing this topic.

SparWeb

  • Global Moderator
  • Super Hero Member Plus
  • *****
  • Posts: 5452
  • Country: ca
    • Wind Turbine Project Field Notes
What Not To Do
« on: July 09, 2007, 06:07:32 AM »
Members occasionally complain that they hear lots about people's successes, too little about people's failures.  Well, I'll confess to my goof-up.  Y'all get to say "I told ya so".


I discovered this weekend that cable doesn't fit!


Here's the diagram that I SHOULD HAVE drawn BEFORE going with this plan:


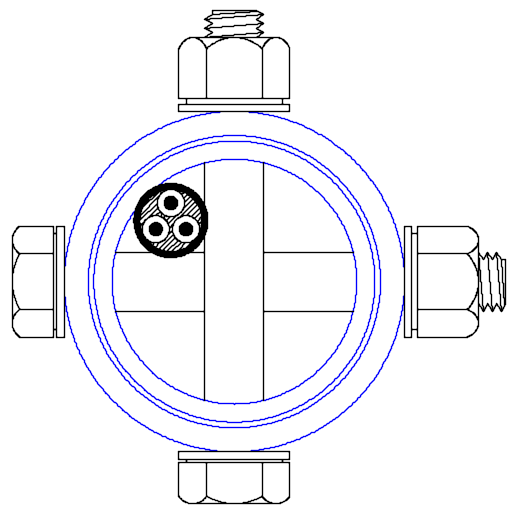
As you can see, the cable won't slide between the criss-crossing bolts.  The biggest cable that will go is a #10 gauge, 3-conductor cable.  And that's only when I split off the outer jacket, and fed the three wires through.  They just barely fit.  I doubt #8 wires would have passed through.


I originally wanted to avoid welding structural joints as much as possible - my welding sucks.  Since I have a drill press, I was able to drill the holes in the pipe to bolt them together, so it seemed like the simplest way.  Right.  Now where's the space for the power cable?


I used a stiff "fish-wire" to catch the conductors at the other end and pull them through, just like eletricians do to put wires into existing walls or conduits.  But this technique has its limitations, too, and you can't really control where the fish-wire goes as you push it up a blind tube 40 feet long.  If absolutely necessary, individual conductors up to #2 Gauge could be fed down, each in its own corner.  Pushing the fish-wire down the tube three times and not getting it jammed is pretty unlikely, so that approach is probably fraught with trouble, too.


Well, the wire is in, such as it is.  It's going to be very windy for the next couple of days (according to the weather report), so all I can do is wait.  I may not be able to raise this thing until next weekend.  The prop is assembled in the garage, just kinda hanging from the ceiling, and the generator is sitting on the top of the tower, just kinda waiting idly.


My face is turning blue....


Steven

« Last Edit: July 09, 2007, 06:07:32 AM by (unknown) »
No one believes the theory except the one who developed it. Everyone believes the experiment except the one who ran it.
System spec: 135w BP multicrystalline panels, Xantrex C40, DIY 10ft (3m) diameter wind turbine, Tri-Star TS60, 800AH x 24V AGM Battery, Xantrex SW4024
www.sparweb.ca

RP

  • Hero Member
  • *****
  • Posts: 722
  • A dog with novelty teeth. What could go wrong?
Re: What Not To Do
« Reply #1 on: July 09, 2007, 01:03:29 AM »
Would it be possible to separate the bolts (vertically) by 4 or 5 cable diameters?  If so then the cable should be able to snake its way through.


Just a thought...

« Last Edit: July 09, 2007, 01:03:29 AM by RP »

oztules

  • Hero Member
  • *****
  • Posts: 1477
  • Country: aq
  • Village idiot
Re: What Not To Do
« Reply #2 on: July 09, 2007, 01:04:18 AM »
Hmmm do we have a cunning plan to untwist the cable at a later date.... or do you have sliprings.....


just a thought while it is still on the ground.


.........oztules

« Last Edit: July 09, 2007, 01:04:18 AM by oztules »
Flinders Island Australia

kamikaze

  • Newbie
  • *
  • Posts: 20
Re: What Not To Do
« Reply #3 on: July 09, 2007, 02:27:30 AM »
Hi,


http://www.mercotac.com This company has a good range of reasonably priced slipring connectors.


Cheers,


Jon

« Last Edit: July 09, 2007, 02:27:30 AM by kamikaze »

Nando

  • Hero Member
  • *****
  • Posts: 1058
Re: What Not To Do
« Reply #4 on: July 09, 2007, 07:54:19 AM »
Steve:


After returning into your normal colors from the "deep blue" fiasco can you tell me what software are you using to draw such clear drawing.


Does it have a good collection of drawing Icons to use ?>


Thanks


Nando

« Last Edit: July 09, 2007, 07:54:19 AM by Nando »

TomW

  • Super Hero Member Plus
  • *******
  • Posts: 5130
  • Country: us
Re: What Not To Do
« Reply #5 on: July 09, 2007, 08:27:12 AM »
Web;


I have used the vacum cleaner trick to get a pull line thru runs of conduit.


Basic procedure:


Tape or otherwise attach a shop vac to the far end of your conduit run.


Fire up the shop vac go to far end and feed a long string /fishing line into that end.


You need to tie a small, fluffy hunk of something to the end of the string [I use a piece of baggie] so the suction has something to pull on but flimsy enough not to get hung up in the conduit.


At some point the pull lessens and the string goes kind of slack. This usually means the fluff has arrived in the shop vac cannister.


Viola` you now have a pull line in your conduit. From here you can use that Navy technique of pulling successively larger lines until you get what you need across or thru in the example here.


I would offset the bolts to dodge that problem of the restriction. But, I am not a metal working type. I have used this shop vac trick to good advantage many times, yesterday I did it 2X.


Good luck and remember very few of us get it 100% right the first pass unless we have really low standards. If you have fun, keep yourself busy and learn something that is a success in my mind.


Cheers;


TomW

« Last Edit: July 09, 2007, 08:27:12 AM by TomW »

Norm

  • Hero Member
  • *****
  • Posts: 1841
  • Country: us
  • Ohio's sharpest corner
how about one bolt ?
« Reply #6 on: July 09, 2007, 08:39:19 AM »
.....And two bolts with the pipes tapped so they

can screw into the pipe?

                 ( :>) Norm.
« Last Edit: July 09, 2007, 08:39:19 AM by Norm »

ghurd

  • Super Hero Member Plus
  • *******
  • Posts: 8059
Re: What Not To Do
« Reply #7 on: July 09, 2007, 09:10:32 AM »
I have pretty low standards.


But what about adding a couple feet of pipe next to the tower at the top for the windmill to ride on,

Then every few feet down the tower, another short piece of pipe for the wire to be controlled?


I got the idea when thinking about treated 4x4 for a tower.


It would get past that twist problem without slip rings, and still be able to use the 40' you already built.

G-

« Last Edit: July 09, 2007, 09:10:32 AM by ghurd »
www.ghurd.info<<<-----Information on my Controller

pepa

  • Sr. Member
  • ****
  • Posts: 461
Re: What Not To Do
« Reply #8 on: July 09, 2007, 10:00:44 AM »
hi SparWeb, i had a similar problem and simply removed one bolt, installed the wire and replaced the bolt. the same thing when taking any twist out of the wire. pepa

 
« Last Edit: July 09, 2007, 10:00:44 AM by pepa »

Lumberjack

  • Jr. Member
  • **
  • Posts: 88
Re: What Not To Do
« Reply #9 on: July 09, 2007, 11:51:09 AM »
If your drawing is accurate... remove bolt,feed wire, reinstall bolt. The wire will reshape itself to fit into the space to a small degree. Also since the bolts are offset to each other the wire only has to pass one bolt at a time. If the offset between the bots is more then an inch or so ,you should not even notice it.
« Last Edit: July 09, 2007, 11:51:09 AM by Lumberjack »

SparWeb

  • Global Moderator
  • Super Hero Member Plus
  • *****
  • Posts: 5452
  • Country: ca
    • Wind Turbine Project Field Notes
Re: What Not To Do
« Reply #10 on: July 09, 2007, 12:51:39 PM »
Great suggestions from many of my favourite contributors.  I'll try to respond to the many comments in one reply here, instead of one at a time.  It's nice to see so many who are willing to help.


Twisting cable, as the mill yaws about, didn't occur to me, until you mentioned it.  Yet another bother that will get on my nerves.  I will have to lower the tower (easy enough) and turn the mill around as necessary.  At least the top of my genny mount can be disassembled - that shouldn't be too bad.  Only the top 6 feet will get twisted, because the strands are jammed into the corner at the uppermost bolts, so all the twist will occur in the top 6 feet of stub.


I certainly did not plan on putting slip-rings on this tower.  I may be stuck doing so if the site turns out to be windy.  That complication may be enough to convince me to make the typical "clam-shells" that I was supposed to in the first place!


The vacuum cleaner trick sounds like a great alternative when the "fish-wire" doesn't work.  Filed away in my "mental toolbox".


Removing one bolt is definitely a way to get a slightly bigger wire down there, but it will buy me only a few wire gauges and still not afford any free twisting/untwisting.  I was considering that before, but it's very time-consuming to completely remove the yaw head, lower the tower the rest of the way off the saw horse, pull out the bolt, pull thru the cable, replace the bolt, and then start assembling all over again.


Lastly, I use CAD software to draw everything I make.  Almost everything.  Not enough assembly drawings, it seems.  That graphic was produced in AutoCAD (I use the old ACAD R14, because subsequent versions provide no advantage that is not surpassed by true 3D CAD software).  That drawing was then exported (via screen shot) to Photoshop for a bit of extra contrast before being saved as a GIF.  I work with drawings and graphics extensively at work so I am much better equipped than the average Joe for drawing stuff.  BTW, the standard hardware items are blocks that were drawn from scratch - by me!


Well, I'm still grouchy about this, but thanks again for the consolation, guys - I'm not so disappointed any more - there IS an answer!

« Last Edit: July 09, 2007, 12:51:39 PM by SparWeb »
No one believes the theory except the one who developed it. Everyone believes the experiment except the one who ran it.
System spec: 135w BP multicrystalline panels, Xantrex C40, DIY 10ft (3m) diameter wind turbine, Tri-Star TS60, 800AH x 24V AGM Battery, Xantrex SW4024
www.sparweb.ca

Ungrounded Lightning Rod

  • SuperHero Member
  • ******
  • Posts: 2865
Re: What Not To Do
« Reply #11 on: July 09, 2007, 01:44:17 PM »
Those bolts are loaded in shear where they penetrate the walls.  They have to be thick there, to spread the force and provide a large area that must be cut by the pipe's motion for the bolt to fail.  But the middle is just holding the rest of the bolt in place.  The bolt is only tightened enough to keep it positioned, not to provide compression.  So it doesn't have to be very thick at all.


In principle you could turn down the middle of the bolts to make more clearance for your wiring.  In practice this might lead to failure from crack spreading or accidental overtightening.


An alternative is to use thick inserts at the holes (what are those called?) with a thin retention bolt through the middle.  (Imagine a cylinder of metal with a hole through it and a washer welded to the top - but made out of a single piece of metal rather than welded together.)


You'd want to round off and polish the inner end so it didn't cut into the cable jacket.


I can think of several variants that would leave the quadrants nearly clear.


= = = =


Another possibility is to tap the holes in the inner pipe and make the outer pipe's holes just clearance for the threads of four short bolts.  That would free nearly all the inner space, at the cost of weakening the bolted joint.  Fortunately if the inner and outer pipes are a good fit there isn't all that much load on the bolts.  But be sure to use good lockwashers!  Tighten with a torque wrench to insure a good setting without stripping.  And you might want to go to four bolts on each side of the joint.


Better would be to put bolts INSIDE the mast pointing out and crank nylock nuts onto them from the outside.  But that's a horrendous assembly problem.  (I'd try gluing a string to the end of the bolts and pulling them through the holes from the outside.  Then shoving a pipe up the inside to keep them from wandering back out of the holes while they're being tightened.  But that's a massive pain.  And replacement of a loosened bolt would be a bitch.)

« Last Edit: July 09, 2007, 01:44:17 PM by Ungrounded Lightning Rod »

Ungrounded Lightning Rod

  • SuperHero Member
  • ******
  • Posts: 2865
Re: What Not To Do
« Reply #12 on: July 09, 2007, 01:46:47 PM »
Another possibility is to tap the holes in the inner pipe and make the outer pipe's holes just clearance for the threads of four short bolts.


Variant:  Tackweld nuts on the INSIDE of the inner pipe, behind the holes.  (Line 'em up using a disposable spare bolt.)  Then insert short nuts with lockwashers from the outside.


Your welding is up to that, isn't it?

« Last Edit: July 09, 2007, 01:46:47 PM by Ungrounded Lightning Rod »

ghurd

  • Super Hero Member Plus
  • *******
  • Posts: 8059
Re: What Not To Do
« Reply #13 on: July 09, 2007, 03:44:20 PM »
My 4x4 idea is 100% from you "trollytrack" tower, only fixed at the top.


Have Mr. S check his mail, if there is time.

G-

« Last Edit: July 09, 2007, 03:44:20 PM by ghurd »
www.ghurd.info<<<-----Information on my Controller

Boondocker

  • Full Member
  • ***
  • Posts: 193
Re: What Not To Do
« Reply #14 on: July 09, 2007, 03:53:33 PM »


From your drawing and pictures of your tower, I take from it the inner pipe is used as a sleeve to couple two lengths of together.  Weld a flange halfway on the sleeve insert.   This option would provide hard points for guys.  As well, eliminate the need for the bolts going through the tower all together. Leaving an unobstructed bore so the cable can twist freely. The photo came from ARE tower installation manual.
« Last Edit: July 09, 2007, 03:53:33 PM by Boondocker »

RP

  • Hero Member
  • *****
  • Posts: 722
  • A dog with novelty teeth. What could go wrong?
Re: What Not To Do
« Reply #15 on: July 09, 2007, 09:13:18 PM »
A variant on this would be to drill a "port hole" through the side of the main pipe below the yaw stub and just feed the cable out the side and then down the outside of the tower through guide pipe sections as Ghurd suggests.


This way the tower is still balanced and the cable can twist and untwist along its entire length just like it would typically inside the tower pipe.


Picture a 1.25 inch hole drilled into the side of the tower.  Now take a piece of round bar and a BFH and beat the bottom side of hole inward and pry the upper side of the hole outward.  Now you have a nice wire feed guide leading the cable smoothly out the side of the tower.


Add some pipe sections every 5 feet or so down the tower to guide the wire.  You could even use a full length of thick wall PVC water pipe to provide UV protection for the cable if you'd like.


If you're worried about weakening the tower pipe, just weld some reinforcement around the outside of the "port" to bulk it up.

« Last Edit: July 09, 2007, 09:13:18 PM by RP »

tdmack

  • Newbie
  • *
  • Posts: 45
Re: What Not To Do
« Reply #16 on: July 09, 2007, 09:49:53 PM »
Steven


Remove bolts.  Have a buddy who can weld do the welding for you.


Tim

« Last Edit: July 09, 2007, 09:49:53 PM by tdmack »

Countryboy

  • Sr. Member
  • ****
  • Posts: 269
2D pic. Answer lies in 3rd dimension
« Reply #17 on: July 09, 2007, 11:31:06 PM »
The only problem you have is in the drawing.  It is 2D, and fails to show the 3rd dimension present in the tower pipe.


Unless your bolts run through each other, you have plenty of room.  Wire is flexible, and will bend.


Try looking at the picture with only one bolt present.  You have plenty of room beside the bolt.  Then, look at the picture of the other bolt.  Again, plenty of room.


It only appears to be an interference fit when you look at both bolts in the same plane.  Yes, the wire will do a little zigzag going through the bolt area, but it will fit just fine.

« Last Edit: July 09, 2007, 11:31:06 PM by Countryboy »

SparWeb

  • Global Moderator
  • Super Hero Member Plus
  • *****
  • Posts: 5452
  • Country: ca
    • Wind Turbine Project Field Notes
Re: 2D pic. Answer lies in 3rd dimension
« Reply #18 on: July 11, 2007, 12:00:32 AM »
You could drive up here and pull on the fish-wire yourself, if you want....  Got a cold beer in the fridge for you if you can get it throu where I failed.  I ripped the wire off the cable a few times myself before giving up.


There's hardly an inch between the upper and lower of the two bolts.  Yes, it looks like it can get by when you consider that, but in practice, it doesn't want to make the corner.  Inside of the pipe is rough, cable and fish-wire have to be joined somehow, murphy's law involved somehow, too, I'm sure...

« Last Edit: July 11, 2007, 12:00:32 AM by SparWeb »
No one believes the theory except the one who developed it. Everyone believes the experiment except the one who ran it.
System spec: 135w BP multicrystalline panels, Xantrex C40, DIY 10ft (3m) diameter wind turbine, Tri-Star TS60, 800AH x 24V AGM Battery, Xantrex SW4024
www.sparweb.ca

SparWeb

  • Global Moderator
  • Super Hero Member Plus
  • *****
  • Posts: 5452
  • Country: ca
    • Wind Turbine Project Field Notes
Re: What Not To Do
« Reply #19 on: July 11, 2007, 12:10:54 AM »
No, my welding skill isn't.  You should see the ugly job I did on the base.  "Bigger the gob, better the job" is all I can do - there's no truth to that saying, though.


You've got lots of good suggestions - I'm tempted to look for a 1/2 inch plate-nut.  Small ones get used in aircraft all over the place, usually for mounting equipment on panels that you can't open.  The plate nuts are rivetted to the back of the panel when it's being made, and you can put the screw in later.  I doubt these "aircraft" fasteners come in 1/2" size - a humungous fastener in aviation terms.

« Last Edit: July 11, 2007, 12:10:54 AM by SparWeb »
No one believes the theory except the one who developed it. Everyone believes the experiment except the one who ran it.
System spec: 135w BP multicrystalline panels, Xantrex C40, DIY 10ft (3m) diameter wind turbine, Tri-Star TS60, 800AH x 24V AGM Battery, Xantrex SW4024
www.sparweb.ca

wooferhound

  • SuperHero Member
  • ******
  • Posts: 2288
  • Country: us
  • Huntsville Alabama U.S.A.
    • Woofer Hound Sound & Lighting Rentals
Re: What Not To Do
« Reply #20 on: July 11, 2007, 07:47:02 AM »
Drill another hole and move one of the bolts.

or

will it work with only one bolt ?
« Last Edit: July 11, 2007, 07:47:02 AM by wooferhound »

Countryboy

  • Sr. Member
  • ****
  • Posts: 269
Re: 2D pic. Answer lies in 3rd dimension
« Reply #21 on: July 11, 2007, 12:49:28 PM »
Try this.


Remove the bolts.  Run the wire through the tower.  Then use a punch to align the bolt holes.  The punch (or big screwdriver) will bend the wire out of the way.  Then put the bolts back in place.


That will be a lot easier than trying to pull the wire through the zigzag.  You may be able to get away with just removing one blot, and leaving the other bolt in place when you run the wire to keep the holes aligned.  Then use the screwdriver to bend the wire out of the way so you can put the other bolt back in.


The bad thing about having the zigzag in the wire is that it will not untwist easily.  You will need to lower the tower to untwist the wire occasionally.  I would recommend putting some kind of quick connect plug at the top of the tower, so you can lower the tower, unplug the wire from the alt, and untwist the cord.


Another solution you could do - cut slots a couple inches up the side of the outer pipe (where they join).  Then use a few exhaust pipe clamps to join the pipes.  The slots cut in the end of the outer pipe will allow it to crimp onto the other pipe. You can always get an exhaust manifold flange to slide over the pipe before you clamp it.  The flange can be held in location with exhaust clamps at the joint, and the flange will give you easy guy wire attachment points.

« Last Edit: July 11, 2007, 12:49:28 PM by Countryboy »

windspeed

  • Full Member
  • ***
  • Posts: 105
Re: What Not To Do
« Reply #22 on: July 11, 2007, 05:13:16 PM »
well done Sparweb


your post is most informative not only for the detail in your drawing but  for  focusing the various minds on the a small but troublesome item ,as is often the case more can be learned from a mistake,


I dont think the wheel was invented intentionally

« Last Edit: July 11, 2007, 05:13:16 PM by windspeed »

DanG

  • Hero Member
  • *****
  • Posts: 1122
  • Country: us
  • 35 miles east of Lake Okeechobee
Re: What Not To Do
« Reply #23 on: July 12, 2007, 09:13:57 AM »
Heat the insulation jackets to make it more flexible, like bake in sunshine for an hour before attempting? Use conduit pull lubricant? Good luck...  just quick thoughts : )
« Last Edit: July 12, 2007, 09:13:57 AM by DanG »

jmk

  • Hero Member
  • *****
  • Posts: 603
Re: What Not To Do
« Reply #24 on: July 19, 2007, 05:49:58 PM »
 I did mine without any bolts. Once you slide the top section in the guy wires to the gin pole will hold the tower together. The tower will flex from the weight of the turbine and a small spread will occur, but as long as the sleeve is in six inches or so you should be fine. Mine might spread 1/2". I drilled, taped, and bolt the top section and used four bolts. The threads got messed up from the tower flexing at the top, so I like the way I did it in the middle much better

« Last Edit: July 19, 2007, 05:49:58 PM by jmk »

jmk

  • Hero Member
  • *****
  • Posts: 603
Re: What Not To Do
« Reply #25 on: July 19, 2007, 05:54:35 PM »
 Should read I did my middle sction without bolts. The picture is the top section. I don't have a picture of the middle.
« Last Edit: July 19, 2007, 05:54:35 PM by jmk »

dyslexicbloke

  • Newbie
  • *
  • Posts: 24
Re: What Not To Do
« Reply #26 on: July 24, 2007, 07:08:50 PM »
Two thoughts ...


Put in 4 draw lines as you assemble it, one in each quadrant, use wire rather than a fish tape. If you do that you will be able solder the larger cables cores to the single core draw wire.


Can you run the drop cable suspended below the tail, but close to the tower. it would not look as pretty but would completely remove the twist issue and sise problem.

If you clip the cable to a centenary you would be able to use it to spin the head and untwist as necessary, tower up!


Drawings by the way, have a look at 'Alibre Design' it is 3D capable and free!

there are some limitations in the free version but none that make it impractical for modest drawings, or even big ones if you build them up by constructing sub assemblies.

« Last Edit: July 24, 2007, 07:08:50 PM by dyslexicbloke »