Author Topic: Solar panel fitted  (Read 2206 times)

0 Members and 1 Guest are viewing this topic.

Capt Slog

  • Sr. Member
  • ****
  • Posts: 378
Solar panel fitted
« on: February 19, 2008, 01:30:30 PM »
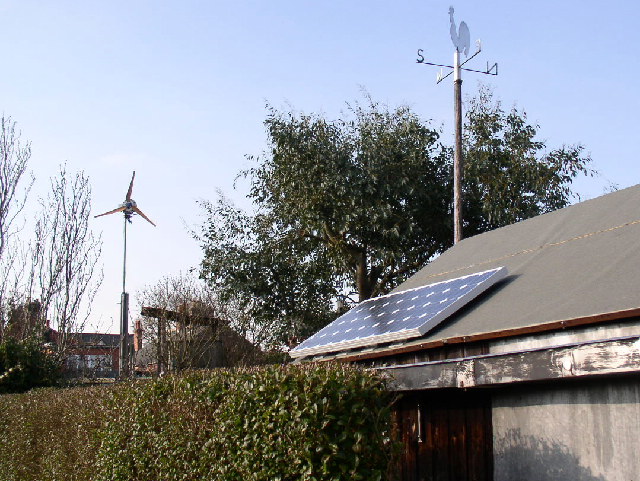
I installed my solar panel this weekend; 80w of mono-crystaline loveliness is now fastened to my shed roof.


I started out by making a cardboard template of the fixing holes on the back of the panel.  There are eight of these, it seemes a bit like overkill but I thought it was best if I used the lot.  I then placed this template on the shed roof where I wanted it to go and hammered in panel pins in the points where the holes lined up (I should have taken pictures of this, wish I had now).


I'd made myself some brackets from channel section aluminium, and these had a locating hole that I could drop over the panel pins I'd nailed in and held them in the right place.  All it needed then was a good blob of silicone sealent under each bracket to stop the rain getting in and fasteneing down with stainless steel screws.


I'd fitted stainless bolts into the panel fixing holes and held them there with a sort of PTFE washer.  The idea was that the panel's holes were oval, and I wondered if I should use this fact to allow for expansion; the way I have it allows for a little of this when it gets hot because it has a some slip due to the PTFE.


Anyway, I droppped the panel onto the roof, and all the holes lined up perfectly, which goes to show that it's worth taking a bit more trouble with the preparation.  Tightening up the bolts was all that was needed and then connection to the battery through a blocking diode.


I put the feed in through my homemade ammeter and was seeing 2-3 amps in the bright low sunshine (it's an amp indicator rather than a meter I'll admit).  


24 hours later and I was seeing float.  Now this was quite a special moment for me because it's never happened before; the wind here is not consistent enough and my wind turbine isn't quite there yet either. I'm using Ghurds dump controller and it was happily ticking away and making the dump load warm.   I'm now in a position to start properly using the power.  

« Last Edit: February 19, 2008, 01:30:30 PM by (unknown) »

AbyssUnderground

  • Sr. Member
  • ****
  • Posts: 461
Re: Solar panel fitted
« Reply #1 on: February 19, 2008, 06:48:05 AM »
Looks good. I wish i could afford one of those panels. I virtually never see more than 0.6A from my 36w of thin film panels. I, like you did, struggle to float my battery if I use any power from it.
« Last Edit: February 19, 2008, 06:48:05 AM by AbyssUnderground »

DamonHD

  • Administrator
  • Super Hero Member Plus
  • *****
  • Posts: 4127
  • Country: gb
    • Earth Notes
Re: Solar panel fitted
« Reply #2 on: February 19, 2008, 07:46:59 AM »
Very nice!


That matches my entire current solar PV in Wattage!


How did you secure the panel at the top to stop it flapping in the breeze or being tunneled under by curious moggies, etc?  Did you have to pierce the roofing felt and if so, how did you (re)seal it?


Rgds


Damon

« Last Edit: February 19, 2008, 07:46:59 AM by DamonHD »
Podcast: https://www.earth.org.uk/SECTION_podcast.html

@DamonHD@mastodon.social

DamonHD

  • Administrator
  • Super Hero Member Plus
  • *****
  • Posts: 4127
  • Country: gb
    • Earth Notes
Re: Solar panel fitted
« Reply #3 on: February 19, 2008, 07:48:31 AM »
Ah, maybe the anwer to my question is the silicone sealant.


If so, are you happy that that will be enough?


Rgds


Damon

« Last Edit: February 19, 2008, 07:48:31 AM by DamonHD »
Podcast: https://www.earth.org.uk/SECTION_podcast.html

@DamonHD@mastodon.social

wooferhound

  • SuperHero Member
  • ******
  • Posts: 2288
  • Country: us
  • Huntsville Alabama U.S.A.
    • Woofer Hound Sound & Lighting Rentals
Re: Solar panel fitted
« Reply #4 on: February 19, 2008, 09:39:52 AM »
Double Cool

I started out with a 10 watt panel and was disappointed

Now I have the Harbor Freight 45watt panels and I love it, there is actually enough power to use and have fun with. Plus Ghurds Controller Ticking away every sunny day.

Nice to see that you have twice the power that I'm used to. You now have enough power to get some real work done.

I need to stop dragging my feet and put up my wind genny, so I can get the power from that one windy day we get every month here in Alabama.
« Last Edit: February 19, 2008, 09:39:52 AM by wooferhound »

fungus

  • Sr. Member
  • ****
  • Posts: 448
Re: Solar panel fitted
« Reply #5 on: February 19, 2008, 09:41:52 AM »
Looks good :)

I'd want to check the temperature under the panels as it doesnt look like its lifted high above the roof, but then again the solar panels likely have a higher albedo than the asphalt roof so it might not get too hot, might be a problem in summer but with the UK weather ..

How did you get the cable inside?
« Last Edit: February 19, 2008, 09:41:52 AM by fungus »

Capt Slog

  • Sr. Member
  • ****
  • Posts: 378
Re: Solar panel fitted
« Reply #6 on: February 19, 2008, 10:01:07 AM »
The cable goes from the panel's box and in through the end of the shed at the end facing the windmill.  I've just fitted a new roof and there was space next to a joist because the sizes are slightly different.  This space needs sealing as it lets in all the draught.


The shed by the way, is very old.  It was a present for mt father when he was around 18, and he would have been 90 if he were still alive now.  I live in his house and sleep in the exact spot where I was born.

« Last Edit: February 19, 2008, 10:01:07 AM by Capt Slog »

Capt Slog

  • Sr. Member
  • ****
  • Posts: 378
Re: Solar panel fitted
« Reply #7 on: February 19, 2008, 10:02:22 AM »
Yup, on both counts.


The panel has an identical four fittings at the top edge, or is that not what you meant?

« Last Edit: February 19, 2008, 10:02:22 AM by Capt Slog »

DamonHD

  • Administrator
  • Super Hero Member Plus
  • *****
  • Posts: 4127
  • Country: gb
    • Earth Notes
Re: Solar panel fitted
« Reply #8 on: February 19, 2008, 10:31:39 AM »
That is what I meant.


OK.


I ask because I may want to fasten a panel to a (flat) shed roof of mine and I'm loathe to puncture the roofing felt since I understand that that way lies madness and leaks...


Rgds


Damon

« Last Edit: February 19, 2008, 10:31:39 AM by DamonHD »
Podcast: https://www.earth.org.uk/SECTION_podcast.html

@DamonHD@mastodon.social

Bruce S

  • Administrator
  • Super Hero Member Plus
  • *****
  • Posts: 5393
  • Country: us
  • USA
Re: Solar panel fitted
« Reply #9 on: February 19, 2008, 03:16:48 PM »
Capt Slog;

 looking good :-) Nice pic along with having the 'mill in the back ground too.

What's your battery setup like? Maybe you'll need to add more batteries to keep up? Wouldn't that be sweet?

At 80watts max, and if you're setup at 12Vdc once the sun really gets out from behind the clouds you should be seeing upwards of 5~6 amps. with that you can really do some more stuff :-]


Those little dump controllers are handy little buggers aren't they. :->

Rest assured they can grow right along with your increased power.

Those extra pins on the PCB are just for that, couple wire off to more FETs and you're all set for more POWER Capt'n.


I like that you went the extra step, took your time, and did a proper installation.

One little item you could do with the dumping power is to attach a small squirrel cage fan to the dump load; another way would be to locate some small 12/24Vdc computer fans. Located under one end to get the air moving during the hot days when there's extra power and need the extra cooling.

The distance from the roof seems very nice and should hold up against winds.


Once again ;-> great job.

Cheers

Bruce S

« Last Edit: February 19, 2008, 03:16:48 PM by Bruce S »
A kind word often goes unsaid BUT never goes unheard

Ungrounded Lightning Rod

  • SuperHero Member
  • ******
  • Posts: 2865
Re: Solar panel fitted
« Reply #10 on: February 19, 2008, 09:49:40 PM »
I'd be inclined to orient the brackets (and the panel if necessary to make the bracket installation clean) so the long dimension is up/down the roof rather than sideways, to minimize the trapping of water against the brackets.


The roof looks to be tar-papered rather than shingled.  Had it been shingled, I'd have suggested putting some flashing under the shingle just upstream of each bracket and then over the bracket, to lead the water over the bracket.


You don't want to depend on any sort of caulk to keep the water out of a roof - or a wall.  By making the overlapping layers such that the water has to go upstream to get under them and into the structure you're safe even after the caulking fails.


It only takes a tiny leak to start rot in the underlying structural wood.  This weakens it where the mounting is.  But you typically don't discover this until the wind tears the panel loose enough that you have a leak through the roof - or tears it off entirely, leaving holes - or tears it partially loose, bending the panel enough to destroy it.  By that point (in a typical structure where the underside of the roof isn't directly visible due to a ceiling between it and occupants) the roof structure is usually sufficiently rotted that the repair can be major.

« Last Edit: February 19, 2008, 09:49:40 PM by Ungrounded Lightning Rod »

Capt Slog

  • Sr. Member
  • ****
  • Posts: 378
Re: Solar panel fitted
« Reply #11 on: February 20, 2008, 02:56:51 AM »
I have two batteries, 75Ah and 110 Ah, wired together in parallel (with 1/4 inch diameter copper! that was a lucky find).


I'm one step ahead of you about the fan......


....but of course it tends to twitch rather than spin because the dump comes in pulses.  So far this has not been a problem but it is something that will need sorting out.  I'm thinking of making a little timer circuit that lets the fan run on for a few seconds whenever the dump pulse occurs.  This way it will be always on when there is a lot of dump happening but not run to much in the occasional gust from the mill.


I also built over big on the dump load in the first place, and the extra FETs are already there.

« Last Edit: February 20, 2008, 02:56:51 AM by Capt Slog »

Capt Slog

  • Sr. Member
  • ****
  • Posts: 378
Re: Solar panel fitted
« Reply #12 on: February 20, 2008, 03:07:38 AM »
The whole instalation can be taken off the roof in probably less than 30 mins and can be reached with a small step-ladder, so any repair isn't going to be too much trouble I hope.  It also makes it very easy to monitor and I take your point about the roof weakening under the panel, it costs more than the roof and I'll keep my eye on it.  The silicone caulk is good stuff though, especially when it's compressed like that between two surfaces.


I positioned the panel that way round to help it cool, the reasoning behind it being more air flowing through a shorter path.

« Last Edit: February 20, 2008, 03:07:38 AM by Capt Slog »

DamonHD

  • Administrator
  • Super Hero Member Plus
  • *****
  • Posts: 4127
  • Country: gb
    • Earth Notes
Re: Solar panel fitted
« Reply #13 on: February 20, 2008, 04:57:22 AM »
As has been suggested elsewhere if I understood correctly, just put a big power-supply cap in parallel with the fan to keep it running for a few seconds after a dump pulse, and put a diode in series with the pair to stop the cap power driving the dump loads!


Rgds


Damon

« Last Edit: February 20, 2008, 04:57:22 AM by DamonHD »
Podcast: https://www.earth.org.uk/SECTION_podcast.html

@DamonHD@mastodon.social

Capt Slog

  • Sr. Member
  • ****
  • Posts: 378
Re: Solar panel fitted
« Reply #14 on: February 20, 2008, 05:36:57 AM »
Thanks for that.  I should have guessed there was something that obvious!  However, the 1 hour spent messing about with the 555 timer and triggers etc should not be considered wasted I suppose.


,

« Last Edit: February 20, 2008, 05:36:57 AM by Capt Slog »

ghurd

  • Super Hero Member Plus
  • *******
  • Posts: 8059
Re: Solar panel fitted
« Reply #15 on: February 20, 2008, 09:43:20 AM »
Now you have to find more loads.  

Like they say "If it isn't one thing, its another!"  ;-)

G-
« Last Edit: February 20, 2008, 09:43:20 AM by ghurd »
www.ghurd.info<<<-----Information on my Controller