Author Topic: Getting there slowly - Mini DIY alternetor  (Read 3703 times)

0 Members and 1 Guest are viewing this topic.

gotwind2

  • Sr. Member
  • ****
  • Posts: 383
  • ben[at]gotwind.org
    • Gotwind - The Renewable Energy Resource
Getting there slowly - Mini DIY alternetor
« on: February 14, 2009, 05:54:01 PM »
Continuing from my last posting.

http://www.fieldlines.com/story/2009/2/9/15032/62195


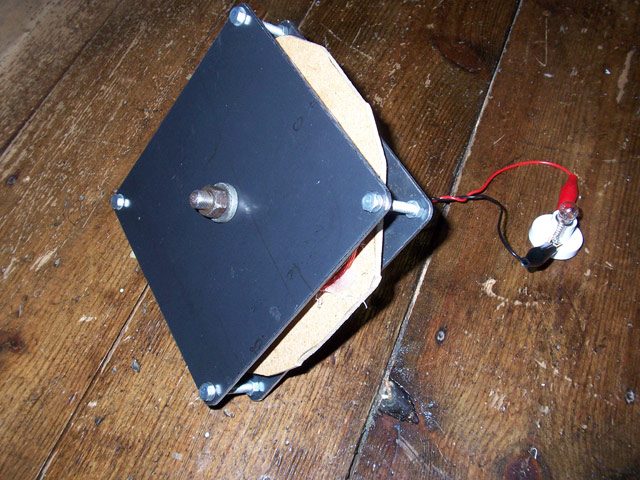
The addition of a second rotor as suggested by DanB and Flux has improved performance significantly.

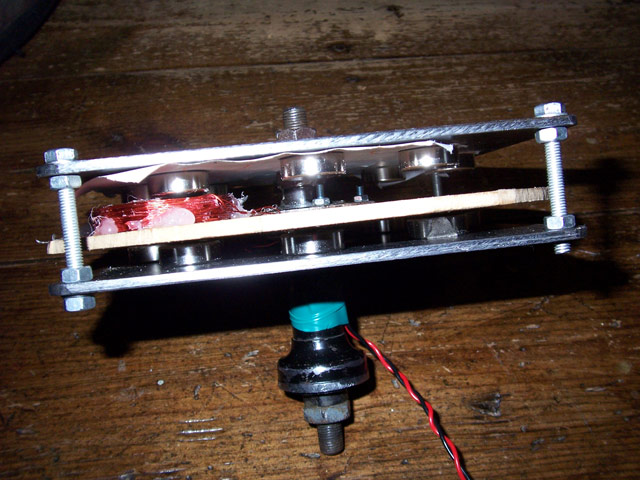
The rotors are 6" square, and using a bicycle hub for the main bearing.


Still only using a single test coil, with more turns of thinner wire, 24 swg (0.56 mm) this time, 340 (Then I ran out of wire..)


Whilst the MDF wooden stator mount is adding to the air gap considerably, it gave me some idea of what can be achieved, there was still a strong attraction of the rotors.


The single 3 ohm coil produced 7 volts @ 700 rpm, and was enough to illuminate a 2 watt bulb with a hand spin.


As this is a 6 coil, 3 phase set up, I may be in VAWT territory?, not really bothered at this stage, as it is fun experimenting.


I have found a good method of winding coils also.


Using the actual chosen magnet as the former sandwiched between 2 steel plates, circular probably best, the coils can be wound, and then (to prevent them expanding when released from a jig) the plates can be carefully slid apart to expose the coil and adhevise can be applied to hold the windings in place, leave to set and repeat on the opposite side - It worked well for me with thin wire.


Ben.

« Last Edit: February 14, 2009, 05:54:01 PM by (unknown) »

capthook

  • Newbie
  • *
  • Posts: 36
Re: Getting there slowly - Mini DIY alternetor
« Reply #1 on: February 15, 2009, 12:51:29 AM »
Small wire is a power stealer.

While a did a few projects with small wire because it required the many turns that small wire provides to achieve a required voltage, a larger/more robust design to begin with that uses larger wire is a huge benefit.


P=IR^2


So 3 ohms per coil x 2 coils x 2 phases = 12 ohms

So if you are producing 2 amps....

Power lost/disipated in coils = 2(12x12) = 288 watts


If you wound with #17 AWG you would have a coil resistance of about .7ohms

.7x2x2= 2.8 ohms

2(2.8x2.8) = 15.68 watts

Huge difference!!


As to the plywood mount...figure it's temporary for testing.

Casting coils in resin is so darn permanent!

You could use a hole saw to cut a hole in the plywood, place the coil in, and then use plastic zip-ties to secure it to the plywood.

Would eliminate the 1/4"(?)extra gap and give you a better reading/more output.


(And maybe get a few more magnets and go with a 12-pole, 9 coil design)

« Last Edit: February 15, 2009, 12:51:29 AM by capthook »

Flux

  • Super Hero Member Plus
  • *******
  • Posts: 6275
Re: Getting there slowly - Mini DIY alternetor
« Reply #2 on: February 15, 2009, 01:23:57 AM »
Probably the dual rotor version is on the right lines and may be as good as you are going to get. Using the extra thickness wasted by the MDF will improve things.


The cycle hub is going to limit you to a very small machine and you now probably have an alternator up to handling the sort of blades that hub can carry. Going with more or bigger magnets and coils with thicker wire will most likely result in something too powerful for the size of blades the hub can carry.


Flux

« Last Edit: February 15, 2009, 01:23:57 AM by Flux »

tecker

  • SuperHero Member
  • ******
  • Posts: 2183
Re: Getting there slowly - Mini DIY alternetor
« Reply #3 on: February 15, 2009, 03:29:46 AM »
 There's happy zone with a large resistnce coil and if you try to increase the power with frequency the coil just wont current out well the lr time constant is a good indicator when choosing a coil winding .
« Last Edit: February 15, 2009, 03:29:46 AM by tecker »

electrondady1

  • SuperHero Member
  • ******
  • Posts: 3120
  • Country: ca
Re: Getting there slowly - Mini DIY alternetor
« Reply #4 on: February 15, 2009, 09:01:54 AM »
so use a whole saw on the mdf, implant the coil,

and bring the mags in closer.

see what you get.

with those magnets you could use a double layer of mdf for the stator and a coil about the same as what it is now.

getting curious.
« Last Edit: February 15, 2009, 09:01:54 AM by electrondady1 »

gotwind2

  • Sr. Member
  • ****
  • Posts: 383
  • ben[at]gotwind.org
    • Gotwind - The Renewable Energy Resource
Re: Getting there slowly - Mini DIY alternetor
« Reply #5 on: February 15, 2009, 09:38:25 AM »
Yes, I agree with the coil resistance issues using thin wire,


I have now wound another test coil using thicker wire - 22 swg, and thinner (8mm) I believe I can get 6 coils in of this size. Resistance down to 1.2 ohm per coil,


I don't think at this size I can embed the coils into MDF, they will have to be cast in resin.


The stator will be almost full of copper wire - There appears to be a huge amount of coil width being exposed to the small magnets now, i am not sure this is a good or bad thing?


Ben.

« Last Edit: February 15, 2009, 09:38:25 AM by gotwind2 »

electrondady1

  • SuperHero Member
  • ******
  • Posts: 3120
  • Country: ca
Re: Getting there slowly - Mini DIY alternetor
« Reply #6 on: February 15, 2009, 10:59:06 AM »
it may be a heresy for those who think god is three phase

 but using the same dia. as you have now.

it looks as though you could add at least 50% more magnets

with out much effort.

with round coils you can go tighter than 50/50 spacing

so with 12 mags and 12 coils ??

or even 8 smaller coils and still be 3phase?

« Last Edit: February 15, 2009, 10:59:06 AM by electrondady1 »

Flux

  • Super Hero Member Plus
  • *******
  • Posts: 6275
Re: Getting there slowly - Mini DIY alternetor
« Reply #7 on: February 15, 2009, 02:51:41 PM »
You are doing the best you can when the coils touch. Yes there is room for more magnets without crowding them too much. You could stack two rows or use thicker ones. If you can't get enough from the present magnets you have this option but I suspect that with the coils touching and using the full thickness without the MDF you will have at least as powerful an alternator as the maximum size of blades for that hub can stand. When you have reached that point you have the ideal.


Flux

« Last Edit: February 15, 2009, 02:51:41 PM by Flux »

gotwind2

  • Sr. Member
  • ****
  • Posts: 383
  • ben[at]gotwind.org
    • Gotwind - The Renewable Energy Resource
Re: Getting there slowly - Mini DIY alternetor
« Reply #8 on: February 15, 2009, 03:21:38 PM »
Thanks everyone for the great advice.


I think I will go with a resin cast stator using 6 of the larger wire diameter (1.2 ohm coils), wired series star.


2 coils per phase, 3 phases, should get me near 12v cut in at around 400 rpm - 3 ft diameter prop, 2 or 3 amps I suspect achievable.


I haden't realised the high cost of enamelled wire new, looks like I will need 0.75 Kg (approx 1 1/2 lb) costing £15 ($21), same price as the 16 magnets.


The costs do mount up, and will near $60 I suspect for maybe a 30 watt alternator - I don't really mind, as it is enjoyable learning.


Maybe the 30v Ametek motors at $50 each are not such a bad deal after all.


Ben.

« Last Edit: February 15, 2009, 03:21:38 PM by gotwind2 »

electrondady1

  • SuperHero Member
  • ******
  • Posts: 3120
  • Country: ca
Re: Getting there slowly - Mini DIY alternetor
« Reply #9 on: February 15, 2009, 09:13:06 PM »
nine !
« Last Edit: February 15, 2009, 09:13:06 PM by electrondady1 »

Flux

  • Super Hero Member Plus
  • *******
  • Posts: 6275
Re: Getting there slowly - Mini DIY alternetor
« Reply #10 on: February 16, 2009, 12:54:45 AM »
Don't forget the Amteks are scrap price or what some fool will pay. The original price may have been very interesting. Copper in small quantities is difficult to get no that we don't make anything in the UK. It is only cost effective to import huge reels of wire and the cost of winding off small quantities is high.


I used to buy 1lb reels of fine wire from British manufacturers and it was good quality. Now I have to buy 10kilo minimum and the scrap bits get wound in the middle when the machines go wrong. I think the old manufacturers stopped the process at that point and started a new reel, I never got bare bits and lumps in the old days.


Not done any comparisons of cost of magnet compared with copper, for small wire quantities it may be cheaper to use bigger magnets and less copper. That doesn't work out with lager quantity copper price.


Flux

« Last Edit: February 16, 2009, 12:54:45 AM by Flux »