The Solar Cell Laminator
PHOTON TECHNOLOGIES, INC.
Using a Refrigerator Door to Laminate your Solar Array
Can you build your own "Laminator" to help you assembly your Solar Array? Sure you can!!!
One of the simplest ways to build a solar array is to use Dow Two-Part Clear Silicone as the encapsulate. It has been used since the late 1970's in the photovoltaic industry for solar panel construction and has been used by lots of Solar Car Racing Teams.
It can be used in lots of ways such as an encapsulant under the cells with a sprayed-on Conformal Coating over the cells, as an encapsulant between the front surface of the cells and a clear plastic front surface, or as an encapsulant between the front and back of the solar cells when a plastic laminate with plastic on both sides of the solar cells is used.
When you paint or pour on the Two-Part silicone, there is the possibility of air bubbles being trapped in your laminate, especially if plastic is applied to the front and back of the solar cells with the silicone as the "mushy" bonding layer. While trapped air bubbles detract from the appearance of the solar array when viewed from the front, if large air bubbles are trapped under the solar cell, they can expand when the cell gets hot and can actually crack the solar cell.
Small bubbles are not much of a problem but if you are building individual solar panels to be mounted on your car, (which we recommend rather than directly laminating the cells to the car), you can easily build a simple vacuum laminator to remove the trapped air bubbles from the laminate.
All that you need is some type of rectangular "door" such as one from an old refrigerator or freezer. Look for one of the very old type since the steel will be of a thicker gauge. Also look for one where the rubber edge sealing is intact or you will need to replace it to seal the edge to prevent vacuum leaks.
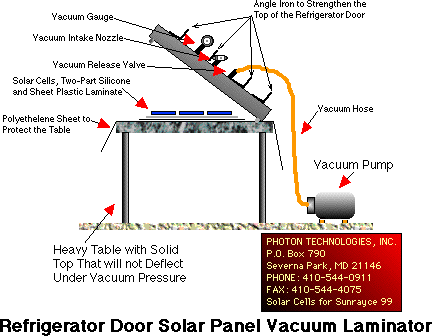
Also, because most "real" laminators use 1/2" steel or even heavier aluminum plate for the sides and top to prevent the vacuum pressure from "sucking" in and down the walls and top, a refrigerator door will have to have some angle iron reinforcement to keep the top, especially, from deforming under the vacuum pressure.
If you have a metal shop, try building one out of some 1/2" steel plate. Because of the heavy weight, you will probably need some type of mechanical lifting system to "open" the door.
The "laminator-door" is used by placing it on a heavy table. Note that because the surface of the table will be the actual bottom plate of the laminator, it will have to be quite sturdy also, to prevent deformation under the vacuum pressure.
Three holes are drilled into the top of the "door". One is for the installation of a vacuum gauge to measure the amount of vacuum applied, the next is for a pressure release so that you can gradually let air back into the chamber to release the vacuum and the third is for the vacuum pump intake hose attachment.
Just place your solar array laminate on the table, close the "door" over it and turn ON the vacuum pump. Close the release valve and watch the vacuum build in the chamber.
The amount of vacuum and the length of the time your array has to remain in the chamber is determined by how your laminate is made (whether the solar cells are sandwiched between two layers of plastic or whether the front or back of the cells are open to the air at the top) and the heftiness of your laminator "door". The stronger the "door" and its ability to resist deformation due to vacuum, the more vacuum pressure you can apply.
Note that the objective is to remove any trapped air bubbles under the solar cells and within the laminate. Not a lot of vacuum pressure is needed but the lower the vacuum pressure, the more time it will take to draw the bubbles out. Note that the Two-Part Silicone has a "pot-life" so you will only have about 15 minutes to preform the vacuum "de-bubbling" before the silicone begins to cure and gel.
Hope that this helps you with your Solar Array construction and we look forward to your comments.
Best Regards,
Bob Mulligan
PHOTON TECHNOLOGIES, INC.
