Author Topic: More on 16 inch duel rotor  (Read 2672 times)

0 Members and 1 Guest are viewing this topic.

harrie

  • Sr. Member
  • ****
  • Posts: 365
More on 16 inch duel rotor
« on: March 20, 2006, 02:43:34 AM »


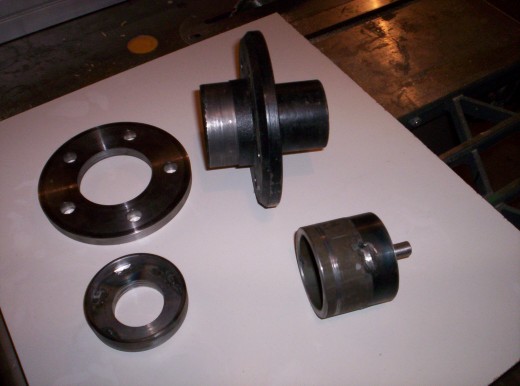
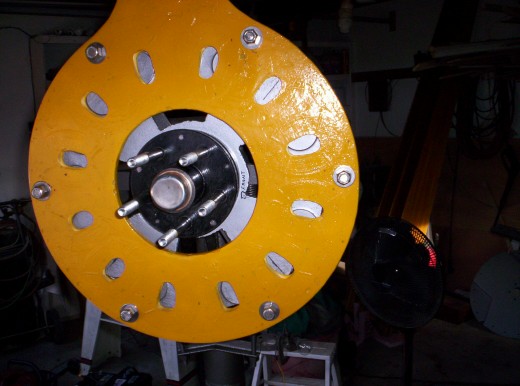
This is a trailer hub that has been machined on the back side to allow another flange to slide on with close tollerance. this flange will be in front of the back rotor. both front and back rotors center hole also are machined to fit tightly on the hub.also in the picture, is a cup washer that will be the base of the stator support bracket. the cup will fit over the end of the hub behind the back rotor to prevent water entering into the back hub bearing.(at least most of it).the other piece in the picture is just a hub that will fit over the front of the hub after everything is together and locked on with set screw, for drill motor testing.

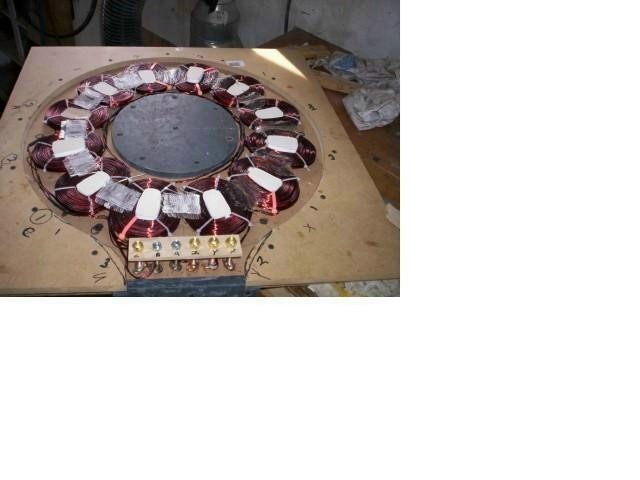
This picture is kind of small, but I was just trying to show the pieces of sheetrock that I cut to fit, and placed them in the center hole of each coil.

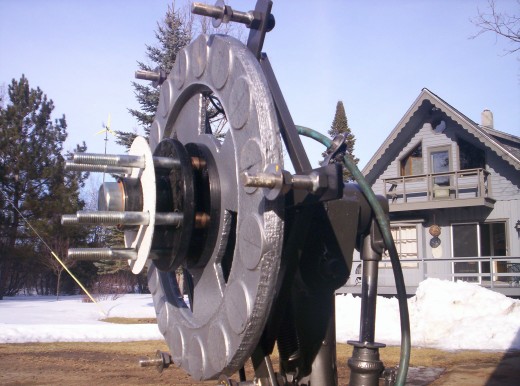
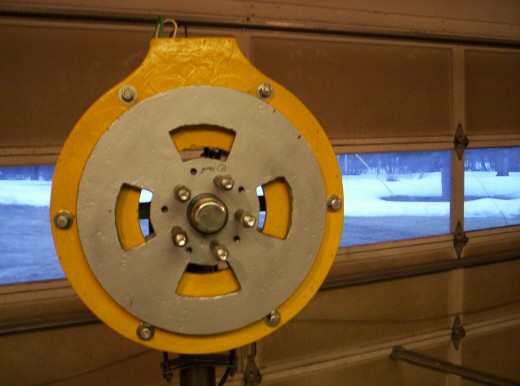
Back rotor on,with flange,and also a shim that is ready to go between front rotor and front flange to have desired gap.the 5 thru bolts are 9/16 inch dia, and 6 & 1/2 Inches long.

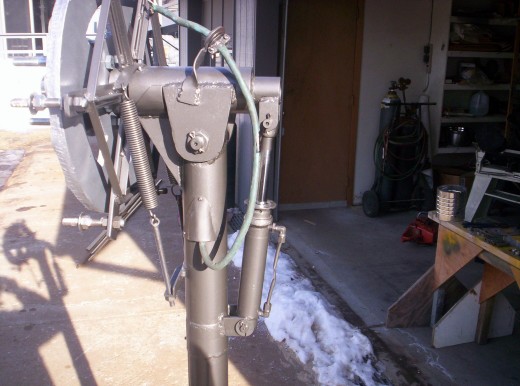
side view showing how feed wires enter the stand pipe with removeable cover to prevent water from getting inside where the yaw bearings are. also shows the hyd. cylinder that prevents fast movement when it tilts back. also adjustable springs can be seen that will also help in the action. I will have to test and adjust the tilt on a test tower and tell more about it later.

Stator is mounted with sheetrock removed. this of course was a little nerve racking, not wanting to damage the wire. If I did this again, I think I would have greased sheet rock good,and I think it would have came out easier. I just hope it was worth the effort for cooling. ITs kind of neat tho, to see the mags behind how they line up in phase, and the others out of phase. I have to admit, I think there was a little room for improvement with line up prior to pouring the stator, but it seems to work fine.

front rotor on, using 5 jack bolts. I will be trying to use this one for 48 volts, the cut in at 48 in star, is 100 RPM. checking the resistance again, Im getting 1.3 ohms per phase. Im not sure if the 18 foot blades will be ok, but I guess I can aways shorten them if I want. The stator is 1/2 inch thick, and have the gap set at 11/16 inch. the mags are the 2 X1/2" discs, and are 13/16 apart. The coils are 60 turns two in hand #15 mag. wire.I brought out six wires for using Delta if needed. In delta, 48 volt cutin is 175 RPM.Any questions you have, I will try and answer. again thanking all you guys for your help in making this possible,but I still have alot to learn.


Great Fun Harrie

« Last Edit: March 20, 2006, 02:43:34 AM by (unknown) »

Shadow

  • Sr. Member
  • ****
  • Posts: 473
Re: More on 16 inch duel rotor
« Reply #1 on: March 19, 2006, 08:41:33 PM »
Very Nice Job Harrie!Thats great workmanship!I like the idea of open coil centers. It looks like alot of thought has went into every aspect of this machine. I cant wait until its completed and some test results are posted.Are the blades completed yet?
« Last Edit: March 19, 2006, 08:41:33 PM by Shadow »

harrie

  • Sr. Member
  • ****
  • Posts: 365
Re: More on 16 inch duel rotor
« Reply #2 on: March 19, 2006, 09:24:02 PM »
Hi Shadow, Thanks. Yes the blades are done, I will be posting them very soon, the rotors were made with a cutting torch, even as shakey as I am in my old age, I was surprised they turned out as good as they did. No warpage, and stayed very true with only about ten thousands run out. If you were closer, I would have you paint up my blades. Ha. take care, Harrie
« Last Edit: March 19, 2006, 09:24:02 PM by harrie »

commanda

  • Hero Member
  • *****
  • Posts: 731
Re: More on 16 inch duel rotor
« Reply #3 on: March 20, 2006, 01:12:11 AM »
I would have mounted the hydraulic cylinder upside down, and fitted a rubber boot over it. Very nice job though.


Amanda

« Last Edit: March 20, 2006, 01:12:11 AM by commanda »

dinges

  • Hero Member
  • *****
  • Posts: 1294
  • Country: nl
Re: More on 16 inch duel rotor
« Reply #4 on: March 20, 2006, 03:11:04 AM »
Nicely done.


Is it possible to see a close-up of how you made the electrical connections (the 6 bolts) in the stator plate?


I was planning on doing something similar, only a bit differently: bolting the bolts through the stator mould (the wood), fixing the wires, casting, and then removing the mould (it's a bit more complicated than I describe here, but doable).


I'd be really interested in seeing a closer-up of that part of the stator.


Peter.

« Last Edit: March 20, 2006, 03:11:04 AM by dinges »
“Research is what I'm doing when I don't know what I'm doing.” (W. von Braun)

fanman

  • Jr. Member
  • **
  • Posts: 67
Re: More on 16 inch duel rotor
« Reply #5 on: March 20, 2006, 04:57:56 AM »
hey harrie

 thats a fine looking machine, i do like it very much those center holes may work very well for cooling of those coils too, i need to see how effective your tilt back governer is, keep up the good work, and the pictures
« Last Edit: March 20, 2006, 04:57:56 AM by fanman »

harrie

  • Sr. Member
  • ****
  • Posts: 365
Re: More on 16 inch duel rotor
« Reply #6 on: March 20, 2006, 08:21:22 AM »
Sorry Dinges, I dont have close ups of that area. Its kinda the same as whats been done by others , using brass tolet bolts that have a flat and oblong head wires were stripped, wraped around bolt, and sodered. I drilled some holes to fit the bolts in a flat strip of wood that was only used to keep them in place while pouring.


commanda Yes, having the cylinder upside down is the proper way to install it, but I made that one out of a torshion shock out of a Toyota , so the top seal is made with weep holes to allow water to run off. Thanks for the constructive criticism tho, thats what keeps us learning.

« Last Edit: March 20, 2006, 08:21:22 AM by harrie »

Buck L

  • Newbie
  • *
  • Posts: 11
Re: More on 16 inch duel rotor
« Reply #7 on: March 20, 2006, 10:23:51 AM »
Hi Harrie Great looking unit and nice design. Looking forward to when it is up and running. Please keep up your postings. Thanks Len Buck ,lbuck30672@aol.com
« Last Edit: March 20, 2006, 10:23:51 AM by Buck L »

redeyecow

  • Newbie
  • *
  • Posts: 26
Re: More on 16 inch duel rotor
« Reply #8 on: March 20, 2006, 08:33:00 PM »
  Hi Harrie,  That's a fine bit of workmanship and design.  I'm wondering why you choose round magnets and the reasoning behind the oval shaped hole rather than round. Really like the damper.  I've got an ancient Paris Dunn with no genny that used tilt-back furling. It might be a good idea to add your damper when I rebuild it.  Would it be possible to control furling from the ground with a live hydraulic cylinder.  It would be a nice way to tie it down in a storm.


  very inspiring, keith


« Last Edit: March 20, 2006, 08:33:00 PM by redeyecow »

harrie

  • Sr. Member
  • ****
  • Posts: 365
Re: More on 16 inch duel rotor
« Reply #9 on: March 20, 2006, 09:37:10 PM »
hello, I used the mags, because I had them. There has been alot of discussion on this site, as to which magnets are best. It has to do with the flux path. some say the round are not as good as the rectangle, or wedge shape, but I find they do a good enough job for my applications. The hole, does not have to be completly round as is the magnet, due there being less flux at the outside arc of the rnd. mags. its got to do with the mags passing thru the horizontal legs of the coils.


I dont think one could use live hydrulic for furling. It is a practice of most using the duel rotors to simply short out the stator, which effectively stops the blades from turning.


thanks for the comment, Harrie

« Last Edit: March 20, 2006, 09:37:10 PM by harrie »

tecker

  • SuperHero Member
  • ******
  • Posts: 2183
Re: More on 16 inch duel rotor
« Reply #10 on: March 21, 2006, 02:31:11 AM »
 The round magnets could add some smoothing to the power cycle similar to the difference between a round or flat rock hitting the surface of the water.
« Last Edit: March 21, 2006, 02:31:11 AM by tecker »

hvirtane

  • Hero Member
  • *****
  • Posts: 712
    • About Solar Cooking
Re: More on 16 inch duel rotor
« Reply #11 on: March 21, 2006, 05:14:34 AM »
Really nice.


Please post more, after testing it.


- Hannu

« Last Edit: March 21, 2006, 05:14:34 AM by hvirtane »

SmoggyTurnip

  • Sr. Member
  • ****
  • Posts: 294
Re: More on 16 inch duel rotor
« Reply #12 on: March 21, 2006, 06:21:55 AM »
Very nice job!
« Last Edit: March 21, 2006, 06:21:55 AM by SmoggyTurnip »

harrie

  • Sr. Member
  • ****
  • Posts: 365
Re: More on 16 inch duel rotor
« Reply #13 on: March 21, 2006, 11:35:26 AM »
gotta clear up what I said about horizontal legs of the coils, I should have said the legs of the coil that the magnets pass thru. Sorry!
« Last Edit: March 21, 2006, 11:35:26 AM by harrie »

ivandenisovich

  • Newbie
  • *
  • Posts: 13
Re: More on 16 inch duel rotor
« Reply #14 on: March 22, 2006, 09:03:41 AM »
harrie,


Great job!  you have incorporated several of the ideas I had for a larger rotor system such as a slotted magnet rotor and vented stator to remove some of the heat buildup.  I was thinking about using more wedge shaped coils.  I think you could use more turns or a heavier gauge wire and still have the same cast stator area.  Also, If there was a way to leave the bottom 1/3 of the coil exposed to air, but this would mean you would need some sort of dam within the stator mold to keep the resin from flowing over those parts.  Cedar is a good choice for blades, it is light and strong.  Even so, the centripetal forces on the magnet rotors are going to be very large for this sized rotor.  Have you considered a composit or fiber glass blade set?  Again, great job.  I will be interested to see how the rest of the project comes along

« Last Edit: March 22, 2006, 09:03:41 AM by ivandenisovich »