Author Topic: New furling mount  (Read 1912 times)

0 Members and 1 Guest are viewing this topic.

suitep123

  • Jr. Member
  • **
  • Posts: 67
New furling mount
« on: July 31, 2008, 03:18:30 PM »
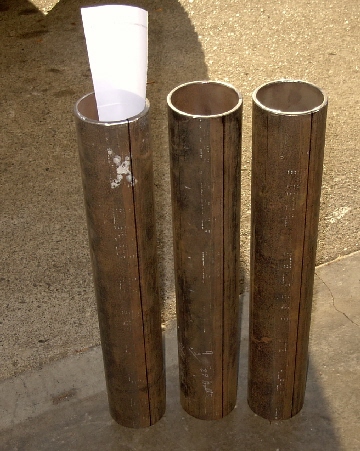
Hey y'all - it's been awhile, lot's going on here. We got the pipe to use for the split collars, like the picture wooferhound had posted on our tower construction post, and we got a bunch of 3/8" wire rope to use for the tower. Problem being, our welder is tied up on a big order at work and he's putting in 14 hour days with no end in sight. I'm off work caring for Mom for awhile, bought some calves, waiting for them to be delivered, money has been wiped out. We did fing a place to buy the screw in anchors though.... With new animals we are at our max until we can get this well up and running reliably.


We've been playing with a furling mount to keep busy, and to keep learning and trying to understand. There is much that is absorbed from "doing" and learning as we go. Wishing we had started with a 10' mill - 20/20 hindsight and all that....


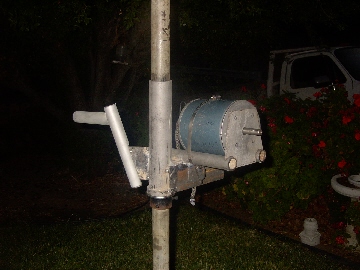
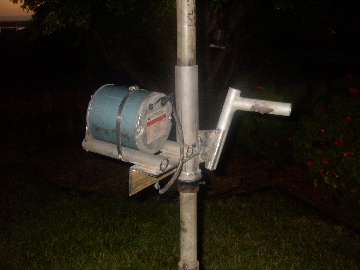
This furling mount has a 6" diameter motor, 5" offset from yaw axis, 18 degree tail pivot mount, 5 degree tilt on the motor, 5' diameter blades, still need to figure tail size, tail length and weight, and if any of it works...


Thanks again everyone.

Pauline

« Last Edit: July 31, 2008, 03:18:30 PM by (unknown) »

Flux

  • Super Hero Member Plus
  • *******
  • Posts: 6275
Re: New furling mount
« Reply #1 on: July 31, 2008, 03:10:20 PM »
With 5" offset and a 5ft prop you will need a large tail, a long boom and even then you will have to offset it away from furling direction to keep it pointing reasonably into the wind. It is about double the generally used offset.


One thing is certain it will be safe and if you can keep it pointing reasonably into the wind you should have reliable furling that is much less affected by the changes in tsr that normally cause trouble.


The larger vane and longer boom will be partly compensated by the large offset but don't let the tail get too heavy for the first try, it is far safer to have to add weight than start off the other way.


Flux

« Last Edit: July 31, 2008, 03:10:20 PM by Flux »

suitep123

  • Jr. Member
  • **
  • Posts: 67
Re: New furling mount
« Reply #2 on: July 31, 2008, 03:49:54 PM »
Thank you so much - so, we have a tail that is roughly 18 front to back x 24 tall - where should we start with the lenth of the tail boom?  Is the 18 x 24 large enough to start, or should we start even bigger than that?  We were talking this morning and my thought was to start with the boom at 5' - does this make sense or am I out to lunch?  The problem is that even if we mounted the motor right up against the yaw pipe, we'd still have a 4 - 4 1/2' offset as the motor as it sits now is only 1/2" off the yaw pipe.  I believe I understood that we needed to compensate for the offset with a larger and longer tail - but how large and how long?  I'll shut up now since it looks to me like I'm starting to sound stupid.  Anyway.....thanks again for the input!  It all really helps!

Pauline
« Last Edit: July 31, 2008, 03:49:54 PM by suitep123 »

windy

  • Full Member
  • ***
  • Posts: 191
  • Country: us
Re: New furling mount
« Reply #3 on: July 31, 2008, 09:04:39 PM »
 Looks like it should all work but I would be a bit nervous using a hose clamp to hold the end of the motor down. I personally would use a steel strap,like an 1/8 inch thick x 1 inch wide strap and pull it up tight with a bolt. I don't think the hose clamp would last very long. Good luck!


windy

« Last Edit: July 31, 2008, 09:04:39 PM by windy »
I don't claim to be an electrical engineer. I just know enough to keep from getting electrocuted.

electronbaby

  • Sr. Member
  • ****
  • Posts: 407
  • Country: us
    • Windsine.org
Re: New furling mount
« Reply #4 on: July 31, 2008, 09:39:20 PM »
My guess would be:


Normally with a 2.5" alternator offset, you would be looking at a tail boom length of roughly half your blade diameter. Flux stated that you might want to start off with a longer tail boom. I would  agree. An important thing to think about is the balance of weight on the yaw bushing. If you are using a heavy prop, and the motor you are using weighs "X" amount of pounds, you can calculate the weight it puts on the yaw bushing (including your offset). You want to try and match this weight with the tail boom and tail. BUT, you have to remember that its not just the weight of the tail boom and tail alone, it is the force acting on the yaw bushing by having the tail hanging off the back of the turbine.


Im not saying you have to match the weight exactly, but the closer you get it, the smoother the furling response will be. Think of it as balancing it on the tower top. You have the alternator and prop in front of the tower, and the long tail boom and tail in the rear.

« Last Edit: July 31, 2008, 09:39:20 PM by electronbaby »
Have Fun!!!  RoyR KB2UHF

suitep123

  • Jr. Member
  • **
  • Posts: 67
Re: New furling mount
« Reply #5 on: July 31, 2008, 10:12:06 PM »
Hey Windy:


You're right - a hose clamp is a bit oakie...but waddya spect from a cattle rancher?


Just kidding....there is a front mount plate that is welded to the two pipes the motor sits on and the motor is mounted to it with 4 5/16" bolts.  Still using the hose clamp to hold the back down, but Bob's looking for a steel strap at work for it now.


Thanks so much for posting....every little bit helps!


Pauline

« Last Edit: July 31, 2008, 10:12:06 PM by suitep123 »

suitep123

  • Jr. Member
  • **
  • Posts: 67
Re: New furling mount
« Reply #6 on: July 31, 2008, 10:45:05 PM »
Hey Roy:


Thank you for posting too!  When we built our non-furling mount, we drilled a 1/8" hole through the yaw pipe about 3/4" from the top, put a piece of welding rod through it, and suspended the entire unit from a cross bar in the garage and balanced it that way.  Would we balance a furling mounted motor and tail the same way?  If that's the case then, hot damn, I think we've got it!  If not, do you, or does anyone else know if the Blade Designer on Ed's windstuff now site will work for helping us to figure out tail size and such?  Would a fish scale from the local Wally World help us out here?  I believe it would be very helpful in determining the weight/pressure where furling would begin, and maybe even use it for weighing and balancing like the way we did with the other mount.


Motor weighs close to 30 pounds and is 6" X 6 1/4" and our blade design is heavy too.  We also made a sliding lead weight for the tail on the non-furling mount.  It even almost worked!  It wasn't quite heavy enough at that point so we leaded the tail pipe instead.


Thank you for your support and even though this is very frustrating at times, it is indeed fun!


Y'all have a great night!

Pauline

« Last Edit: July 31, 2008, 10:45:05 PM by suitep123 »

Flux

  • Super Hero Member Plus
  • *******
  • Posts: 6275
Re: New furling mount
« Reply #7 on: August 01, 2008, 01:35:27 AM »
Your 18 x 24" should be large enough. I would be tempted to make the boom such that the start of the vane is 3ft from the yaw pivot. You will have to play with the weight as you have fixed the hinge angle.


Even if it doesn't face directly into the wind it will work ok. There is not much loss up to 30 deg to the wind direction.


Flux

« Last Edit: August 01, 2008, 01:35:27 AM by Flux »

TomW

  • Super Hero Member Plus
  • *******
  • Posts: 5130
  • Country: us
Re: New furling mount
« Reply #8 on: August 01, 2008, 07:05:02 AM »
Pauline;


You're right - a hose clamp is a bit oakie...but waddya spect from a cattle rancher?


Personally, I find baling wire to be the end all do all for rural "rescue". Everything from lost keepers to busted bones can be helped with a hank of wire and a pliers in a pinch.


Nice progress and thanks for posting.


From the photos the motor shaft looks tiny. Maybe its an illusion? Do consider the forces on the prop shaft. Sure are a lot of "parts" to consider with these things.


Our motor Guru, Zubbly [RIP] passed away awhile back. He introduced a great way to attach a hub to a motor shaft. Here is a link to a photo of the one he built for my mill:


http://www.anotherpower.com/gallery/ZubblyMill2/Zmillhubclose


The prop hub is sandwiched between 2 round plates. The rear one towards motor has a weld on hub to match the shaft size and keyway. Shaft end is bored and tapped for a 3/8 bolt. bolt hub sandwich together, slip hub over shaft and keyway, torgue down the shaft bolt. Properly sized it snugs the shaft end up to the outer hub plate. Now it cannot rotate on the shaft or work off.


Set or grub screws just will not do to keep a prop on. That also shows how Zubbly balanced his props. The "pendulum" arm with weight on it works very well.

« Last Edit: August 01, 2008, 07:05:02 AM by TomW »

suitep123

  • Jr. Member
  • **
  • Posts: 67
Re: New furling mount
« Reply #9 on: August 03, 2008, 10:51:01 PM »
Howdy Flux, and everyone else.  So - balancing these things.....


We simply did what we did last time with the non-furling mount? Attached the blade and tail assemblies and suspended the entire unit from the garage rafter with electric fence wire.  The tail section is 38 inches (a piece of pipe we had in the garage) from center of yaw pivot to end. The tail was a bit light so we added our leaded slide weight we had made for the other mount, and it dialed right in. Sure was easier than the last time we did this! As you can see in the first picture, we put a level on the top of the yaw pipe. Now we need to wind test this unit and hopefully it will furl at 5 amps on a 6 amp motor.  Need to rig the truck to do the test too.......  The second picture shows the weight.


There has been a bunch of theivin' going on at the ranch. We lost a pump a few months ago, and just recently, a horse trailer. Bob has a Krypto disc lock he used on his Harley - what if we omit the top cap washer and use this disc lock?  There's a picture of it below. It will accomplish two things - keep the yaw pipe on the tower, and keep idiots from simply lifting it off and walking away with it.....any thougts? We will have a short tower for a little while til the other one is finished.


We were hoping to get more done, but we have moved an ungodly amount (like 20 ton or so) rock this weekend - it's sleepy time!


Thanks again everyone!  Have a blessed day!

Pauline

« Last Edit: August 03, 2008, 10:51:01 PM by suitep123 »

suitep123

  • Jr. Member
  • **
  • Posts: 67
Re: New furling mount
« Reply #10 on: August 03, 2008, 11:19:39 PM »
Hi Tom:  The motor has a 5/8 inch keyed shaft. We used a Grainger arbor 5/8 inch to 1/2 inch double set screw into the key for mounting the hub. Bob cut the key so the set screws inset into the key.


Then used the 3/8 inch heavy hub off ebay. It's heavy, but the guy's machine work is good.


By the way, baling wire is good too - we use a lot of it.  Baling twine works wonders too - we have to buy mechanics wire (much softer than true baling wire), all our hay is twined now. Another thing that works real well is the electric fence poly tape - we use that for a lot of stuff too.....


Bob read your post and information on how Zubly made your hub. He doesn't quite understand it yet, but we haven't had much time to really read and look at it either. We also are not using wooden blades yet, but this looks like some very interesting information. Thank you for posting it!


Have a great night.

Pauline

« Last Edit: August 03, 2008, 11:19:39 PM by suitep123 »

fungus

  • Sr. Member
  • ****
  • Posts: 448
Re: New furling mount
« Reply #11 on: August 04, 2008, 08:25:12 AM »
Here's a picture of how zubbly did it ..


Basically just that with a bolt coming in from the other side into a threaded hole in the shaft ..
« Last Edit: August 04, 2008, 08:25:12 AM by fungus »

suitep123

  • Jr. Member
  • **
  • Posts: 67
Re: New furling mount
« Reply #12 on: August 05, 2008, 10:59:45 PM »
Local police department ok'd a truck test on a sunday.

In Ca. its illeagle to ride in the back of a truck or to have a mill on the front obstructing the drivers view.

If all works out we will be making a cab over mount setup on our Old 1 ton dump truck that has no accurate speedometer at all, mounting it on the front of the truck would probably be a more accurate wind test if we had a dead calm day and I was a better welder.

 We do have a couple days more of road work at the ranch so were going to try to put in a sun up to sun down saturday to attempt the tests this weekend.

Figuring how to wire the battery, amp guage, battery voltage guage and the dump controller to the unit is going to be quite a challenge for me Being a rookie to all this.


I (we) do appreciate all your help on this project.

Thank you.

Bob

« Last Edit: August 05, 2008, 10:59:45 PM by suitep123 »

suitep123

  • Jr. Member
  • **
  • Posts: 67
Re: New furling mount
« Reply #13 on: August 12, 2008, 11:14:30 PM »
Prelim truck test -----


Adjustable furling mount furled out of the wind at 30 mph and 6 amps with very little adjustments.  It was a windy evening though with some cross winds @ maybe 5 - 7 mph.  Unfortunately, there are VERY few days with less wind than this around here.  Cut in speeds and accurate ground speeds still need to be determined.  More later......


Trying to get the furling system down.


Thanks folks.

Bob and Pauline

« Last Edit: August 12, 2008, 11:14:30 PM by suitep123 »