Author Topic: blade making 101  (Read 1973 times)

0 Members and 1 Guest are viewing this topic.

fanman

  • Jr. Member
  • **
  • Posts: 67
blade making 101
« on: December 22, 2007, 12:25:04 AM »
hello all

fanman here, i had many reguest for a posting on how i make my blades so here it goes, i start out with a blank of wood thats laminated to the approximate size then i cut out the rough shape of the blade.


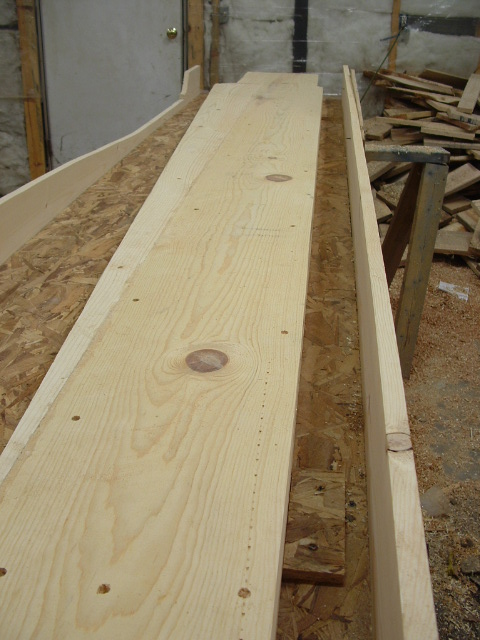
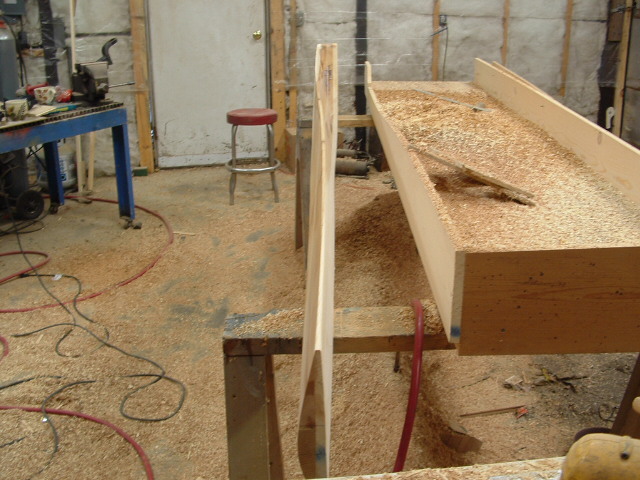
i made up a box to carve the blades in, its a simple box that holds the blank secure. on either side of the box is pine boards that auctually create the twist in the blade, you can see the top or leading edge board is straight and the bottom board or the trailing edge has all the curve of the blade,


this is the router that i use for the carving of the blade,i attached the board as a guide, i set the board across the two pine boards and slide it back and forth and let the bit carve out the wood, it does work really good and fairly quick


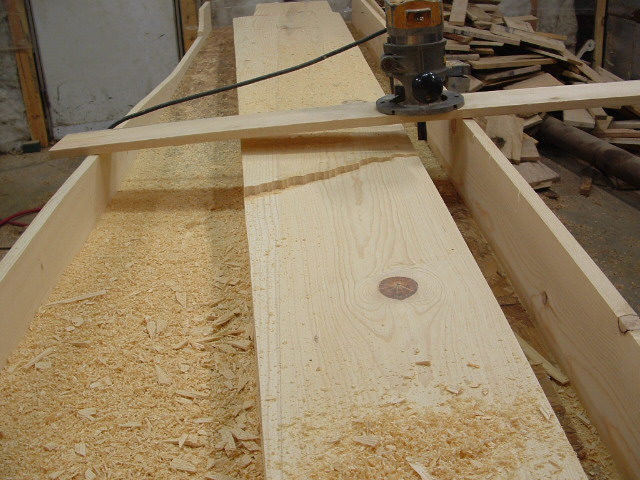
i started to carve this blank as you can see the board onthe router follows the two pine boards and creates the twist in the blade blank, you can see the angle on the face of the blade


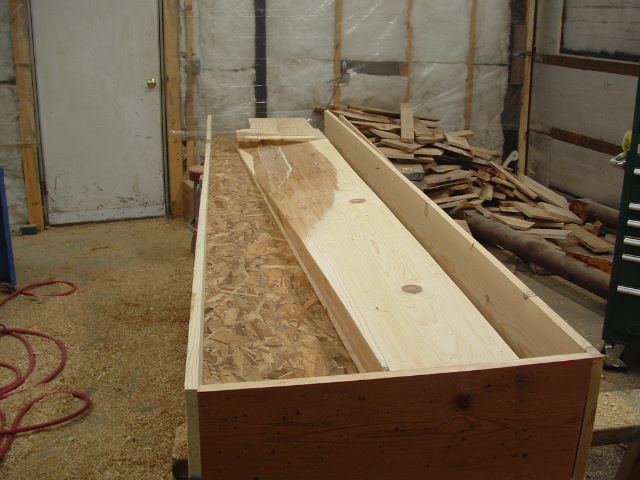
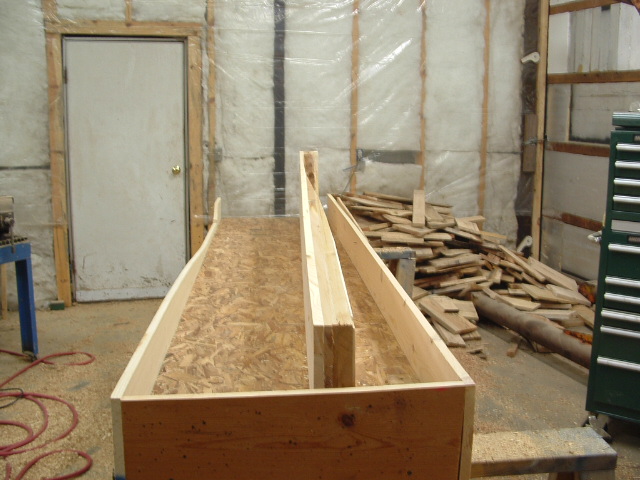
and this is the blade after i carved the back of it, i kind of skipped the carving of the back, i carve the back with a electric hand planer and my belt sander,once i have the thickness i want in this case its 1 1/2 at the tip, then i mark two lines on the back one at 30% and one at 50% and carve to those lines and then round over whats left to make a nice round airfoil shape and thats it see ya

fanman

« Last Edit: December 22, 2007, 12:25:04 AM by (unknown) »

harrie

  • Sr. Member
  • ****
  • Posts: 365
Re: blade making 101
« Reply #1 on: December 21, 2007, 07:26:49 PM »
Nice Post Fanman, I do my blades kind of the same way, by using a skilsaw on the board that holds your router. It also works great, but probley not as safe as the way you do it. Thanks for shareing
« Last Edit: December 21, 2007, 07:26:49 PM by harrie »

strider3700

  • Jr. Member
  • **
  • Posts: 91
Re: blade making 101
« Reply #2 on: December 21, 2007, 09:30:52 PM »
Nice post.  I'll have to try that when I make my first wood set.


For christmas you should ask for a broom ;)

« Last Edit: December 21, 2007, 09:30:52 PM by strider3700 »

methanolcat

  • Full Member
  • ***
  • Posts: 134
  • Country: us
Re: blade making 101
« Reply #3 on: December 21, 2007, 10:36:02 PM »


    Thank you fanman, this one added to hotlist.


A couple questions though.


  1. did you just use trial and error to get the twist right or as you wanted? (tracer board, left side pine board in pic.)


  2. is that blade held in place from back side of box with screws?


Can't wait to see her flying, keep up the good work.


methanolcat

« Last Edit: December 21, 2007, 10:36:02 PM by methanolcat »

jmk

  • Hero Member
  • *****
  • Posts: 603
Re: blade making 101
« Reply #4 on: December 21, 2007, 11:02:37 PM »
 Thanks fanman, That's pretty slick!
« Last Edit: December 21, 2007, 11:02:37 PM by jmk »

Janne

  • Full Member
  • ***
  • Posts: 244
  • Country: fi
  • Turbiini
    • My image gallery
Re: blade making 101
« Reply #5 on: December 22, 2007, 03:11:42 AM »
thanks for posting.. seems like an accurate way to make the twist on the blade. Did you do all the carwing with the router? Propably would be a good idea to make a rough shape first with a chain saw.


Harrie.. did you use the skill saw to cut slots in the blank and then use a chisel to chop of the remaining wood? seems like a good way too, as long as you keep it safe.

The good thing with this method is that it works with many sorts of tools.. routers skillsaws lancelot blades.. you name it.

« Last Edit: December 22, 2007, 03:11:42 AM by Janne »
Nothing's as easy as drilling a hole in the wrong place

fanman

  • Jr. Member
  • **
  • Posts: 67
Re: blade making 101
« Reply #6 on: December 22, 2007, 04:37:14 AM »
morning methanolcat,

i fashioned the blades off of altons wind blade calculater page off the internet, its a very useful page it gives all the angles you need for any tsr that you want to carve, then if your blade box is very level to start with you can simply put the same angle on the trailing edge pine board, so if you were to put your router across the to pine boards you would get the desired angle at that station, make sense? and you can do that for all the stations, but make very sure the box is level or your angles will come out wrong,


and yes the blade is held by screws from underneath the box, i also have a couple stop blocks behind the blade that arent shown in pics, that makes sure each blank goes into the same posistion each time.

« Last Edit: December 22, 2007, 04:37:14 AM by fanman »

Shadow

  • Sr. Member
  • ****
  • Posts: 473
Re: blade making 101
« Reply #7 on: December 22, 2007, 08:39:36 AM »
Very good idea! I'm gonna build one of these, but I'm a slow learner.. I can see the angle on the front pine board but I'm trying to figure out the back one? Is it perfectly level ,then a short piece attached at the far end? Is this for the twist? Or are my eyes seeing things?

        What are the dimensions of the total box? Does the router support board give you pretty accurate depth? I wondered if it would be hard to maintain equal pressure on your router all the time without the board sagging. Wondered if metal channel iron or square tubing would work? Sorry for all the questions but I may as well get it right.  Thanks
« Last Edit: December 22, 2007, 08:39:36 AM by Shadow »

alibro

  • Full Member
  • ***
  • Posts: 102
Re: blade making 101
« Reply #8 on: December 22, 2007, 01:30:20 PM »
Hi Fanman

I spent days making my blades so any idea which might speed up the making of the next set would be very welcome but I have one question. It is not easy toe see from your pics but does your blade not get narrower towards the tips? Mine are about half the width at the tips as the root. If not does this effect the performance in any way?


Cheers

Alibro

« Last Edit: December 22, 2007, 01:30:20 PM by alibro »

fanman

  • Jr. Member
  • **
  • Posts: 67
Re: blade making 101
« Reply #9 on: December 22, 2007, 07:30:53 PM »
hello alibro,

yes the blades are tapered, they are 17" at the root and 9" at the tips, seems like the bigger the blade the less it looks tapered,
« Last Edit: December 22, 2007, 07:30:53 PM by fanman »

fanman

  • Jr. Member
  • **
  • Posts: 67
Re: blade making 101
« Reply #10 on: December 22, 2007, 07:39:29 PM »
hello shadow

the box is 24" wide and 10' 2" long, the back board you are talking about is the leading edge board and it is level, that little extra board on there is not suppose to be there sorry, great observation though, the router board does give a slight bit and could be made stronger, it leaves very small marks in the blade, after im done i sand them all down anyway, so the marks disappear easily  nice talking with ya

fanman
« Last Edit: December 22, 2007, 07:39:29 PM by fanman »

methanolcat

  • Full Member
  • ***
  • Posts: 134
  • Country: us
Re: blade making 101
« Reply #11 on: December 22, 2007, 09:31:26 PM »
   Everything cleared up, I have that blade calculator as well and now understand.

Thank you very much for posting this for us.


     methanolcat

« Last Edit: December 22, 2007, 09:31:26 PM by methanolcat »

harrie

  • Sr. Member
  • ****
  • Posts: 365
Re: blade making 101
« Reply #12 on: December 23, 2007, 01:46:58 PM »
janne. Yes, I cut slots close together with the skill saw and knock the left over out with a hammer and chisel. Of course the box sides cant be used, I just clamp a 2X2 full length of the blade on the leading edge, and clamp a tapered 2 inch wide strip full length on the trailing edge. than both of these strips are cut at the same time as you are cutting the blade. the saw support blade just sits on top of these two strips and moves along as the cut is made.


The height of these strips depends on how thick the blades are. The blades are also screwed to the table like fanman does to hold it in place.


I like the way fanman does it better, because you can use the box sides for all the blades, where my clamped on strips are destroyed when cutting each blade.

« Last Edit: December 23, 2007, 01:46:58 PM by harrie »

elvin1949

  • Hero Member
  • *****
  • Posts: 645
Re: blade making 101
« Reply #13 on: December 26, 2007, 12:21:00 AM »
Thank's Dave

 I added this to my hotlist.Going to need a set of blades shortly.

later

Elvin
« Last Edit: December 26, 2007, 12:21:00 AM by elvin1949 »