Author Topic: Just finished my solar water heater 2 days ago... (Image heavy)  (Read 47518 times)

0 Members and 1 Guest are viewing this topic.

GaryGary

  • Sr. Member
  • ****
  • Posts: 411
    • Build-It-Solar
Re: Just finished my solar water heater 2 days ago... (Image heavy)
« Reply #33 on: May 22, 2011, 01:58:45 PM »
Looking for opinions on flow rate...  It turns out after my testing last night that my 3-speed pump puts out almost exactly 1.5GMP, 1.75GPM and 2.0GPM.  Any suggestions which of the 3 speeds I should run, or what an optimal flow rate for me would be if outside that range?


Hi Jon,
For the thermal efficiency of the collector (within reason), the higher the flow rate the better the efficiency.   The reason is that higher flow rates give a lower temperature rise through the collector, which means a lower absorber temperature, which means less heat loss out the glazing and more efficiency.
You can look at this page and get an idea how much you gain as you go up in flow rate. 
http://www.builditsolar.com/References/ColFlowRate.htm

I think that a sensible cutoff point is up toward 0.07 gpm per sqft of collector.  If you push it up too high, the controller (well maybe not yours:) will have a tendency to short cycle in partly sunny weather because the water coming back is so close in temp to the water leaving -- a lot of controllers will turn the pump off when the difference drops to less than 2F ish.

I did not see the area of your collector, but if its (say), 60 sf, then the 2 gpm would give you 0.033 gpm per sf.  That is not at all high, so I think that would be your best bet.
The pump will use a little more power on the higher speed, but you will more than make up for it in collector efficiency.
From the link above, the collector will gain about (5.7 - 3.5) = 2.2% in heat output going from 0.02 gpm/sf to 0.03 gpm/sf -- this is about (60sf)(0.5efic)(300 BTU/sf-hr)(0.022) = 200 BTU/hr, which is 58 watts -- probably at lot more than the additional pump power usage.

One thing an electrical type like you might tackle is figuring out a way to switch between low and high speed on the fly.  This would let you use low speed for cloudy weather and high speed for sunny weather.  The other big advantage this would have is that some people who have a lot of vertical between tank and collector could start the system on high speed to get the system filled, and then via a time delay relay switch back to lower speed for running.

----------

Saw your mention above on using a bulkhead fitting vs a U-tube.  I have a u-tube on one system and a bulkhead fitting on the other.  They both work.
If I were to do another system, I'd go with the U-tube just to not be punching holes in the liner.  I guess its a personal preference issue, but the nice thing about these drain back systems is that they are pretty bombproof on reliability, and it seems to me that its worth thinking twice about whether its really worth sacrificing reliability.  You want to system to be able to be ignored for 20 years and still keep working when you move on to the next project :)

If you wanted to put some numbers on what stratification actually gains you in efficiency (by being able to have the collector work at lower temps), you can use this calculator to develop some actual numbers:
http://www.builditsolar.com/References/Calculators/Collector/ColEfic.htm
Pick the Heliodyne Gobi black paint collector, enter your estimated absorber temp w/o strat and calc efic, then do the same for with strat and see how much of an effic gain you get.  It looks to me like a 5F drop in average absorber temp is worth about a 1.7% gain in collector efficiency under typical conditions.


------------
You mentioned cutting your tank temperature drop in half overnight with the reflective layer on the outside -- that is really good.
Could keep us posted on how that holds up over a few more nights?  I'm about ready to get my roll of tinfoil out :)


Gary


jondecker76

  • Full Member
  • ***
  • Posts: 100
Re: Just finished my solar water heater 2 days ago... (Image heavy)
« Reply #34 on: May 22, 2011, 02:10:59 PM »
My suction is in the lower right-rear corner of the tank (when looking from the front)
The return is in the upper left-front corner of the tank.
I'm thinking that I could be seeing more stratification than normal in my tank for a couple reasons.   One being that my tank design in a bit taller than most others that I have seen of this style.  Also,  I think the fact that my PEX coil is in 2 almost perfect concentric rings running the entire top 2/3 of the tank and may be helping to keep things from mixing as well.

I piped it like this to purposely try to agitate the tank, but now I'm having second thoughts.

At a minimum, I'd like to insulate the pump suction line inside the tank to keep the cooler water from picking up heat to increase my efficiency.  While I agree that economics of a DIY system are more important than efficiency, in my case where the tank is oversized for my collector, trying to cheaply increase my efficiency would be cheaper than rebuilding a part of the system to improve my performance. For this reason, I do want to do some experiments with stratification and actually see what kind of increase I get.  A gain of 10%15% would be huge in my situation!

Regarding freezing, this won't be an issue for me really, because I do not plan on running the system in the winter.   I live right off the great lakes, and we get lake effect snow all winter - I can count on one hand how many clear and sunny days we had this last winter (though this winter was worse than most, I'd say an average winter might yield 20 sunny days here). Though if I do pipe my return into the tank (through a stratifying tube for example), I do have a plan on a failsafe venting system.  Picture the return line entering the top of the tank level.  I was going to experiment with putting a T in this line, where the perpendicular part of the T points up, and has a very light check valve installed which holds closed from the pressure from the pump while its on, but allows air to vent back into the system once the pump shuts off.  If I couple a passive backup like this with a solenoid vent at the panel, I may just find that its enough protection to justify taking the risk - but then again,  it would have to be an unusual winter here for me to start the system back up.

Right now my bigger focus is devising a good, accurate way to measure output. That way, when I do experiment, I will have figures to make a good comparison.  I have high hopes for the energy monitor programming I wrote, it should be much more accurate than the standard way of computing it.
« Last Edit: May 22, 2011, 02:30:33 PM by jondecker76 »

jondecker76

  • Full Member
  • ***
  • Posts: 100
Re: Just finished my solar water heater 2 days ago... (Image heavy)
« Reply #35 on: May 22, 2011, 02:25:35 PM »
(replying to Gary's 2nd post)


Re: switching pump speeds
A future plan of mine for the controller is implementing phase-angle firing for the pump.  This would allow excellent control of the pump speed from about 25%-100% of its range (on an AC pump of course).  I'm sure the flow characteristics wouldn't be linear, but I'm sure there would be a way to fine-tune things...

Thanks for the links - I'm going to check them out and see what kind of numbers I can get

I just adjusted my pump to the highest speed per your advice,  my temperature rise didn't change much as a result (less than a full degree drop).  Doing some quick math, if I can sustain 2GPM with a 7 degree rise for 8 hours a day,  I should theoretically be able to capture about 63000BTU per day if I get the right conditions (though in the real world I see me capping out more towards 55000BTU). With a 66 sqft collector,  I'd be pulling about 105-120BTU per hour per square foot of collector.  I wonder how this compares to other installations?

On a good note, the sun magically appeared today at about 1:00 after raining all morning, and because of the small change I made last night, my incoming temperature is measuring about 3 degrees higher than it was (I'm now showing a 10 degree temperature rise instead of 7).
« Last Edit: May 22, 2011, 02:43:45 PM by jondecker76 »

jarrod9155

  • Sr. Member
  • ****
  • Posts: 289
Re: Just finished my solar water heater 2 days ago... (Image heavy)
« Reply #36 on: May 22, 2011, 07:11:58 PM »
You talk about shutting the system off in the winter , I don't think that's a good idea my system so far has perform the same if not better in the winter . Its seems there is more clear sky's for me . And I'm in Maine so I also had to contend with snow but nothing abroom and snow paints couldn't fix  I find the little labor well worth the money it saved me on electricity .

Drain back 110 square feet of collector .

jondecker76

  • Full Member
  • ***
  • Posts: 100
Re: Just finished my solar water heater 2 days ago... (Image heavy)
« Reply #37 on: May 22, 2011, 10:10:21 PM »
Jarrod

I'm still considering not running it in the winter. I understand that these systems work in cold temperatures, and in snow. But my situation is different.  In the snow belt (about 20 miles south of Lake Erie), we only get between 5 and 20 days with any sunshine at all during the winter months, all other days are under incredibly thick cloud cover where the system will do me no good.  I paid very close attention this last winter (as I knew I would be getting this system online)  That, and I run a serpentine collector, where most people have parallel riser collectors.   My collector drains back ok, but nowhere near as well as the parallel designs!

Of course, I would keep it online in the winter IF we got enough sun to make it worth the risk of freezing my collector, or if we had a year with above average sunny days, but its been pretty rare anymore to get winters here with a lot of sun.

ghurd

  • Super Hero Member Plus
  • *******
  • Posts: 8059
Re: Just finished my solar water heater 2 days ago... (Image heavy)
« Reply #38 on: May 23, 2011, 02:47:57 AM »
Stirring and stratification.

Seems like minimizing the stirring at the end of the return pipe would solve most issues (if they exist), and stirring would be caused by velocity.
What if you put a 3/4 male on the pipe, 3/4 male to 4" PVC adaptor on it, then nylon window screen over the 4" PVC end?  Sort of a giant faucet areator.
Might help if there was a screen half way down in the 4" section too.

The flow would be slow and spread out, allowing it to rise or fall without a lot of stirring disturbance in the tank?

Couple days ago, I was going to say something about the the extra pipe run to waste heat being in the house in winter.  A couple days of good sun may have the surplus heat available.
G-
www.ghurd.info<<<-----Information on my Controller

jondecker76

  • Full Member
  • ***
  • Posts: 100
Re: Just finished my solar water heater 2 days ago... (Image heavy)
« Reply #39 on: May 23, 2011, 10:35:47 AM »
Ghurd -   I'm with you,  I just started working on an incredible idea that came to me out of nowhere last night.  It will allow full venting and drainback of the system while allowing me to return water towards the center of the tank through an increased sized opening to slow the velocity (if it works) - all with no moving parts of points of failure.  I may get it done today before going to work tonight, I hope to get to test the idea...

jondecker76

  • Full Member
  • ***
  • Posts: 100
Re: Just finished my solar water heater 2 days ago... (Image heavy)
« Reply #40 on: May 23, 2011, 06:38:51 PM »
Had a really good day today with some stuff.
It was cloudy most of the day, but late in the afternoon I got some good sun for a couple hours.

I uploaded the latest controller changes and the energy monitor is now up and running, and early impressions are really good!  The energy monitor calculated within a couple hundred BTU what my manual calculation showed (manual calculation was just tank_delta_T * 240(gallons) * 8.33).  A few weeks of testing should show it working in a range of weather conditions and I plan on comparing accuracies each day.  Another plus for having an onboard energy monitor, is that you can take showers, etc without affecting your calculation.


I also have my collector return going into my tank about half way up the water level - thats right, its no longer returning into vapor space!  At the end of my return pipe, I have a bit of a diffuser to slow the velocity of the incoming water to help me keep stratification in the tank. Currently, the "diffuser" is nothing more than a 1"x1/2"x1" T fitting.  Going from 1/2" to 1" should slow things down, along with the fact that it now splits into 2 directions.  Once I can get my hands on some 1" copper pipe scraps, I plan on adding a 1"x1 1/2" step-up (so its kind of like having a cone on each side of the diffuser T).  Here is what I have currently though for now:


And finally, Gary's comment was right that if you are running a drainback system, you need it to work without fancy gadgets or added points of failure.  I had an idea hit me last night, so I decided to try it out today....


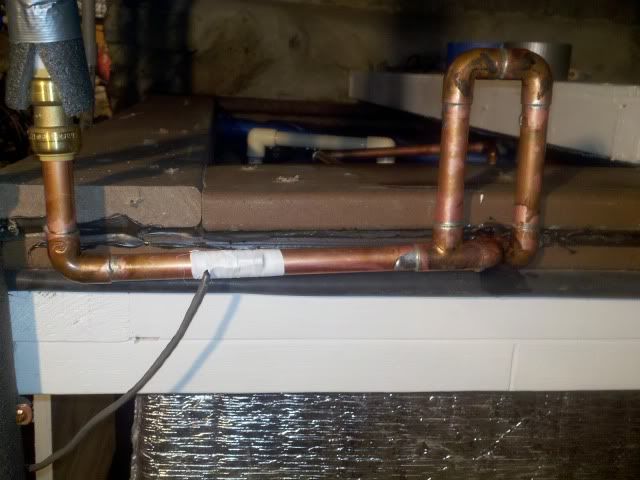
Here, you can see that I put a T in the return line(which now goes into water space about half way up the tank), and went upwards off this T to create a vertical stand pipe, then back down into the vapor space of the tank.  What should happen is that when the pump comes on and water comes down the return line, it will climb up this standpipe a bit until the initial surge needed to start pumping down into the tank is overcome, at which time the water level in the standpipe drops back down to the bottom. When the pump shuts off, air is pulled backwards through the standpipe from the vapor space of the tank, and drainback happens as it normally would. The best of both worlds!


here you can see in the tank where the return line goes down into the water, and just on the other side of it where it enters the sidewall, you can see the other end of the standpipe that goes into vapor space... (the other pipe you see entering the water around the center of the tank is just a dry well that a temperature probe sits in)


How did it work?  NOT SO WELL! (initially)
When the pump ran, water would rise up and around the bend in the standpipe, and enter the tank in vaporspace.  However, if I covered the end of the pipe just for a brief second, the return water would start pumping down into the tank as it should, even after my finger was removed... So it was obvious what to do at this point....   Build a taller standpipe to overcome the initial surge needed to get the water pumping into the center of the tank...  I had about 18" to work with,  so I was hoping it would be enough!


Here, you can see how I extended the standpipe, which was now about 18" tall.  Upon pump start,  the returning water would initially rise about 1/2 way up the standpipe (I could tell by feeling where it went from warm to cold), and almost instantly dropped back down to the bottom of the standpipe - it worked!  Water now pumps into the tank at the level I want it to, and I didn't sacrifice drainback reliability!

I only had a few hours of sun today, so its too early to tell how much this will help keep stratification in my tank.  But I will keep you posted!


« Last Edit: May 23, 2011, 06:41:05 PM by jondecker76 »

jondecker76

  • Full Member
  • ***
  • Posts: 100
Re: Just finished my solar water heater 2 days ago... (Image heavy)
« Reply #41 on: May 23, 2011, 09:09:55 PM »
just ordered some DS18B20 1-wire temperature sensors.

With the energy monitor now in place on the controller, accurate readings are much more important.  The LM-35 temperature sensors aren't bad, but they take up a lot of the I/O on the arduino board, plus I have to deal with calibration issues, arduino analog multiplexing issues and voltage drop issues on longer runs.  Switching to DS18B20's will address all of these problems, and they're not much more expensive. (though they are much harder to write programming for!)

Now to figure out what I can do with the I/O that will be freed up on the arduino?
« Last Edit: May 23, 2011, 09:12:08 PM by jondecker76 »

rossw

  • Hero Member
  • *****
  • Posts: 834
  • Country: au
Re: Just finished my solar water heater 2 days ago... (Image heavy)
« Reply #42 on: May 23, 2011, 11:10:07 PM »
just ordered some DS18B20 1-wire temperature sensors.

With the energy monitor now in place on the controller, accurate readings are much more important.  The LM-35 temperature sensors aren't bad, but they take up a lot of the I/O on the arduino board, plus I have to deal with calibration issues, arduino analog multiplexing issues and voltage drop issues on longer runs.  Switching to DS18B20's will address all of these problems, and they're not much more expensive. (though they are much harder to write programming for!)

I'm sure you too will be very happy with them once you get the code written!

Couple of suggestions, if I might.
1. Don't take the "easy way" out and run one device per port. Take the extra time, code to address individual devices on the bus. Yes, it's more work, but it means one I/O pin only, and one cable to manage.

2. Go for the full 12-bit conversions. It doesn't take any more code, and not much more time per sample, but you get much more precision.

3. Once you have all your sensors running, label each ones cable so you know which one is which later. Use waterproof markers.

4. Once you have all the code done, clip each sensor to a copper bar or pipe offcut. Put the whole lot in an insulated box and let them stand for an hour. Take readings from each and provide a fine-tune offset for each sensor. Regardless of *accuracy*, making sure each reads the same temperature will help you no end later when you start doing stuf on differential temperatures. You won't thank me now - but you will later :)

5. You can buy the chips quite cheaply (around $2), but I've been buying them as complete sensor assemblies - cable, connector, sensor epoxied into a stainless steel tube - for only a few dollars more. It makes them vastly more convenient, waterproof, robust and professional-looking - at a price you can't match at home even if you exclude your time.

rossw

  • Hero Member
  • *****
  • Posts: 834
  • Country: au
Re: Just finished my solar water heater 2 days ago... (Image heavy)
« Reply #43 on: May 24, 2011, 12:40:03 AM »
Thought I saw someone suggesting just sticking the hot return at the bottom and letting it "float up" - can't see the post now quickly, however here's some "hard data"

This shows the heat exchanger at the bottom of the tank (tank is 2.5m or 8 feet tall). Scale is 20 deg C to 80 deg C, so water is entering at 70C and returning at around 52C, at a flow rate of 18 litres/minute. (Heat is split across two heat exchangers in two tanks)
" alt="" class="bbc_img" />

around 7 feet above this, I'm measuring the temperature of the tank - which takes a LONG time to start to respond:
" alt="" class="bbc_img" />

You can see, not withstanding a substantial heat input to the tank, it took an hour before the top of the tank even started to rise in temperature. The entire tank however is now warmer, so the total energy has gone to some use. Part way through the generator run, the tank temperature got high enough that the system started pumping water through the floor - most clearly visible looking at the return temperature from the hydronics. (It's measured close to the tank, so when the pump isn't running, it "floats" to the temperature of the tank at that height)
" alt="" class="bbc_img" />

Here's the interesting thing... around 11:30 the sun came out and I started getting water from the solar collector. It was only at 63 deg C, and the flow rate was only a few litres/minute, but look at the (highlighted) area showing how quickly the tank temperature rises when the heat is added close to the top of the tank (2/3 up the tank)
" alt="" class="bbc_img" />

« Last Edit: February 06, 2018, 01:09:56 PM by JW »

frackers

  • Sr. Member
  • ****
  • Posts: 435
  • Country: nz
  • Picard spits "Hello"
Re: Just finished my solar water heater 2 days ago... (Image heavy)
« Reply #44 on: May 24, 2011, 12:45:05 AM »
just ordered some DS18B20 1-wire temperature sensors.

With the energy monitor now in place on the controller, accurate readings are much more important.  The LM-35 temperature sensors aren't bad, but they take up a lot of the I/O on the arduino board, plus I have to deal with calibration issues, arduino analog multiplexing issues and voltage drop issues on longer runs.  Switching to DS18B20's will address all of these problems, and they're not much more expensive. (though they are much harder to write programming for!)

Now to figure out what I can do with the I/O that will be freed up on the arduino?

I found it of great advantage to put one 1-wire device per I/O line on my tunnel house window opener as I then don't have to address each device individually or keep a record of which device is which when I try to address them. I know from which port pin exactly which device I'm talking to. I'm using 3x DS18B20 and 2x DS2413 GPIO so using 5 I/O lines but /much/ simpler code on my AVR Butterfly based project!!
Robin Down Under (Or Are You Up Over)

rossw

  • Hero Member
  • *****
  • Posts: 834
  • Country: au
Re: Just finished my solar water heater 2 days ago... (Image heavy)
« Reply #45 on: May 24, 2011, 12:57:22 AM »
I found it of great advantage to put one 1-wire device per I/O line on my tunnel house window opener as I then don't have to address each device individually or keep a record of which device is which when I try to address them. I know from which port pin exactly which device I'm talking to. I'm using 3x DS18B20 and 2x DS2413 GPIO so using 5 I/O lines

You're quite right, the code is easier, and following one sensor to one pin is straightforward. However a bus allows you to (easily) expand sensors without dicking with the hardware again and (ultimately) running out of I/O pins. It's also handy when (like me) you want 4 or 6 sensors in one cluster about 30 feet away through a concrete slab, then another dozen sensors in a cluster, then a few more 40 or 50 feet away in a different direction!

It's horses for courses - but I've been watching this project, it's growing. Its like many of my own. You do something "straightforward", then find you'd like to quantify what you've got, and get some data, then it grows a bit more, and then more, and morphs into something you wouldn't have started if you'd known how it was going to end! I see a kindered spirit - who will be frustrated with only being able to get the same number of sensors he has now when he'd *really* like to add:
 * outside ambient temperature
 * temperature at the inlet and outlet of the collector itself (to measure losses in the flow and return pipes)
 * inside ambient temperature
 * DHW temperature
 * cold water into the DHW heater
 * a string of sensors every 2" to drop into the tank to measure and understand water stratification
etc etc!!

frackers

  • Sr. Member
  • ****
  • Posts: 435
  • Country: nz
  • Picard spits "Hello"
Re: Just finished my solar water heater 2 days ago... (Image heavy)
« Reply #46 on: May 24, 2011, 05:28:56 AM »

You're quite right, the code is easier, and following one sensor to one pin is straightforward. However a bus allows you to (easily) expand sensors without dicking with the hardware again and (ultimately) running out of I/O pins. It's also handy when (like me) you want 4 or 6 sensors in one cluster about 30 feet away through a concrete slab, then another dozen sensors in a cluster, then a few more 40 or 50 feet away in a different direction!


Oh absolutely - my irrigation project uses 19 1-wire chips in total and the wind turbine controller has 2 and I'm using them all on a single bus in both cases. I wouldn't recommend using just a bare I/O port to drive more than 2-3 but use a proper 1-wire bus master (such as the DS2482-100 or the DS2480B) otherwise you'll get yourself in all sorts of problems. Also, remember to keep them as a string, /not/ star connected, otherwise again you'll get problems, especially on long wire runs!!

You'll know what I mean when you start getting 85C temperature readings from the DS18x20 series sensors :)
Robin Down Under (Or Are You Up Over)

jondecker76

  • Full Member
  • ***
  • Posts: 100
Re: Just finished my solar water heater 2 days ago... (Image heavy)
« Reply #47 on: May 24, 2011, 11:44:48 AM »
frackers

Why do you recommend only 2-3 sensors per string, and why use a dedicated master?  I've never used the DS18B20, so what kind of problems will it cause and why?


thanks!

jondecker76

  • Full Member
  • ***
  • Posts: 100
Re: Just finished my solar water heater 2 days ago... (Image heavy)
« Reply #48 on: May 24, 2011, 01:39:07 PM »
Things are looking great today - the new piping definitely helps stratification,  there is a much bigger difference in the temperature of the top and bottom of the tank.  Of course, this piping as a bit temporary until I built a 4 port stratification tube!

Uploaded a lot of changes to the controller today.  Reformatted the UI so that you can get more information in a glance.  Got my first implementation of an abstracted temperature system that supports Celsius, fahrenheit and Kelvin - so the controller will be able to run in all 3 of these modes seamlessly.  Things are looking good!

jondecker76

  • Full Member
  • ***
  • Posts: 100
Re: Just finished my solar water heater 2 days ago... (Image heavy)
« Reply #49 on: May 24, 2011, 03:35:36 PM »

here is a quick overview of the new UI screen - it displays all the info you really need in one glance (before, i was rotating between 6 different screens once per second, and it took too long to loop around if there was a temperature that you really wanted to see)

Theres only an hour and a half of collection left today. Before the piping changes, by this time in the day my tank outlet temperature (O: on the display) was just 2-3 degrees below my tank temperature (T: on the display) because it was stirred up pretty good from the pump running all day.

But look now, it shows the tank outlet temperature 9 degrees below the tank temperature - and this was after a full day of running. Early in the day, it was over 15 degrees different.  I think once I make the stratification tube, I'll see even better results!

Madscientist267

  • Hero Member
  • *****
  • Posts: 1181
  • Country: us
  • Uh oh. Now what have I done?
Re: Just finished my solar water heater 2 days ago... (Image heavy)
« Reply #50 on: May 24, 2011, 05:41:48 PM »
Jon -

Something else you might try for the return diffuser, and it might allow you to keep the vapor space return functionality (at least I *think* that's what you wanted, right?) :)

A disk, something similar to a shallow frying pan comes to mind, placed in the center at the top of the tank. The return water fills the disk (or pan), and then proceeds to run over the sides. The result is full flow with much lower velocity water merging with the existing water in the tank, minimizing disturbance of the stratification.

Think in terms of washing a frying pan. Holding it in the sink with the faucet on full, if the pan is held level, the water will evenly be distributed around the outside edge, and the turbulent flow will be diffused into calmly flowing water over the edges of the pan.

Did a quick google images search, didn't come up with anything, and that's the best I can describe it on short order... ;)

Make sense?

Steve
The size of the project matters not.
How much magic smoke it contains does !

frackers

  • Sr. Member
  • ****
  • Posts: 435
  • Country: nz
  • Picard spits "Hello"
Re: Just finished my solar water heater 2 days ago... (Image heavy)
« Reply #51 on: May 24, 2011, 07:32:25 PM »
frackers

Why do you recommend only 2-3 sensors per string, and why use a dedicated master?  I've never used the DS18B20, so what kind of problems will it cause and why?


thanks!

The 1-wire bus requires an active pull-up - some micros can't source enough current to meet the slew rate timing constraints of the protocol once the capacitance of long cable runs and parasitic power supply storage capacitors take their toll. The Maxim website has an example of an active pullup using a FET to improve slew rate control on the bus. http://www.maxim-ic.com/app-notes/index.mvp/id/148.

The error reading of 85C is a result of a power loss during the temperature conversion due to bad parasitic power. The temperature register defaults to 0x0550 at power up so thats the reading you get even though the device is spec'ed from -55 to +125. This value represents 85C. For this reason I'd /highly/ recommend putting a +5v supply to all the sensors. It also means you can poll then to see if they have finished their conversion which means you can take readings faster (i.e. start all sensors converting, poll round each in turn, when complete get reading and start conversion again)!
Robin Down Under (Or Are You Up Over)

rossw

  • Hero Member
  • *****
  • Posts: 834
  • Country: au
Re: Just finished my solar water heater 2 days ago... (Image heavy)
« Reply #52 on: May 25, 2011, 04:34:17 AM »
The 1-wire bus requires an active pull-up - some micros can't source enough current to meet the slew rate timing constraints of the protocol once the capacitance of long cable runs and parasitic power supply storage capacitors take their toll.

Easy: run the sensors on a 3-wire bus. Gnd, + and signal. They'll operate from 3.0 to 5.5V, and in that mode are much less fussy. I've got busses with 20 devices, 100' of cable and no problems.
[/quote]

jondecker76

  • Full Member
  • ***
  • Posts: 100
Re: Just finished my solar water heater 2 days ago... (Image heavy)
« Reply #53 on: May 25, 2011, 05:01:32 AM »
yes, I already planned on running a 3-wire bus so all should be good. (in fact, all the wiring is in place because although analog, the LM35 sensors need a +, - and a line for the signal return). I also plan on writing a "wizard" for installing the sensors... Poll for all sensors, and compare to last poll... Got a new one?  Great, prompt the user to select which one it is (tank temperature, collector temperature, etc..).....  Should make setting them up much less painful

jondecker76

  • Full Member
  • ***
  • Posts: 100
Re: Just finished my solar water heater 2 days ago... (Image heavy)
« Reply #54 on: May 25, 2011, 02:43:11 PM »
Having a great collection day today - the sun hasn't been perfect all day, but a great example of some light cloud cover.

Temperature losses overnight continue to be surprisingly low - 1-2 degrees, even now that I'm getting into some higher storage temperatures.

The controller's energy monitor has been spot with its accuracy! Surprisingly, doing a manual calculation on the tanks top temperature almost always comes within 2000 BTU or so (the energy monitor is always slightly higher than the manual calculation, though A) I don't include decimals in my manual calculation and B) the energy monitor can account for some low grade heat that never makes it to the top of the tank).  This means I can very accurately track what kind of effect future changes have, and I also don't have to worry about domestic hot water usage messing up my results while doing experiments (the energy monitor tracks temperature rise of tank outgoing and incoming water while the pump is running, and uses an adjustable setpoint for flowrate of the pump).


Lastly, I have a pretty good idea of how I want the finalized controller to look. I really want this controller to be the standard when it comes to DIY DHW systems like this.  It will be cheap, easily built and modified by other DIYers, and be the most feature packed controller you can find for this type of system.  The current prototype supports:
-Onboard energy monitor
-Over 15 user definable setpoints
- Fahrenheit, Celsius and Kelvin temperature scales
- "Remote" relay - can be used for active blowback options, and also as a status indicator for other systems (relay open=tank temperature below max setpoint, closed = tank temperature above max setpoint) This allows you to let another system (like a wind generator powering heating elements in the same tank) to work with the controller.

Future improvements that I'm trying for:
- Upgrade to a 4 line x 20 character LCD (instead of the current 2 line x 16 character lcd)
- I have a unique idea for a "control panel".  I've been looking for cheap options for the DIY crowd, but membrane switch panels and keypad panels are pretty expensive and take up a lot of I/O on the board. Then I came up with this idea....  I'm going to put a Nintendo NES controller plug on the board. Old nintendo controllers and new aftermarket ones can be had all day long on ebay and even garage sales for $5 and less.  They have 8 multiplexed buttons, so it will only take up 3 I/O ports on the board.  They are already laid out for easy navigation (up down left and right arrows for example) Plus the idea of a tethered control pad (that can also be unplugged and removed so noone messes with your setpoints) just seems cool to me.  Any thoughts on this?
-Optional ethernet/SD card daughterboard (this is a standard Arduino shield - they cost $35-$50) can be plugged in (optional). This allows remote control and monitoring over your home network and the Internet, as well as built-in datalogging to an SD card, or to a mysql server on your home network.

The cost breakdown I'm looking for is something like:
$35 - Arduino
$5   - NES controller
$15 - 20x4 LCD
$25 - DIY board kit
-------
$80

add an arduino ethernet shield for $50, and you got an incredible controller for about $130 that does more than just about anything you can find on the market!

jondecker76

  • Full Member
  • ***
  • Posts: 100
Re: Just finished my solar water heater 2 days ago... (Image heavy)
« Reply #55 on: May 25, 2011, 08:19:44 PM »
More features to look into adding to the controller:

-Variable speed pump control via phase angle firing
-If the ethernet module is installed, use weather forcast data to optimize system. For example, if the next day is to be sunny, and the tank is at full temp, turn on radiant heat loops to make maxim use of collected heat (these types of scenarios can be endless if you have several RE projects).

Madscientist267

  • Hero Member
  • *****
  • Posts: 1181
  • Country: us
  • Uh oh. Now what have I done?
Re: Just finished my solar water heater 2 days ago... (Image heavy)
« Reply #56 on: May 26, 2011, 02:40:04 PM »
Sounds like you and I both have at least one more thing in common...

"Feature Creep"

You know, when something starts out as just monitoring one probe and controlling one relay?

A couple weeks later, you can't fit the schematic on a single piece of paper (or 5) anymore, the code is pushing the limits of your development environment, and there is AT LEAST one input that goes nowhere (even though you KNEW at one point you just had to include it!)

LOL  ;D

Keep it up! I might just buy one when it's "complete"...  :P

Steve
The size of the project matters not.
How much magic smoke it contains does !

jondecker76

  • Full Member
  • ***
  • Posts: 100
Re: Just finished my solar water heater 2 days ago... (Image heavy)
« Reply #57 on: May 29, 2011, 11:50:05 AM »
Yeah,  I can't help myself on projects like this - the more features the better!

The weather has been overcast for the last few days here - only been collecting between 10,000 and 20,000 BTU per day (which has been just below our average usage). Still, the good thing is that the Energy Monitor calculations have seen varying conditions and has been calculating BTU collection completely reliably. Today looks like it will be better than the last few days, with a good stretch of sunshine starting tomorrow, so I'll finally get to see some higher temperatures! (the highest we've seen yet is 118 degrees)


I'm going to order another arduino board so that I have a separate one for development (I've only been able to work on programming changes at night so that I don't miss out on any collection).  I've been testing the temperature conversion code and found some room for improvement, so I'll be focusing on that 100% until its where it needs to be - as its the most important feature that will allow anyone to use the board in their own temperature scale - then I need to follow up with all the flowrate conversion (GPM, LPM) stuff and test it out.  Aside from that, upgrading to the 4 line LCD screen and Nintendo controller for input are very minor programming changes.

jondecker76

  • Full Member
  • ***
  • Posts: 100
Re: Just finished my solar water heater 2 days ago... (Image heavy)
« Reply #58 on: May 30, 2011, 01:15:10 PM »
I'm finally getting a good, sunny day to see this thing in action. Just now at solar noon, I have collected almost 25,000btu, and have seen instantaneous production peak out at 8400btu/hr - thats equivalent to 2.46 KW output! To put up a solar electric system capable of this same output would have cost up to 10x what it cost to build this solar water heater - it really puts into perspective just how affordable these DIY solar hot water systems are! (Also keep in mind that my 235 gallons of water storage can store water at 160 degrees, so it can store 205,000 BTU of energy, or about 60 KWH worth, imagine the battery bank you would need for this equivalent, plus the time cost and risk of proper battery maintenance)

One thing that I have noticed, is that for a while, I was fretting every time I saw my storage tank temperature dropping.  After a while, that went away after I realized that the drop in temperature only means that I'm actually using the energy I collected (vs wasting off into atmosphere through the insulated tank).  I do however want to see me get into some higher temperature ranges though (my current high has been 118 degrees, because of our very cloudy weather this month)  - for several reasons:
-I want to see what my heat loss per night is at higher temperatures
-I want to keep my water clean and bacteria/fungus free
-I want to have a few days of storage above 120 degrees (which is what my electric water heater is set at)

On the controller front, i've been testing a simple circuit to detect the mains zero-crossing for phase angle timing and everything is looking really good for variable speed AC pump speed control

« Last Edit: May 30, 2011, 01:58:25 PM by jondecker76 »

jondecker76

  • Full Member
  • ***
  • Posts: 100
Re: Just finished my solar water heater 2 days ago... (Image heavy)
« Reply #59 on: May 30, 2011, 04:05:48 PM »
Wow, just did the quick math on what kind of battery bank it would take to store the same 60KWH that my 240 galloon tank can store (160 degrees max - 55 degree@well = 105 degree difference * 240 * 8.33 = 205,000+btu = 60KWH)!  It would take 45 T105 trojan deep cycle batteries (225AH @ 6v - $150+ each), and thats if they were discharged completely (add to that, that I can "discharge" my tanks full capacity indefinitely with little to no maintenance).  Solar hot water, and solar heating should be the first thing on anyone's list getting into RE (in my opinion) - followed by some DIY wind designs. Its very hard to beat the payback of DIY systems, especially solar thermal systems due to the very low maintenance.  I can't wait to get a turbine flying, as its next on my list :)

Ungrounded Lightning Rod

  • SuperHero Member
  • ******
  • Posts: 2865
Re: Just finished my solar water heater 2 days ago... (Image heavy)
« Reply #60 on: May 30, 2011, 08:26:13 PM »
JarrodIn the snow belt (about 20 miles south of Lake Erie), we only get between 5 and 20 days with any sunshine at all during the winter months, all other days are under incredibly thick cloud cover where the system will do me no good. 

Got family in that area.  Yeah, it's thick all right.

But some infrared gets through even thick clouds.  Come the depth of winter check out the temperature of your sensor inside the collector.  You might find there's still enough collected heat to be worth going after.  (Assuming this house is occupied and heated in the winter.)

If so, your use of a programmable controller gives you a bonus:  You can also program it to start the pump if the collector is getting near freezing (for instance, at night) while the tank is still warm, to actively heat the collector and avoid a freezup, at a small cost to your stored heat or alternative heating system.  Also, heating the collector after a storm might melt stuck-on snow just enough for it to slide off.

jondecker76

  • Full Member
  • ***
  • Posts: 100
Re: Just finished my solar water heater 2 days ago... (Image heavy)
« Reply #61 on: May 30, 2011, 09:25:15 PM »
UndergroundLightningRod:
Those are all excellent points that I hadn't considered!  I'll be sure to take the advice, and try to be more aware of these kinds of opportunities!


On a side note,  I brought my 235 gallons up 26 degrees f today, collecting about 52000BTU  (about 15KWH!) worth of energy. This is just around where I thought it would peg out (just shy actually, but there may be better days ahead that will get me to the 55,000 that I'd really like to see on a perfect day), and I'm very happy with that!  I'm anxiously awaiting the day that I can max the tank out at 160!

ghurd

  • Super Hero Member Plus
  • *******
  • Posts: 8059
Re: Just finished my solar water heater 2 days ago... (Image heavy)
« Reply #62 on: May 31, 2011, 12:31:52 AM »
~100 square feet?
Would like to guesstimate the recent few days BTU/Sq ft.
I am tinkering with something semi-similar, though exponentially smaller (I am measuring in sq inches  :-\), and our zip codes must be pretty close to each other.
G-
www.ghurd.info<<<-----Information on my Controller

jondecker76

  • Full Member
  • ***
  • Posts: 100
Re: Just finished my solar water heater 2 days ago... (Image heavy)
« Reply #63 on: May 31, 2011, 06:05:23 AM »
ghurd:

I'm at right about 65 sq. ft. of collector area.  My collector is biased by about 10 degrees for better fall/winter/spring collection, so right now the panel is pretty far from being perpendicular to the sun's rays - you'll have to keep this in mind for my calculations. (the max power available is about 320 BTU/hr per sq. ft on a perfect day with the collector perfectly parallel to the suns rays)

With yesterday being a great example of a sunny day, my numbers break down to:
Max Outupt: 8400 btu/hr / 65 = 129 btu/hr  per sqFt.
average output: 52000 btu / 7.5 hours = 6933 btu/hr    / 65 = 106 btu/hr per sqFt.

My best early estimates are showing that my collector is somewhere around 40% efficient (129 btu/hr measured / 320btu/hr = 40%) - and I'm not even perpendicular to the sun's rays, so it may even be a few percent higher. I've also seen other home built systems in this same efficiency range.
Sounds like you're possibly working on a concentrating collector? (steam generation?)  If so, I would expect similar numbers, though probably 5%-10% lower or so due to the higher operating temperatures - however the average would be much higher than mine if it has tracking!


I'm in zip code 44082 - very north-east corner of Ohio. Where are you located?
« Last Edit: May 31, 2011, 06:08:57 AM by jondecker76 »

GaryGary

  • Sr. Member
  • ****
  • Posts: 411
    • Build-It-Solar
Re: Just finished my solar water heater 2 days ago... (Image heavy)
« Reply #64 on: May 31, 2011, 09:34:16 AM »
ghurd:

I'm at right about 65 sq. ft. of collector area.  My collector is biased by about 10 degrees for better fall/winter/spring collection, so right now the panel is pretty far from being perpendicular to the sun's rays - you'll have to keep this in mind for my calculations. (the max power available is about 320 BTU/hr per sq. ft on a perfect day with the collector perfectly parallel to the suns rays)

With yesterday being a great example of a sunny day, my numbers break down to:
Max Outupt: 8400 btu/hr / 65 = 129 btu/hr  per sqFt.
average output: 52000 btu / 7.5 hours = 6933 btu/hr    / 65 = 106 btu/hr per sqFt.

My best early estimates are showing that my collector is somewhere around 40% efficient (129 btu/hr measured / 320btu/hr = 40%) - and I'm not even perpendicular to the sun's rays, so it may even be a few percent higher. I've also seen other home built systems in this same efficiency range.
Sounds like you're possibly working on a concentrating collector? (steam generation?)  If so, I would expect similar numbers, though probably 5%-10% lower or so due to the higher operating temperatures - however the average would be much higher than mine if it has tracking!


I'm in zip code 44082 - very north-east corner of Ohio. Where are you located?

Hi Jon,
You can get the hour by hour solar on your collector, incidence angles, ... from:
http://www.builditsolar.com/Tools/RadOnCol/radoncol.htm

Gary


jondecker76

  • Full Member
  • ***
  • Posts: 100
Re: Just finished my solar water heater 2 days ago... (Image heavy)
« Reply #65 on: May 31, 2011, 10:59:09 AM »
Excellent tool Gary, thanks!
These numbers pretty much match what I have 100%!!

Here is the output from the program...
Code: [Select]
Solar Radiation on Collector for day of:  5/30

  Collector Area:          65.0 (sqft)
  Collector Azimuth:        0.0 (deg) measured from South, + is to East
  Collector Tilt:          52.0 (deg) measured from horizontal
  Latitude:                41.7 (deg)
  Altitude:               700.0 (ft) Above Sea Level
  Sun Rise:                 4.6 (hr) Sunrise in solar time

Time    Sun --------------------------------    Collector ------------------------------
Hour    Az   Elev  DirNormal  Diffuse  Total    HorzTot IncidAng Direct Diffuse   ITotal

   4  126.1   -5.7      0        0        0        0      90        0        0        0
   5  116.0    3.9     20        2       22      246      90        0      129      129
   6  106.6   14.3    159       20      179     3840      90        0     1043     1043
   7   97.4   25.2    221       28      249     7922      80     2451     1451     3902
   8   87.7   36.4    251       31      283    11736      67     6387     1649     8036
   9   76.3   47.5    268       33      301    15006      55    10102     1758    11860
  10   60.9   57.9    277       35      312    17513      43    13070     1819    14889
  11   36.9   66.4    282       35      317    19087      35    14972     1851    16823
  12    0.0   70.0    284       35      319    19624      32    15626     1860    17486
  13  -36.9   66.4    282       35      317    19087      35    14972     1851    16823
  14  -60.9   57.9    277       35      312    17513      43    13070     1819    14889
  15  -76.3   47.5    268       33      301    15006      55    10102     1758    11860
  16  -87.7   36.4    251       31      283    11736      67     6387     1649     8036
  17  -97.4   25.2    221       28      249     7922      80     2451     1451     3902
  18 -106.6   14.3    159       20      179     3840      90        0     1043     1043
  19 -116.0    3.9     20        2       22      246      90        0      129      129
  20 -126.1   -5.7      0        0        0        0      90        0        0        0
                    -----   ------   ------    -----            -----    -----    -----
Day Total            3240      405     3645   170327           109589    21260   130849

Angles in degrees, Radiations in BTU/hr, DayTotal in BTU/day
1 BTU/hr-ft^2 = 3.152 W/m^2


From the above output, you can see in the total in the last column that I could have possibly collected 130849 BTU with a 100% efficient collector.  From yesterday's output of 52,000 BTU:
52000/130849 = 39.74% efficient
This matches what my other calculations have been showing me to within 0.26% - pretty impressive!