Author Topic: Homemade Solar Panels  (Read 60938 times)

0 Members and 1 Guest are viewing this topic.

Tom in NH

  • Full Member
  • ***
  • Posts: 191
Homemade Solar Panels
« on: January 05, 2005, 05:12:11 AM »
This is the fabrication technique that has evolved out of my trials and errors. I'm sure there are many different ways to build solar panels that would work just fine.

I have tried to keep mine as simple as possible.


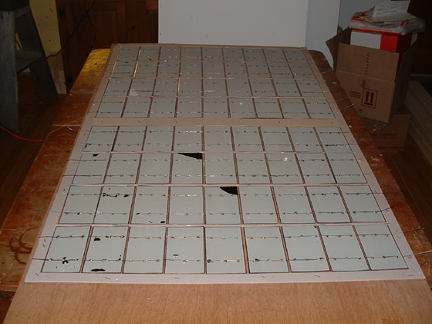
This shows the cells upside down in a jig made from strips of mat board stapled onto a piece of 1/4 inch plywood. At this point, the tabs can be soldered to the cells. I found a 30 watt iron to be the minimum acceptable and a low temperature solder to be the best.


Here the cells are all soldered and a dab of silicone caulk is placed on each one.
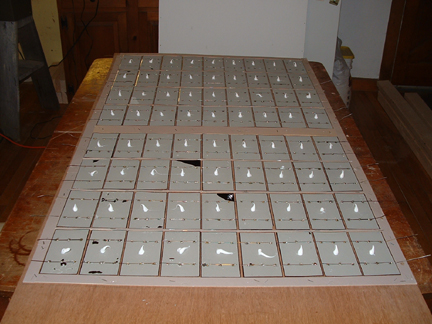


I used 1/2 inch plywood for my backing. It sits atop spacers as I align it with marks on my jig. When it is in the right position I remove the spacers and let it press into the silicone. You may be able to make out the 1 x 1 x 1/16 inch aluminum angle stock that's bolted to the upper face of the plywood. The angle stock is bent into an 'L' shape and two of them are set to form a rectangular shape and bolted down. The metal adds a great deal of stiffness to the plywood.
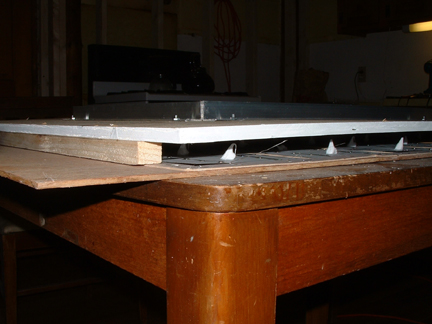


The next step is to flip the rig over. This can be tricky, but I find using two small C-clamps opposite each other holds the backing and the jig together just enough to let me flip it over without any of the cells moving on me. Here is the new panel with the jig removed.
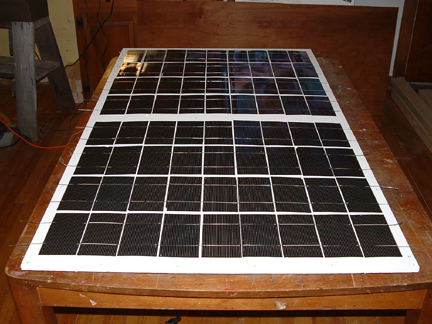


Power is brought to the back of the panel using bolts counter sunk into the plywood. The copper strip is .015 copper sheet purchased on-line and cut up into strips.
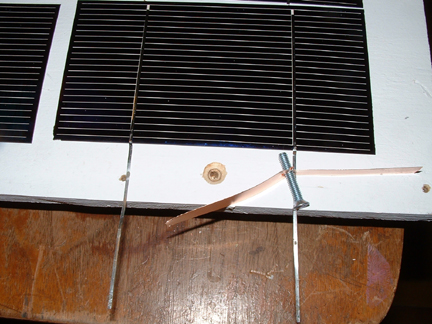


The terminal bolts are soldered to the copper strip to ensure a good connection. The copper is also used to string the rows of cells together at the ends.
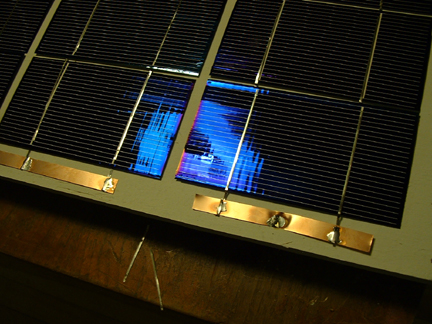


A double layer (total thickness about 1/4 inch) of foam tape pipe insulation (purchased at Home Depot) is layed around the perimeter of three sides and in spots across the middle and what will be the bottom edge of the panel. The space between the spots will allow ventilation.
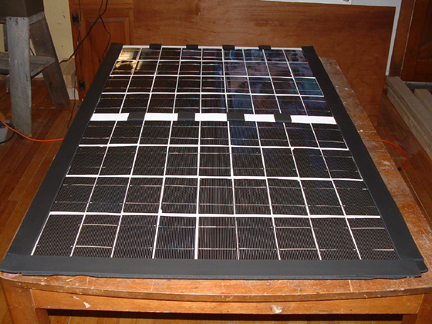


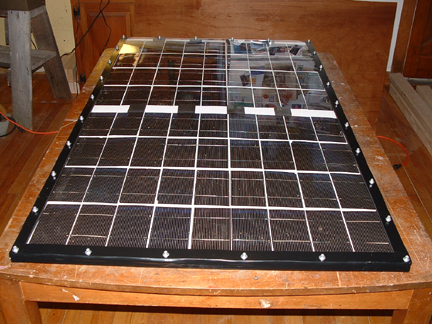
The finished panel has plexiglas screwed down into the foam tape every six inches. I used one inch metal roofing screws that have a rubber washer on them. There is also a layer of vinyl electrical tape (3M 88T) around three sides of the perimeter. This is experimental. I'm hoping the tape will protect the foam from UV radiation and make it last a little longer. It is important to predrill the screw holes in the plexiglas and plywood, and to do so on a solid surface. If you try to do it after the foam tape is in place, you will crack the plexiglas for sure.


--Tom

« Last Edit: January 05, 2005, 05:12:11 AM by (unknown) »

ghurd

  • Super Hero Member Plus
  • *******
  • Posts: 8059
Re: Homemade Solar Panels
« Reply #1 on: January 05, 2005, 12:33:23 AM »
Looks great.


If the cells touch, do they short?


Your spacing is great, I'm more curious. I have a few China panels that look like they are touching. Has me worried.


G-

« Last Edit: January 05, 2005, 12:33:23 AM by ghurd »
www.ghurd.info<<<-----Information on my Controller

drdongle

  • Hero Member
  • *****
  • Posts: 552
Re: Homemade Solar Panels
« Reply #2 on: January 05, 2005, 05:31:54 AM »
 I would suggest using LEXAN rather than plexiglass it tougher, resists shattering, can be drilled safely and cut with metal shears ( if thin).


Carpe Vigor


Dr.D

« Last Edit: January 05, 2005, 05:31:54 AM by drdongle »

wdyasq

  • Hero Member
  • *****
  • Posts: 1324
Drilling plastics
« Reply #3 on: January 05, 2005, 07:26:12 AM »
I'm a fan of using tempered glass.  It is inexpensive and has proven record of transparency and durability.


However, if one cares to use Acrylics or Polycarbonates they will be well advised to learn the proper way to sharpen drill bits where they will not break the material.  After driling or cutting all edges and holes need to be beveled to remove the stress risers created in the cutting process.


Ron

« Last Edit: January 05, 2005, 07:26:12 AM by wdyasq »
"I like the Honey, but kill the bees"

Tom in NH

  • Full Member
  • ***
  • Posts: 191
Re: Homemade Solar Panels
« Reply #4 on: January 05, 2005, 07:30:58 AM »
Lexan would be much better and long lasting than plexiglas. I was looking into it but I choked on the price. I bought this PG I used on ebay for $10 per sheet. I can go through a lot of PG before I get up to the price of lexan.  -Tom
« Last Edit: January 05, 2005, 07:30:58 AM by Tom in NH »

Tom in NH

  • Full Member
  • ***
  • Posts: 191
Re: Homemade Solar Panels
« Reply #5 on: January 05, 2005, 07:35:57 AM »
I learned on my first panel not to put them too close together. On that panel, which uses smaller monocrystalline cells, the voltage suddenly drops to about half of normal when the sun shines on them and warms them up. I intend to take that panel apart and fix it, but that panel has a glass cover that is sealed with silicone and I'm not looking forward to it. That's the reason I elected to go the ventilated and screwed-down route in these panels.  -Tom
« Last Edit: January 05, 2005, 07:35:57 AM by Tom in NH »

Tom in NH

  • Full Member
  • ***
  • Posts: 191
Re: Drilling plastics
« Reply #6 on: January 05, 2005, 09:03:48 PM »
Tempered glass is a fine covering. It is a little on the expensive side, but good. Regarding plexiglas and holes drilled in it near the edges, I found I had to drill a hole slightly oversized and then be extremely careful not to tighten the screw down too tight. As far as drilling goes, it's not a problem if you don't push too hard on the drill bit and you have a solid surface under the plexiglas. Any flex at all will cause problems. Can you tell me more about proper sharpening of drill bits for plastics? --Tom
« Last Edit: January 05, 2005, 09:03:48 PM by Tom in NH »

ixtow

  • Newbie
  • *
  • Posts: 1
Re: Drilling plastics
« Reply #7 on: May 03, 2006, 04:16:16 PM »
I'm having trouble finding an apple to apples comparison of the polymers to tempered glass.


Plexiglass doesn't last long enough.  I'm trying to pick Lexan or Tempered glass.  Can't get straight apples to apples comparisons of price.

« Last Edit: May 03, 2006, 04:16:16 PM by ixtow »

flamenco5555

  • Newbie
  • *
  • Posts: 1
Re: Homemade Solar Panels
« Reply #8 on: June 24, 2006, 06:15:41 PM »
Tom and others,

What do you think of using food grade mineral oil inside the panel to displace air rather than allowing it to vent?  Thanks

« Last Edit: June 24, 2006, 06:15:41 PM by flamenco5555 »

Evandream

  • Newbie
  • *
  • Posts: 2
Re: Homemade Solar Panels
« Reply #9 on: May 07, 2007, 04:45:30 PM »
Under wind pressure, tempered glass is approximately four times as strong as annealed glass. It resists breakage by small missiles traveling approximately twice as fast as missiles which break annealed glass. Tempered glass is also able to resist temperature differences (200 ° F - 300 ° F) which would cause annealed glass to crack.


Evan Dreamz,

Fsbo Owner Technician

« Last Edit: May 07, 2007, 04:45:30 PM by Evandream »

MedicalMan

  • Newbie
  • *
  • Posts: 1
Re: Homemade Solar Panels
« Reply #10 on: February 11, 2008, 12:31:30 PM »
Where do you get those solar cell from, in order to build your oun panels?
« Last Edit: February 11, 2008, 12:31:30 PM by MedicalMan »

Tom in NH

  • Full Member
  • ***
  • Posts: 191
Re: Homemade Solar Panels
« Reply #11 on: March 23, 2008, 03:37:25 PM »
This is an update to my original posting and a warning to any readers who wish to follow the same construction methods. Three years have passed since I built about 900 watts worth of panels using this method. A year ago all these panels were replaced with 1.65kw of panels manufactured by Photowatt.


The construction method shown here is flawed. The homemade panels start out working very well, but they succomb to moisture in the atmosphere, wind vibration, and expansion/contraction due to temperature differentials. Over time the silicon cells crack and electrical output drops severely, or even stops altogether. The soldered tabbing lifted off the front surface of the panels and I could not find a satisfactory way to clean the contacts after exposure to the elements so they could be resoldered.


Where soldering remained intact, the cells broke. I suspect the breakage was caused by different expansion rates of silicon and the metal tabbing.


There was also the autumn wind storm that cruelly finished me off. 85 mph gusts shook the fragile silicon cells to bits.


The only way to make a reliable long lasting panel in my opinion is to encapsulate the cells in plastic. That requires specialized equipment. If one must purchase glass and aluminum frame material, it turns out to be more economical to purchase manufactured panels. They are more reliable and they have a 20 year replacement warranty.


Tom Woods

www.altenergyweb.com  

« Last Edit: March 23, 2008, 03:37:25 PM by Tom in NH »

pegasus

  • Newbie
  • *
  • Posts: 1
Re: Homemade Solar Panels
« Reply #12 on: February 07, 2009, 07:30:20 AM »
I'm thinking that the cell breakage may have been due to the following causes:


Backing (1/2" plywood) and facing (plexiglass) was too flexible, allowing the entire panel to bend in the wind.


The backing (plywood) would absorb moisture and swell causing the solar cells to press hard against the plexiglass. In addition, the swelling of the plywood would cause the panel to bow into a concave shape. Anything built with wood must accommodate wood movement.


As far as the tabs coming unsoldered, did you use a rosin flux and 60/40 electronics solder on the solar cells? It sounds like there were quite a few "cold solder" joints since I have never seen a properly-soldered connection come apart, even in weather or severe corrosion environments (boats, salt water, etc).


The minimum size for electronics soldering should be a 45 watt iron. I suspect that using a 30 watt iron may have lead to cold-solder joints.


Just thought I'd add my .02 cents as an electronics tech :)

« Last Edit: February 07, 2009, 07:30:20 AM by pegasus »

joshstephenz

  • Newbie
  • *
  • Posts: 1
  • Country: ph
Re: Homemade Solar Panels
« Reply #13 on: December 14, 2010, 09:15:33 AM »
Which is cheaper to go... This DIY homemade solar panels or those manufactured ones?

joestue

  • Hero Member
  • *****
  • Posts: 1764
  • Country: 00
Re: Homemade Solar Panels
« Reply #14 on: December 14, 2010, 09:44:01 AM »
http://cgi.ebay.com/36-New-WHOLE-solar-cells-3-X6-1-8W-each-tested-/160402975984

you tell me...

i've actually found tabbed cells cheaper than that, but i didn't bookmark the seller.

if my parents replace the windows in their house you can add me to the list of people that's going to attempt to do this..
but with solar down to like 2.50/watt its kinda hard to justify.
My wife says I'm not just a different colored rubik's cube, i am a rubik's knot in a cage.