Author Topic: Wind Gen #2  (Read 2065 times)

0 Members and 1 Guest are viewing this topic.

DBGenerator

  • Jr. Member
  • **
  • Posts: 69
Wind Gen #2
« on: February 04, 2005, 01:28:04 AM »
Here are some photos from my current project.

I started with using the bicycle wheel bearing.  It works well and spins like crazy.  And the price was right.  I removed all the spokes and the outer rim.  Took apart the lock nuts, bearings, and axle and cleaned them all real good.  It turns out that the end pieces are pressed into the middle.  If you set in between two blocks of wood and hit it right with a puch, it comes apart.  I drilled a hole in the front mount (2x4) with a 1.25" bit.  The ends fit in perfect.  It is my second one.  After I finished the first one, I realized I drilled it a little crooked and the wood was a little warped.  The axle shaft was a little bit of a pain.  The original one from the bicycle is only about 6 inches long.  I needed about 8 to 10 inches.  It is a metric axle.  I think it is like 9mm, 27TPI, with an odd pitch.  I think 1degree?  I couldn't find a bolt, so I got a piece of 3/8" all thread and rethreaded it.  I used the bearing holder since it is hardened steel and forced it on.  After running it back and fourth about 3 times it cleaned up pretty good and the nuts fit on easily.  As you can see in the picture, both halves are mounted on the front mount.  That worked out the best and it was easier than trying "exactly" line up the front and rear mounts.  Where the all thread goes in the rotor mount, it is a little wobbly, but I opened up the hole a little and you would never know it.
« Last Edit: February 04, 2005, 01:28:04 AM by (unknown) »

DBGenerator

  • Jr. Member
  • **
  • Posts: 69
Re: Wind Gen #2
« Reply #1 on: February 03, 2005, 06:33:39 PM »


« Last Edit: February 03, 2005, 06:33:39 PM by DBGenerator »

DBGenerator

  • Jr. Member
  • **
  • Posts: 69
Re: Wind Gen #2
« Reply #2 on: February 03, 2005, 06:45:09 PM »
For the magnets, I used 8 3/4" by 3/8" Neo magnets.  I could have probably used thiner magnets.  I must have had some other idea in mind about mounting them which is why I ordered the thicker magnets.

They are mounted on a steel plate that is about 1/8" thick and 3 5/8" diameter.

The center diameter is 2 1/8".  The distance between each magnet is .3637" or a little less than 3/8".  The distance from center to center on the magnets is 1.1114" or a little less than 1 1/8"


It took some work cutting out the steel plate from a sheet with jig saw.  I considered making a larger plate, but figured I would just go with what I had since it took forever to cut it out.  I used a medicine bottle in the middle and wrapped tape around it until I got the right diameter, then centered it on the plate.  I cut up some small craft (popsicle) sticks and spaced the magnets evenly around.  It took 4 pieces of stick and a thin carboard shim to align them all the same.

Once they were in place, I just globbed some epoxy/weld glue around them.
« Last Edit: February 03, 2005, 06:45:09 PM by DBGenerator »

DBGenerator

  • Jr. Member
  • **
  • Posts: 69
Re: Wind Gen #2
« Reply #3 on: February 03, 2005, 07:02:08 PM »
I made the coil mount (stator?) and the 2x4 mount twice.  I'll probably make it a third time!!  My original idea was to use 6 coils.  I made up two that produced a good voltage, then ran out of wire.  I was using wire that I salvaged from microwaves, dehumidifiers, and relays.  I think it was 26 or 28AWG.  So, I started using a differnt size wire. A little thinner.  I got three coils then ran out of wire.  That is when I realized that 6 were not going to fit and decided I would go with 4.

Then....I had a couple spools of thinner wire probably 30AWG.  I made the long coil with the brown wire and the short one there.  Those are 300 windings.  The other's 200 windings.  The longer coil is about 22 ohms and the shorter one is about 18.  The shorter on will produce less voltage, but I can fit 6 of them around there.  I think I have room for more than 300 windings also which will help.  


I also did go and buy some wire from Radio Shack.  (I hate that place).  I bought 3 packages of 3 different wire sizes at $5 each to get what I needed.  I said I wasn't going to buy any wire, there should be enough in old appliances that I could use!
« Last Edit: February 03, 2005, 07:02:08 PM by DBGenerator »

DBGenerator

  • Jr. Member
  • **
  • Posts: 69
Re: Wind Gen #2
« Reply #4 on: February 03, 2005, 07:09:44 PM »
So here is where I am at this point!!  With the three coils on there, I can spin it by hand and get 10 to 12 volts.  If I spin it with the electric drill I get about 18 to 20 volts.  Not a whole lot of current.  I think it came to a little less than one amp.

The main board that I have there is the second one.  I made a real nice one at first.  Then when I wasn't paying attention, I needed a piece of wood and I cut off part of it.  Then realized that I cut up a piece of wood that I was saving!!  Duh!!!

I used a table saw to notch the back of it for the tail.

I just used an old piece of 3/8" plywood there.  I didn't measure it.  Just put it in the chop saw and cut off a piece that I could use.

I'll paint it all when I'm done.  I'll keep you up to date when I get more coils wound.

Dave


« Last Edit: February 03, 2005, 07:09:44 PM by DBGenerator »

DBGenerator

  • Jr. Member
  • **
  • Posts: 69
Re: Wind Gen #2
« Reply #5 on: February 03, 2005, 07:12:39 PM »
Here is a picture of "the shop" in the back of my basement.  Seems as soon as I clean it up, it gets messed up again!!!

« Last Edit: February 03, 2005, 07:12:39 PM by DBGenerator »

DBGenerator

  • Jr. Member
  • **
  • Posts: 69
Re: Wind Gen #2
« Reply #6 on: February 03, 2005, 07:14:55 PM »
Note on the mounting of the magnet rotor and the axle.  There is enough room in there that I can add a washer to move the magnets closer to the coil, or I could put the lock washer on the other side if I need to move it away from the coils.

« Last Edit: February 03, 2005, 07:14:55 PM by DBGenerator »

wooferhound

  • SuperHero Member
  • ******
  • Posts: 2288
  • Country: us
  • Huntsville Alabama U.S.A.
    • Woofer Hound Sound & Lighting Rentals
Re: Wind Gen #2
« Reply #7 on: February 03, 2005, 07:15:26 PM »
I personnaly would not use wire smaller than 20 gage

you won't be able to do much charging or power a load with a 20 ohm coil. Let ebay be your friend and check out thier magnet wire.

http://search.ebay.com/magnet-wire_W0QQfkrZ1QQfromZR8QQsatitleZQ22magnetQ20wireQ22

« Last Edit: February 03, 2005, 07:15:26 PM by wooferhound »

DBGenerator

  • Jr. Member
  • **
  • Posts: 69
Re: Wind Gen #2
« Reply #8 on: February 03, 2005, 07:28:43 PM »
Tim (Woof),

Thanks for the comment.  I tried to make a coil with 20AWG wire, but the 3/4" magnets aren't strong enough to create ANY voltage.  Maybe I wasn't spinning it fast enough?  With 6 coils of 26AWG I should be able to produce 1 to 2 amps I would think.  I'm not trying to light up the house, just trying to make something that works!!  Thanks for your input.

Dave
« Last Edit: February 03, 2005, 07:28:43 PM by DBGenerator »

ghurd

  • Super Hero Member Plus
  • *******
  • Posts: 8059
Re: Wind Gen #2
« Reply #9 on: February 04, 2005, 08:24:47 AM »
Are there laminates behind the coils?

G-
« Last Edit: February 04, 2005, 08:24:47 AM by ghurd »
www.ghurd.info<<<-----Information on my Controller

DBGenerator

  • Jr. Member
  • **
  • Posts: 69
Re: Wind Gen #2
« Reply #10 on: February 22, 2005, 01:06:27 PM »
Here are some updates....

When last we left, I was trying to figure out about coils.  The first ones I made produced enough voltage, but I was out of wire and couldn't fit 6 of them on the stator.

I reluctanly bought some rolls of 30AWG.  Each roll was 200 feet, so I figured I could get 300 windings from the size of the coil that I came up with.  Four hundred windings would have been better, but I would have ended up splicing pieces together and buying more wire.  


I decided it was easier to lay out the design and pound some nails into a board instead of trying to cut out a small piece of wood to wind the coils around.  This worked out good.  Remember to pound the nails in at an angle to keep the wire together at the bottom.

I took an empty juice container, placed a large bolt in the bottom, then melted some wax in it.  Then I dumped some screws and other junk hardware in to give it some weight and melted more wax on top of it.  It works great to hold the spools of wire.  It could also be used to hold solder.

« Last Edit: February 22, 2005, 01:06:27 PM by DBGenerator »

DBGenerator

  • Jr. Member
  • **
  • Posts: 69
Re: Wind Gen #2
« Reply #11 on: February 22, 2005, 01:21:23 PM »


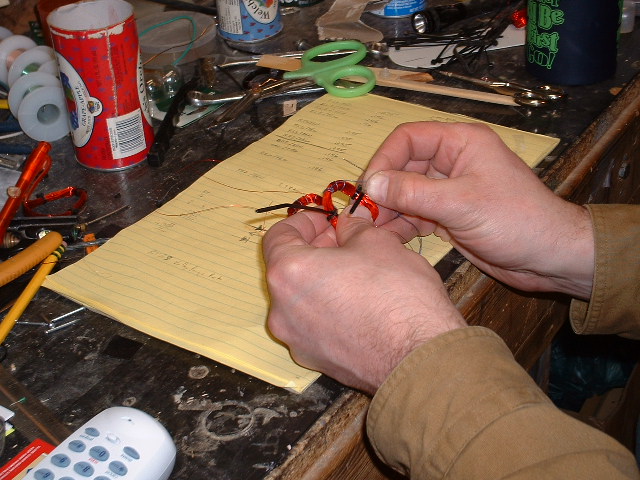
After I had a coil wound, I used small tie wraps to hold it together.  Then took some heavy thread (stuff used to sew denim) and "stitched" them up and carefully cut off the tie wraps as I went around the coil.  It was a little extra work with using the thread, but I found that when making coils with thin wire then can easily get messed up when handling them.


Cutting out a third (or maybe 4th) coil stator!!


I had some nice lines drawn with the protractor, but then I sanded the wood and painted over them.  So I made up a drawing with Auto CAD and printed it out to scale to used as a guide.  I drilled the hole in the center of the wood before I sanded and painted it, so I took the same drill bit and put it through the center of the cardboard template so it was centered on the wood.
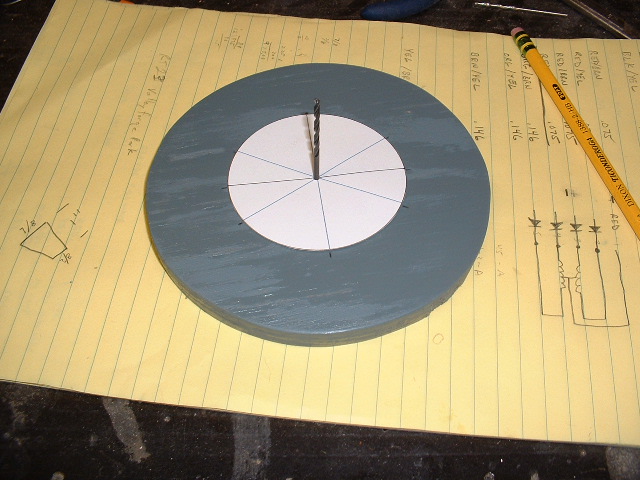


Here is the finished coil stator.  I didn't feel like messing with fiberglass resin.  I just used some super duper epoxy to hold them.  I cut a small notch on the outside edge of wood near each coil to run the wires through and put a little bit of hot glue to hold them.  Before I glued the wire ends, I labeled each wire.
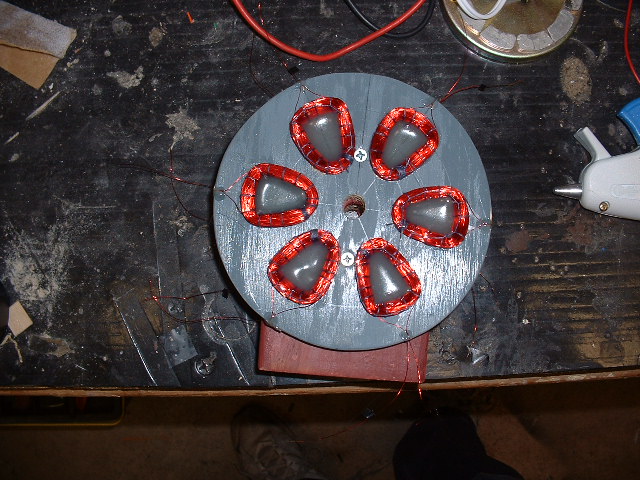


I put it all back together.  With a turn of the hand, I get about 2 volts on each coil.  I hooked up the electric drill and ran it at 1200 RPM just to see what I get.  It puts out almost 9 volts at 1200 RPM.  In any case, six of them together should produce 12 volts and we'll see what kind of amperage we get!

I'm sure that I missed one or two turns on a coil or two and they aren't perfectly placed, so I think I will make up a full wave bridge rectifier for each of them then combine them.

I want to get some terminal strips to mount on the back to wire up the coils.

« Last Edit: February 22, 2005, 01:21:23 PM by DBGenerator »