Author Topic: Stator Rebuild Part Two  (Read 1584 times)

0 Members and 1 Guest are viewing this topic.

Hilltopgrange

  • Sr. Member
  • ****
  • Posts: 263
Stator Rebuild Part Two
« on: May 28, 2007, 02:03:00 AM »
Part2


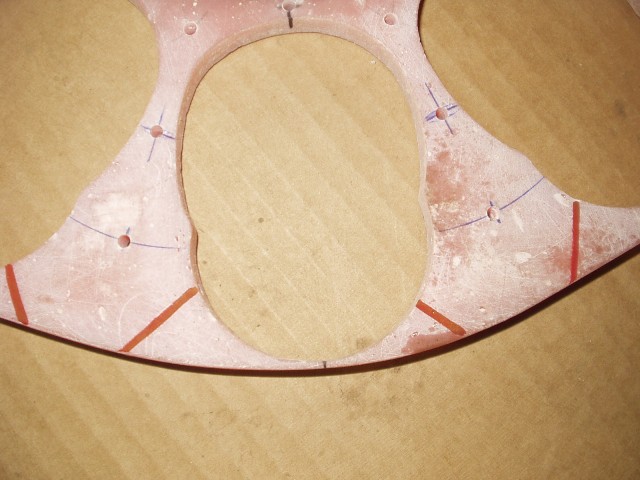
I drilled a series of holes for lacing the coils into the stator and also 2 holes at the end of each coil position to allow exits for the coil ends


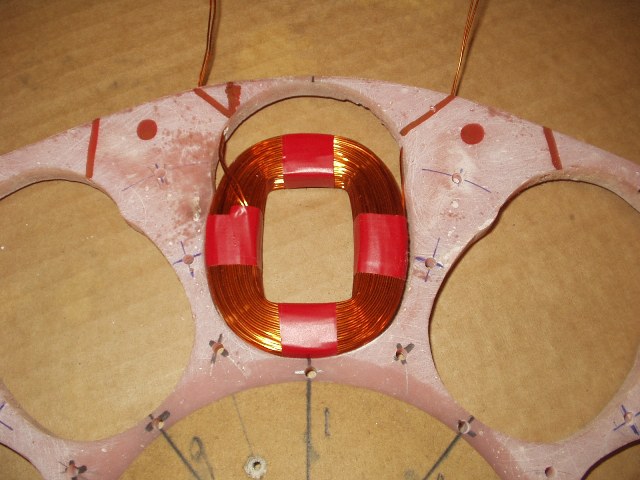
The coils fit nicely in the stator. At this point my intention is to tie/lace the coils in place and epoxy them on the sides and at the bottom but to leave the tops with the tails exposed to improve the cooling.


Fist coil fitted and laced in position, each lacing is done in a figure of eight fashion and is surprisingly strong and very secure. The lacing cord is a cotton polly-something! Mix it is very strong, a single strand is under 1mm dia and will easily support my weight of about 12 stone. I tried various types of cord as I was worried as to how they would react to heat. Cable ties would have been the quickest but on a hot wire test they failed miserably but this cord held up very well. So well in fact that I am going to omit the epoxy from the coils completely on this experimental stator. This could prove to be its downfall! Time will tell


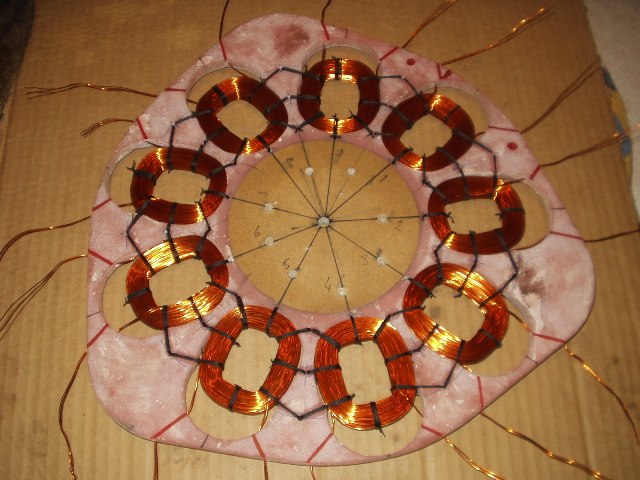
The lacing was the longest part of the job and proved to be very hard on the hands and eyes, but I persevered finally got them all done. The trick was to use a large sewing needle, and a plentiful supply of cold beer!


 The whole stator is very stiff and strong, This might just work! I intend to give this a couple of heavy coats of paint to seal everything and glue the windings together.


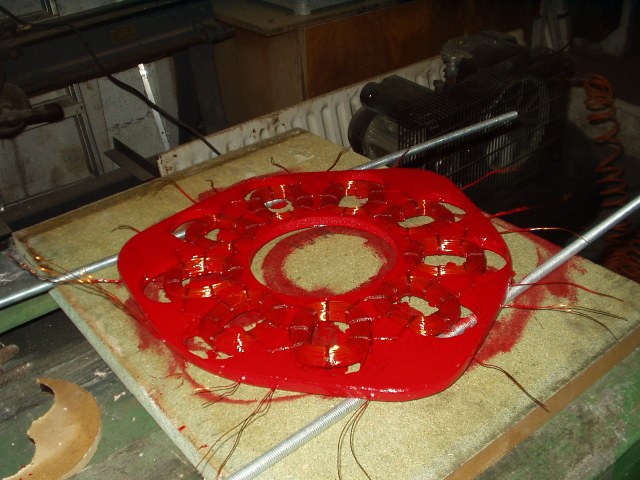
First coat of paint complete. The coil tails will be soldered and clipped to the outside of the stator and terminated in 8mm brass bolts as per normal.


So that's about it, just need a calm day to drop the tower and fit it.

Start to finish is two days with 90% of the work on day two lacing the coils I thought I was never going to get them done.


As always all comments are welcome. Im sure Im not the first to try this approach, there is certainly more work doing it this way and it is probably not worth the extra effort on this size of machine (10ft) but as I said earlier I intend to use this method on the next one but with Tufnol as the stator material.


I would be interested to hear opinions on Tufnol,, as far as I know the only snag is the cut/machined ends need to be sealed to weatherproof it and of coarse the price, it certainly isn't cheap.


I hope this is of some interest to you all!


Russell

« Last Edit: May 28, 2007, 02:03:00 AM by (unknown) »
How many windmills do I have to build to become a windmillologist?

Flux

  • Super Hero Member Plus
  • *******
  • Posts: 6275
Re: Stator Rebuild Part Two
« Reply #1 on: May 28, 2007, 02:14:35 AM »
Which Tufnol?  Tufnol is a brand name and they make various products. I assume you mean the phenolic bonded linen that has been around for many years. This is probably about suitable for class F ratings although it will be pushed in the long term ( more like class B for indefinite life). It may survive class H for a few years with only the heat transfer at the edges.


I don't know if Tufnol make an epoxy glass, they certainly do an epoxy linen. Everyone seems prepared to push the copper beyond its class H rating so ideally all the other components ought to be class H.


Your present polyester will be good enough to see how much extra cooling you get so I would concentrate on the best cooling now and worry about materials when you know what temperature they will be exposed to. Unless you devise fans and baffles to direct the air through the coils I really don't think you will see a lot of improvement except for the outside bit of the coil where you may gain a fair bit.


You seem to be in a high wind area, my advice is to use less turns of thicker wire unless you really do need that odd 2A in low winds you are compromising the stator in high winds by having a low cut in speed. Everyone else is running these things well stalled, it works well in very low winds and makes control easy and keeps things quiet and peaceful but you seem to have found that running stalled in your wind area doesn't give the best energy out.


It makes more sense to wind with less turns than end up opening the air gap or using larger blades, both of which push the stator heating badly.


Flux

« Last Edit: May 28, 2007, 02:14:35 AM by Flux »

Hilltopgrange

  • Sr. Member
  • ****
  • Posts: 263
Re: Stator Rebuild Part Two
« Reply #2 on: May 28, 2007, 08:32:15 AM »
Hi Flux

        Thanks for the reply. The 10ft machine seems to work well but I think the cut in is to high, it seems to be running very fast before it starts to produce but the main problem is that although it seems to furl it is not turning out of the wind as much as I would like. Since raising my second turbine it now gives me a ref as to which way it should be pointing. The offset is 5 inches and tail length (5ft) and the angles are exactly to Hughes spec for the 10ft machine but the stator was wound for the original 8ft design (290t 5 ph).

      I have read a lot of your posts where you describe this as "seeking" and that seems to describe my problem perfectly. My theory in lowering the cut in speed was to try and lower the speed a bit and bring it under control by making the alternator a bit more powerful.

       As it is I would not like to get hit with a gale, the worst I have seen since raising this is 42mph, the tail does fold up but the output just keeps climbing. I have seen it peek at 40 amps which I am sure you will agree is way to high. I would prefer to have it limited to about 20 amps max. I have been watching the weather like a hawk as I would`t rely on a shut down switch as I am pretty certain it wouldn`t hold her and I don`t want a runaway lol.

        I will have the turbine down and on the bench in a couple of days to fit the new stator, should I try an increase in the offset? its about the only thing I have not tried.


Thanks again for your time.


Russell

« Last Edit: May 28, 2007, 08:32:15 AM by Hilltopgrange »
How many windmills do I have to build to become a windmillologist?

Flux

  • Super Hero Member Plus
  • *******
  • Posts: 6275
Re: Stator Rebuild Part Two
« Reply #3 on: May 28, 2007, 09:33:11 AM »
I would have thought that 5" offset would be enough for a 10ft machine, but you do seem to be in trouble. I would try to increase the offset by another inch when you have it down.


If it looks as though it is starting to furl in the 25mph wind speed range then it should be well furled at 40 mph with tail round near 80 deg. Either it very late furling due to the tail being far too heavy or it is seeking the wind. Yes I agree that 40A at 48v is way over the top and something is wrong.


Reducing the cut in speed will probably make it more inclined to stall and furl easier, but you don't have a lot of magnet to spare with a 10 ft prop. Those magnets when well matched to 8ft are about right, for 10 ft you really must get it to furl.


If you can get it to furl earlier then it should be fine. I have no experience of these heavy tails so really I don't know for sure if you are just far too heavy or it is seeking the wind. It may be that if the initial furling speed is too high it may overcome the alternator and start seeking. There is little to loose from too much offset except that you will need to offset the tail to keep it in the wind below furling. If the offset is too small then there is nothing that you can do when it looses control so I would add that extra inch and take it from there.


I find that my machines tend to drop power in high winds rather than go on increasing, so it seems to imply that you may be seeking the wind.


Use your other machine or some independent wind vane and make sure the prop is turning away from the wind direction, just watching the tail doesn't tell the whole story . There is not a lot of power reduction until it turns past 45 deg.


Flux

« Last Edit: May 28, 2007, 09:33:11 AM by Flux »

Flux

  • Super Hero Member Plus
  • *******
  • Posts: 6275
Re: Stator Rebuild Part Two
« Reply #4 on: May 28, 2007, 10:20:50 AM »
I have just had a look at your wire, the 2 in hand .7mm is a bit lighter than the single #17. The equivalent 2 in hand is nearer .8mm.


You will be down to about 40% efficiency at 1kW out so the absolute rating for reasonable life will be about 20A.


This may be a good starting point until you can sort out the furling but I think a better winding for your wind area would be to use as many turns as you can manage of 3 in hand .7mm ( probably 120 turns).


Flux

« Last Edit: May 28, 2007, 10:20:50 AM by Flux »

Hilltopgrange

  • Sr. Member
  • ****
  • Posts: 263
Re: Stator Rebuild Part Two
« Reply #5 on: May 29, 2007, 04:59:55 AM »
Hi Flux

       I think the best bet would be to add an inch to the offset while it`s down just to be safe and as I have this stator ready to fit I will give it a try and see if it helps.Suck it and see as they say! If the new stator causes it to stall badly then its a simple job to fit a set of 120t 3 in hand coils as you advise, thats the advantage of this type of open stator. The tower this machine is on is a wind up telescopic tower so its not to much trouble to raise and lower it. I totally agree with a 1kw limit on it if I can just sort the furling I would be happy with it.


I will let you know how it goes. Once again flux thanks for all your help with this, your a mine of useful information!


Regards Russell

« Last Edit: May 29, 2007, 04:59:55 AM by Hilltopgrange »
How many windmills do I have to build to become a windmillologist?