Author Topic: PWM switch V2  (Read 976 times)

0 Members and 1 Guest are viewing this topic.

bigkahoonaa

  • Jr. Member
  • **
  • Posts: 57
PWM switch V2
« on: November 25, 2007, 05:44:40 AM »
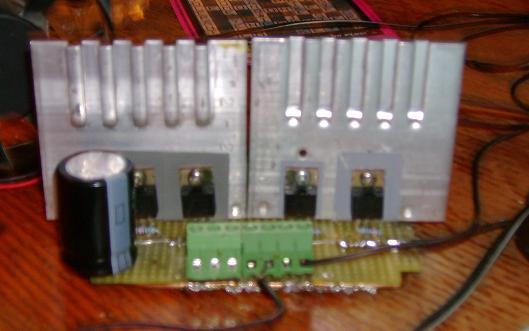
My first attempt at making a PWM switch:


It didn't work.  Darn, I butchered another bunch of perfectly good components.

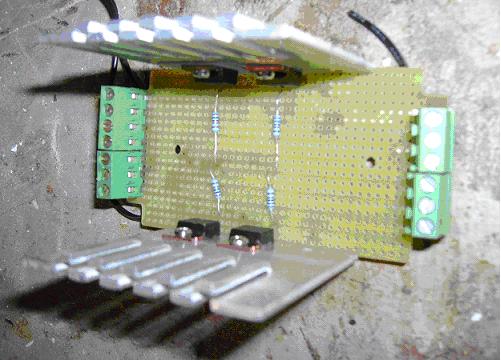
After salvaging, I tried an easier way of laying down copper tracks:


This is the Source side of the switch.  Drain is in the back.  I got a new CAD program, and I'm still trying to learn how to use it.  Anyway, here's my attempt at a circuit:


It's getting cold in Canada.  Instead of freezing my buns off testing the switch outside, I tested with this victim:


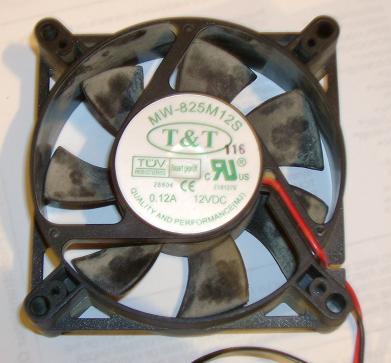
The victim's power Source:


Some details:

    Source open voltage 10.10 VDC

    Load Voltage 8.19 VDC


Wiring:

    Source (+) connected to Fan (+)

    Source (-) connected to PWM switch Source

    Fan (-) connected to PWM switch Drain


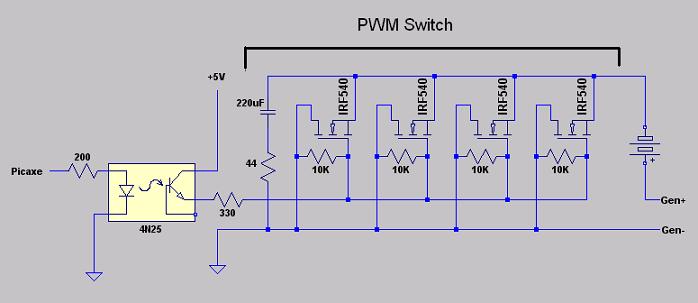
Adding PWM on a DC circuit can induce nasty dips and spikes.  When the gate opens and electrons flow, volts can dip.  When the gate closes and electron flow stops, volts can spike.  That's why I added a cap in version 2.  Since the PWM switch is going between rectifiers and batteries, the section of wire between rectifier and PWM switch has the potential to develop high voltage spikes.  Not good for rectifiers or MOSFETs.  


The standard solution is to add a capacitor.  One leg of the cap should connect to the Source side of the switch.  The other leg of the cap can go to absolute ground or some point on the (+) volt side.  I'm looking at a third option, to put the other leg of the cap on the Drain side of the switch.  The PWM signal should leak across the caps, but this can also reduce nasty dips and spikes.


I measured DC volts between PWM switch Source and Drain to get an idea of performance.  Here's a graft of volts vs. Duty at 5 kHz:


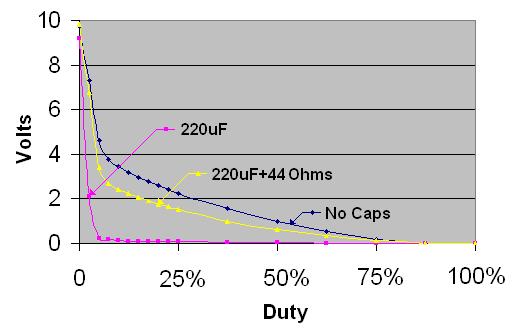
The No Caps line is Volts across the switch vs. duty with no capacitor between Source and Drain.  When I added a 220uF cap across the switch, the 220uf line, a lot of the PWM signal leaked across the cap.  The 220uF + 44 Ohms line is Volts from Source to Drain with a 220uF cap in series with a 44 Ohm resistor.  I tried different cap values but there was no significant change in performance.  The resistor value seems important.  At about 200 Ohms or higher, Volts vs. Duty follows the No Cap line.


My next crazy idea is to add a Buck Converter after the PWM switch to regulate the messy voltage going into batteries.


Mau

« Last Edit: November 25, 2007, 05:44:40 AM by (unknown) »

Flux

  • Super Hero Member Plus
  • *******
  • Posts: 6275
Re: PWM switch V2
« Reply #1 on: November 25, 2007, 01:20:45 AM »
"My next crazy idea is to add a Buck Converter after the PWM switch to regulate the messy voltage going into batteries."


Why not go completely crazy and use the buck converter in place of the pwm switch ( the buck converter is pwm anyway).


Your simple in line switch may work for solar up to a point but even then it will not be much good. For wind you have no chance, chopping the inductive current of the alternator windings gives you effectively a flyback or boost converter and you have already found that the spikes are enormous. Trying to suppress them with a snubber is a bit like throwing the baby out with the bath water. You need to recover the reactive energy not dissipate it. Going to a true buck converter will let you do what you want.


Pwm choppers are ok for resistive dump loads and for motor speed controllers where you can freewheel the reactive bit within the motor winding .


Flux

« Last Edit: November 25, 2007, 01:20:45 AM by Flux »

GeeMac

  • Full Member
  • ***
  • Posts: 230
Re: PWM switch V2
« Reply #2 on: November 25, 2007, 07:45:13 AM »
It looks as if you are having some fun with the project. You may already know this but it is possible to draw a circuit on a copperplated board with a felt pen and then dip it in the nitric acid to remove the remaining copper, leaving you with the circuit on the board. Then all you have to do is drill the holes and solder the parts to the circuit.

« Last Edit: November 25, 2007, 07:45:13 AM by GeeMac »

dinges

  • Hero Member
  • *****
  • Posts: 1294
  • Country: nl
Re: PWM switch V2
« Reply #3 on: November 25, 2007, 08:24:11 AM »
I have never found a pen that was usable for etching in a HNO3 (nitric acid) bath. I've  tried quite a few in the past. If you have or know of a pen that does resist HNO3, I'd be interested to know what brand/type pen.


Many (but not all) pens can be used in FeCl (Iron Chloride) baths.


Peter.

« Last Edit: November 25, 2007, 08:24:11 AM by dinges »
“Research is what I'm doing when I don't know what I'm doing.” (W. von Braun)