Author Topic: Progress on my windturbine  (Read 4501 times)

0 Members and 1 Guest are viewing this topic.

zenpi314

  • Jr. Member
  • **
  • Posts: 56
Progress on my windturbine
« on: May 21, 2008, 03:00:01 AM »
After a lot of help from the board, I am finally putting my first windturbine together.  

The one I made with a ametek motor does not really count.

This one was a lot more challenging.

Here are some picture I took on May 18th.


You can see the completed alternator, the frame that holds it together, and in the last image, you can also see the bridge rectifier.

(Please, be kind, it is my first welding job)


The next step was to test what the voltage / RPM relationship is.

Here is the test set-up


I will add a chart of voltage versus RPM later.


The props are attached with temporary wooden discs because I do not have the ability to fabricate them out of metal. I will replace those hopefully soon with stronger material.


The tail-frame has also been attached.


The tail will hopefully furl.


Well, that's all for now.

The next steps are still somewhat in Limbo because I am getting afraid to actually fly this beast. I am in the middle of a city and am getting cold feet about hurting someone or causing damage to property. I'm also not sure if the tower for the first Ametek windturbine is sufficient to carry this one.

I definitely need to do some more thinking and checking.


Any comments are greatly appreciated.

« Last Edit: May 21, 2008, 03:00:01 AM by (unknown) »

valterra

  • Sr. Member
  • ****
  • Posts: 399
Re: Progress on my windturbine
« Reply #1 on: May 20, 2008, 09:34:51 PM »
Nice job!  As far as I can tell, no need to "be kind" about how it looks... it looks great from here.  Way better job than I would do.


I see you've elected for the Cadillac of DMMs.  Kidding of course.  Hard to beat for $2.99.  I've got 5 of them myself.


You've got some solar, too.  They work great together from what I've experienced.  Currently all of my wind power comes from an Ametek.  I certainly count mine as a "Real" one!  It is real enough to power this very Internet connection!  


No offense meant.  I know lots of people seem motors as "toys."  But what they really should be thought of is the "gateway drug" for this crazy wind power obsession we all have.  Once you successfully make electricity by simply mounting some bent wood onto a motor (5 minutes?) then you're hooked.


Best of luck to you, and great job so far!

« Last Edit: May 20, 2008, 09:34:51 PM by valterra »

wiredwrong

  • Full Member
  • ***
  • Posts: 109
Re: Progress on my windturbine
« Reply #2 on: May 20, 2008, 09:37:55 PM »
I really enjoyed seeing the use of bed frame and plumbing parts, I'd like to know more about the blades you have in the pics.
« Last Edit: May 20, 2008, 09:37:55 PM by wiredwrong »

David HK

  • Hero Member
  • *****
  • Posts: 509
  • Country: hk
Re: Progress on my windturbine
« Reply #3 on: May 21, 2008, 12:57:15 AM »
An excellent piece of work, well done.


I think you are quite right to be concerned about flying it 'as built'. I personally would take steps to use various locking straps or wires etc bent over the flats of the bolts to restrain them and avoid the nuts and bolts coming loose and dropping off the machine. Similarly, drilling a wire through the flats of the nuts and/or bolts and wiring them together achieves the same result.This is common on aero engines and other equipment where failure is not an option. The decision is of course your own, but these minor saftey features should be sufficient to fly it without too much worry.


I am sure other can offer similar encouragement.


David HK

« Last Edit: May 21, 2008, 12:57:15 AM by David HK »

Flux

  • Super Hero Member Plus
  • *******
  • Posts: 6275
Re: Progress on my windturbine
« Reply #4 on: May 21, 2008, 03:21:40 AM »
Nice work.


If you are in an urban area you may never be able to get it up high enough to be in clean air. Trying for a tower high enough would probably be silly, risky and not likely to please the neighbours. just try to get it into the cleanest air within your capability if you can find a gap for certain wind conditions use that even if it is not the highest point.


Make sure the tower is strong enough and nothing is within the fall area. Unless you try for crazy height, tower failure should be avoidable.


Run it in on a low tower to sort out all the bugs and to make sure you can get it to furl or stop on a brake switch. If you can control it you should be ok.


It's a good idea to make sure bolts stay tight but if tightened properly there should be no problem. Loctite is a wise precaution, use tabs or wire if you must but they should only be a backup.


The biggest danger is shedding a blade, it looks as though you have fibreglass blades so be very careful with the root mounting. The wooden hub may be perfectly ok but I have no idea what the blade ends are like. That is the one area that would bother me more than anything else but if they are mounted well and you can avoid overspeed then there should be no problem.


Flux

« Last Edit: May 21, 2008, 03:21:40 AM by Flux »

blueyonder

  • Full Member
  • ***
  • Posts: 184
Re: Progress on my windturbine
« Reply #5 on: May 21, 2008, 06:35:09 AM »
 

 if you want comments .then here are a few.

  you have done very well.

  marks out of ten. TEN.

  the gray paint looks great. i also used gray on the metal rotor.

  you must be very happy with the work you done.


  when i finished a single rotor i was building i wanted to test it in the wind.

  and i had no tower to put it on.  so i fixed it at ground level.

  just to play with it.

  it was the most dangerous thing i could have done.

  i was lucky i had made up a brake switch .

  but that prop at ground level . sum one walking into it in the dark or bye mistake.

  so i tied a rope round the blades to stop it flying when i wasent about .


 one night i was going to bed and looked out the bedroom window and saw the prop flying.  the rope had come undone .it was only loosely tied  .

   i think the work you have done is very good and the mill looks great.

  you just got to trust yourself a bit more.

   if that is a auto hub or trailer hub you have used .  then if you can find

 a alloy wheel  or a steel wheel. then cut out the bit in the center of the wheel.

  it will make a good hub boss.

  you might need a grinder to finish it off .

  all the holes will match up. and you can still see the bearing nut.

  dont forget your brake switch.


  and try it at 20foot just to get going.

« Last Edit: May 21, 2008, 06:35:09 AM by blueyonder »

tecker

  • SuperHero Member
  • ******
  • Posts: 2183
Re: Progress on my windturbine
« Reply #6 on: May 21, 2008, 07:14:12 AM »
I like the bed frame angle also it's very hard steel and a little hard to cut Lots of carbon in there . Very well done I have to say the spade lugs are not a good idea .They will be gone in a very short time in the weather and the head moving in the wind .What you can do with them is solder the lug to the spade remove the crimp insulator and solder there as well and then apply polyurethane caulk to insulate . Your presentation model should work on those hand gestures if she want to get professional work (she's a cute y )
« Last Edit: May 21, 2008, 07:14:12 AM by tecker »

luv2weld

  • Sr. Member
  • ****
  • Posts: 308
Re: Progress on my windturbine
« Reply #7 on: May 21, 2008, 09:26:54 AM »
zenpi,

Really good work!! If that was your first welding project, you certainly

did a lot better than I did on my first project.

I really like the presentation model!!! What a cutey!!


Ralph

« Last Edit: May 21, 2008, 09:26:54 AM by luv2weld »
The best way to "kill time" is to work it to death!

zenpi314

  • Jr. Member
  • **
  • Posts: 56
Re: Progress on my windturbine
« Reply #8 on: May 21, 2008, 11:31:25 AM »
Hey Valterra,

Thanks for the reply.

I did not mean to dish ametek turbine. I had a lot of fun putting mine together, and it is still proudly flying on youtube.

http://youtube.com/watch?v=9ViOGsXqSTI

How is your ametek behaving? Do you have enough wind to charge on a regular basis?

My wind situation is very poor, and the ametek would only occasionally make it to charging current.

My cadillac DMM is only one in a collection of DMM's. The other ones all have dead batteries. One of them is probably worth almost $10.00 ;)
« Last Edit: May 21, 2008, 11:31:25 AM by zenpi314 »

zenpi314

  • Jr. Member
  • **
  • Posts: 56
Re: Progress on my windturbine
« Reply #9 on: May 21, 2008, 11:37:00 AM »
The blades are the Chinese ebay blades. (6.8ft)

Not sure yet how they perform.

I will post results as soon as I have some.
« Last Edit: May 21, 2008, 11:37:00 AM by zenpi314 »

zenpi314

  • Jr. Member
  • **
  • Posts: 56
Re: Progress on my windturbine
« Reply #10 on: May 21, 2008, 11:42:55 AM »
Thank you for the concerned reply.

I'm not exactly sure yet what you mean with 'bent over the flats of the bolts' or 'drilling a wire through the flats', but I will find out and implement it.

At the moment, the turbine is only ready for a test stand, not a tower yet. I was planning on adding more security, but had not figured out how to do it yet. I will seriously consider your suggestion. Thanks.

Zenpi314
« Last Edit: May 21, 2008, 11:42:55 AM by zenpi314 »

zenpi314

  • Jr. Member
  • **
  • Posts: 56
Re: Progress on my windturbine
« Reply #11 on: May 21, 2008, 11:53:44 AM »
Hi Flux,

I would like to personally thank you for all the helpful information you have given to this board and to me in particular. Very much appreciated.

The tower is going to be very low. Somewhere between 20-25 ft. It will just be peeking over the roof of my house.

As for a clear fall area, that will be very tough. But it is going to be my house that will take the fall, not someone elses property.

I'm planning on locking the bolts better but have not made a decision yet on how.

I am extremely worried about a blade failure. That is probably the only way I can endanger other people and their property. I guess that I should make sure that I have full control over the rotation speed as you mentioned. It is made to furl, but that needs to be tested (in a realworld situation I'm afraid). I will also include a switch to short the alternator, but I have not tested yet if that will actually stop the prop in high wind.

I'm just starting the process of getting it ready for the tower, and I will not let it fly unsupervised for some time to come.

Thanks again,

Zenpi314
« Last Edit: May 21, 2008, 11:53:44 AM by zenpi314 »

valterra

  • Sr. Member
  • ****
  • Posts: 399
Re: Progress on my windturbine
« Reply #12 on: May 21, 2008, 12:46:30 PM »
My ametek (40v) does really well.  Some would laugh at 3A, but it is enough to justify its existance.  I don't plan to take it out of commission any time soon.


I really like not worrying about smoking my meters.  Hasn't happened yet anyway.

« Last Edit: May 21, 2008, 12:46:30 PM by valterra »

zenpi314

  • Jr. Member
  • **
  • Posts: 56
Re: Progress on my windturbine
« Reply #13 on: May 21, 2008, 05:29:29 PM »
Hi Blueyonder,

Thanks for the kind remarks.

And thank you for sharing your funny story.

It was appropriate because I had not taken any precautions. I figured that my backyard is in such a wind shade that it will never take off. But still I should have implemented better security measures.

You would think that I would have learned from my previous temporary installment.

Last time I was installing the current prop on my old ametek turbine on top of a 22ft tower. As soon as I raised the tower, it started spinning slowly. Then a little faster. And a little faster still. Then the wind really took off and the turbine was spinning completely out of control. Of course I had no way of stopping it and I did not even put a load on the turbine. I started backing up to the far end of my backyard, but still felt in mortal danger. I decided that the tower had to be lowered. In order to do that, I had to climb a ladder and undo a couple of bolts just below the prop. Well, there I was, on top of a shaky ladder, with a prop spinning a thousand mile per hour right by my head. One of the scariest moments in my life. Luckily the tower came down without the prop exploding. But as I was lowering the tower, the prop swung around since it was much heavier than the tail, and it got jerked right of the axle (held by only one hex). Crash.

In a couple of minutes, I learned more about wind turbines than I had learned in several weeks prior.

A WINDTURBINE IS NOT AN INNOCENT TOY !

Treat them with respect.


I wrote this reply and tried to post it, but got a message that I exceeded my allowed post. The reply was lost. So here is take 2.


I think I will try to find a car wheel to attach the prop. Thanks for the advice.


Zenpi314

« Last Edit: May 21, 2008, 05:29:29 PM by zenpi314 »

zenpi314

  • Jr. Member
  • **
  • Posts: 56
Re: Progress on my windturbine
« Reply #14 on: May 21, 2008, 05:34:07 PM »
I like the idea of welding, but would also like to keep the option of dismantling it. Could I still undo it after welding? I guess all it needs is a little tack weld.

Everything is stainless steel, except for the bolds holding the prop wedges together. I still need to find replacements for those.
« Last Edit: May 21, 2008, 05:34:07 PM by zenpi314 »

zenpi314

  • Jr. Member
  • **
  • Posts: 56
Re: Progress on my windturbine
« Reply #15 on: May 21, 2008, 05:37:16 PM »
I really like the presentation model as well. But then again...as her father, I'm a little bias.

The welding got a little better as I got further along, but it still needs a lot of work to look good. I think it is pretty solid, but not aesthetic.
« Last Edit: May 21, 2008, 05:37:16 PM by zenpi314 »

elvin1949

  • Hero Member
  • *****
  • Posts: 645
Re: Progress on my windturbine
« Reply #16 on: May 21, 2008, 10:24:43 PM »
zenpi314

  Nice.

later

Elvin
« Last Edit: May 21, 2008, 10:24:43 PM by elvin1949 »

Capt Slog

  • Sr. Member
  • ****
  • Posts: 378
Re: Progress on my windturbine
« Reply #17 on: May 22, 2008, 02:59:13 AM »
That looks very nicely done, makes me realise what a dog's breakfast mine is in comparisson.


You say you are getting nervous about putting it up?  I had the same issues with being in a built up area and not wanting to upset anyone


I used a piece of scaffold for my 'tower' (always sounds to grand a word for a bit of pipe) and I secured this tubing to a piece of 2x4 timber with U-bolts.  This means I can raise my turbine vertically by just undoing the bolts and a lot of shove upwards.  It also means that my turbine gradually grew in height over a few weeks, and this happened overnight a couple of inches at a time.


.

« Last Edit: May 22, 2008, 02:59:13 AM by Capt Slog »

zenpi314

  • Jr. Member
  • **
  • Posts: 56
Re: Progress on my windturbine
« Reply #18 on: May 22, 2008, 05:32:21 PM »
Do you have a picture of that?

I like the idea of gradually increase in height.

What is the weight of your turbine? Mine seems fairly heavy to push up.

How do you connect the new pieces at the bottom when you raise it higher?

Thanks
« Last Edit: May 22, 2008, 05:32:21 PM by zenpi314 »

jmk

  • Hero Member
  • *****
  • Posts: 603
Re: Progress on my windturbine
« Reply #19 on: May 23, 2008, 06:01:50 AM »
 I used the red lock tight and it not only gave me a hard time getting it back apart but stretched my threads on 5/8 stainless steel. I hear the blue is for taking stuff back apart. I lust put some silicone on the threads and screwed the nuts on. It's held well for my 5/8 nuts, and is easy to clean up every time I take it apart.
« Last Edit: May 23, 2008, 06:01:50 AM by jmk »

zeusmorg

  • Sr. Member
  • ****
  • Posts: 364
Re: Progress on my windturbine
« Reply #20 on: May 23, 2008, 06:54:59 AM »
 When removing nuts sealed with loctite red, heat must be applied usually in the form of a propane torch, then it is decently easy to break the bond.
« Last Edit: May 23, 2008, 06:54:59 AM by zeusmorg »

zenpi314

  • Jr. Member
  • **
  • Posts: 56
Re: Progress on my windturbine
« Reply #21 on: May 23, 2008, 07:52:48 AM »
Thanks JMK and Zeusmorg,

If the red loctite comes of fairly easily but is strong enough to hold together in rough weather, then that is probably the way I will go.

Thanks,

Zenpi314
« Last Edit: May 23, 2008, 07:52:48 AM by zenpi314 »

zenpi314

  • Jr. Member
  • **
  • Posts: 56
Re: Progress on my windturbine
« Reply #22 on: May 23, 2008, 07:55:15 AM »
Hi jmk,

Zeusmorg just replied that the red loctite comes of easier when heated. Would you use it again if that is the case, or will you stay with silicone?
« Last Edit: May 23, 2008, 07:55:15 AM by zenpi314 »

blueyonder

  • Full Member
  • ***
  • Posts: 184
Re: Progress on my windturbine
« Reply #23 on: May 23, 2008, 05:19:09 PM »
hi zenpi.  looking at your file pics i see what looks like blue discs.

 are thay metal for the china blades?

 i got a few pics for you to look at. im not saying this is what you need do.

 but its just putting a few ideas in photo form.

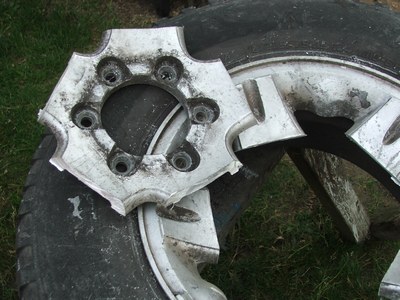
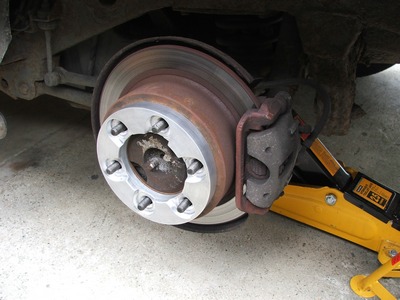
  as i said if you can get a wheel rim to fit your four studs.

   then maybe you can make a hub boss to hold the blades.

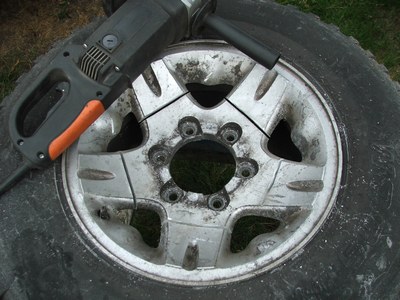
  as you have three blades then look for a wheel with a Evan no of spokes .

  the pics i have posted the wheel has five spokes. no good for a prop.

  but its just a general idea to get you looking at what you can do with a car wheel rim.

    im sure you understand what i mean

   with the carved prop you dont have this problem.

  so tell me what you think about the pics.


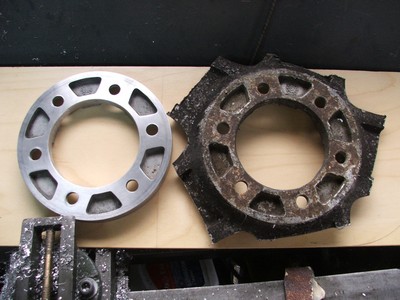
  as you can see i was making sum wheel spacers .

  but its much the same thing.

   only you want to leave three bits for you blades.
« Last Edit: May 23, 2008, 05:19:09 PM by blueyonder »

zenpi314

  • Jr. Member
  • **
  • Posts: 56
Re: Progress on my windturbine
« Reply #24 on: May 23, 2008, 07:35:52 PM »
I appreciate the lenghty response.

The blue disc are for the chinese blades. They fit nicely, but the center hole is too small and I don't know if I can drill the hub pattern through them. Pretty thick.

I do need to check it out a little more thoroughly, and maybe a local shop can do the drilling.

Thanks for the pictures. I'll be checking out a junkyard.
« Last Edit: May 23, 2008, 07:35:52 PM by zenpi314 »

jmk

  • Hero Member
  • *****
  • Posts: 603
Re: Progress on my windturbine
« Reply #25 on: May 23, 2008, 08:21:30 PM »
 No, You are bound to break the bond of the fiberglass that's on the rotor.
« Last Edit: May 23, 2008, 08:21:30 PM by jmk »

zenpi314

  • Jr. Member
  • **
  • Posts: 56
Re: Progress on my windturbine
« Reply #26 on: May 24, 2008, 06:27:43 PM »
Yikes. That sounds bad.

What silicon are you using?
« Last Edit: May 24, 2008, 06:27:43 PM by zenpi314 »

jmk

  • Hero Member
  • *****
  • Posts: 603
Re: Progress on my windturbine
« Reply #27 on: May 25, 2008, 08:54:08 AM »
 Not only can you have problems with the fiberglass but the rotor it self can warp. Then your air gap will have to get bigger and the blades will have to go faster to make cut in and your breaking power will also be decreased. I just use the cheap clear silicone. Hit the threads with paint prep to degrease them. I find that its a good idea to hit the cable clamps with a shot of paint prep and a coat of paint. The ones that I did that to still look bran new, and the ones that I didn't are all rusted and looking like a future problem.
« Last Edit: May 25, 2008, 08:54:08 AM by jmk »

elvin1949

  • Hero Member
  • *****
  • Posts: 645
Re: Progress on my windturbine
« Reply #28 on: May 26, 2008, 02:13:39 PM »
 My bottle of red locktite say's it takes 300 ft/lb's to break the bond. Don't use it on small bolts.


later

Elvin

« Last Edit: May 26, 2008, 02:13:39 PM by elvin1949 »

zenpi314

  • Jr. Member
  • **
  • Posts: 56
Re: Progress on my windturbine
« Reply #29 on: May 28, 2008, 08:42:48 PM »
Again. Sounds like good advice.

Thanks
« Last Edit: May 28, 2008, 08:42:48 PM by zenpi314 »

JAG616

  • Newbie
  • *
  • Posts: 2
Re: Progress on my windturbine
« Reply #30 on: June 10, 2008, 05:03:35 PM »
This is one of the best designs I have seen I'm thinking of duplicating this.


what size are the pipes it looks like 2" pipe and a 1" for the tail?

Also did you cut a hole for the wires to go down the pipe.

« Last Edit: June 10, 2008, 05:03:35 PM by JAG616 »