Author Topic: Building a NiCd battery pack  (Read 3664 times)

0 Members and 1 Guest are viewing this topic.

zap

  • Hero Member
  • *****
  • Posts: 1107
  • There's an app for that
Building a NiCd battery pack
« on: September 10, 2008, 08:23:23 PM »
I received some NiCd battery packs from Bruce S.


According to Bruce, the packs are replaced after 2 years in service.  They are tested, I assume, for voltage and amp hour rating.  The packs are 18vdc @ 1.3 ah.  All the packs are the same physical size and have a strip stuck to them showing the tested ah rating.  The packs I received ranged from 105% down to 96%.

I decided to build a battery pack from these for use in one of my Currie Efolder bikes.


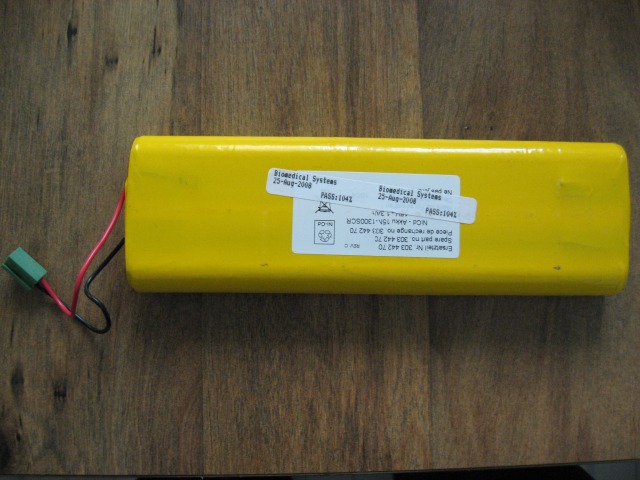
These are the packs as I received them.  I believe Bruce has had other configurations of packs.


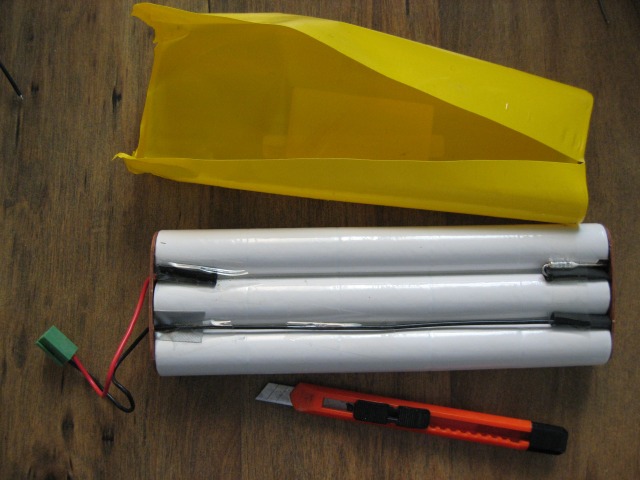
Here's the pack with the shrink wrap removed with careful use of a knife. There are 3 'strings', each string is made up of 5, 1.2vdc NiCd cells shrink wrapped in white.  After many measurements and figuring, I decided the easiest way to get a pack made would be to cut one string off the original pack leaving me with a 12vdc , 1.3 ah string.  Each string is hot glued(WOOHOOO... industrial hot glue!!!) together and it's a pretty simple procedure to slice through the hot glue and separate the strings.  I used 4 of the packs which ranged from 105% down to 102%.  In the top right hand corner of the pack between the first and second string of cells you can just make out a thermal cutoff that shuts the pack down if it gets too hot, I left these in place and ended up with 2 in each pack.  So far this hasn't caused any problem.


CAUTION!!!  THESE CELLS HOLD A LOT OF ELECTRICITY THAT'S JUST ITCHING FOR A WAY TO ESCAPE THE PACK.  The original wires coming out of the pack are 18 AWG(American Wire Guage).  Don't let the small size of the wire fool you.  Depending on the type of insulation, 18 AWG has a rating of up to 25 or more amps although these packs are probably designed to deliver around 2 to 4 amps under load.  Accidentally shorting these cells at any point between cells or strings will produce a discharge of 10 to 15 times the cells amp hour rating... i.e. BIG BAD BANG!  Once the outer shrink wrap has been removed, the strips of metal connecting the individual strings of cells become exposed and one should use GREAT CARE while working on individual stings and individual cells.


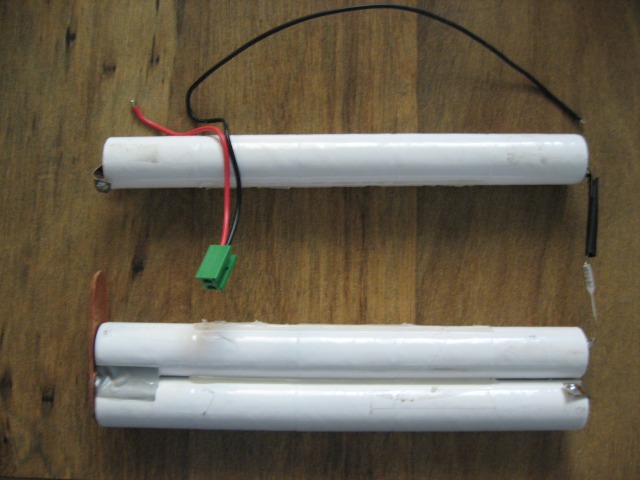
Here is a pack with one string separated from the others.  With a little forethought the 5 cell strings can be cut at the correct place to allow enough bus strip left over to use in reconnecting the strings.


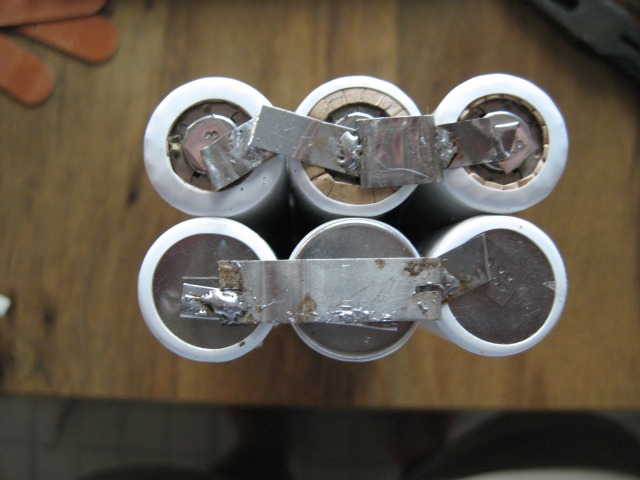
Here you can see where I soldered 3 sets of 2 strings giving me 12vdc @ 3.9 ah.  Be careful when soldering the tabs, too much heat will ruin a cell.  You want to use high heat for a short period of time.  I used a Weller 100/140 watt soldering gun on the high setting and used both the original cells tabs and other tabs off of old electric tool battery packs.  Not pretty but it gets the job done.


This shows the other end of the strings with their original factory connections.  Note the ends of the 2 thermal cutoffs pointing towards the camera.


Here I connected the 12vdc strings together to end up with a 24vdc pack @ 3.9 ah.  Note the jumper wire running left to right in the middle of the bunch connecting both 12vdc packs.  All the strings were hot glued together and the 2 packs were fastened together with packing tape.


This is the original setup of the Currie pack.  2-12vdc SLA @ 10 ah.  It has an internal steel frame with a zippered outside bag.


This is the new NiCd pack.


The original Currie pack weighs around 16lbs, the new NiCd pack is around 8lbs.


I did an endurance test of both packs.

A non-pedaling circular route of 1.95 miles was run till system shut down(about 13.5vdc) on the NiCd and until a consistent (and self imposed) reading of around 20vdc for the SLA.  I can't imagine the SLA lasting long if I took it all the way down to 6.75vdc per battery.

The course included stop signs and light traffic with a fairly consistent grade of about 2.3%.

From observing the volt meter I mounted on the bike and listening to motor noise, I determined the bikes top speed under electric power to be around 12.5 mph.  At or above that speed I didn't use any throttle and let the bike coast.  I did rolling stops at all 3 stop signs for a total of 6 rolling stops per complete lap.

Each battery was fully charged then left to sit for around 15 minutes before starting the test.  Wind was light and variable... under 5mph.

Both batteries 'died' within about 300 feet of each other on the uphill half of the course.


The results were about identical and interesting.

                                          NiCd            SLA

Starting Vdc                          27.6            26.3

Ending Vdc, after 5 min. rest    22.6            24.3

Trip length, miles                    4.95            4.82

Time, minutes                        26               25

Average speed, mph               11.4             11.5

Max mph, coasting                  20              20.1

Kwh to recharge                    .11             .1

« Last Edit: September 10, 2008, 08:23:23 PM by (unknown) »

Norm

  • Hero Member
  • *****
  • Posts: 1841
  • Country: us
  • Ohio's sharpest corner
Re: Building a NiCd battery pack
« Reply #1 on: September 10, 2008, 10:32:30 PM »
Here's a pic of mine Zap:


I done the same as you...took 3 18v paks, split

the two off one side....then took 2 of the three

singles left over made a 12 volt out of it giving

me a 12v  5.2 amp/hr batt pak, took the tabs and

twisted them so they stuck out to the sides,

curled the ends on the bottom row and slid bare

14 guage wire thru .

 The top row was a mistake....drilling holes thru

the tabs. I do all the rest of the paks by curling the ends of the tabs....easy once you get

the knack (about 32 tabs later)

Easiest way to separate the stacks is to put them

in the bottom of the freezer for about an hour

and a halfor maybe two hours they just fall apart

then cover and let them warm back up....

Looks like your configuration is just right for

your box.....

Later

« Last Edit: September 10, 2008, 10:32:30 PM by Norm »

Bruce S

  • Administrator
  • Super Hero Member Plus
  • *****
  • Posts: 5376
  • Country: us
  • USA
Re: Building a NiCd battery pack
« Reply #2 on: September 11, 2008, 09:26:00 AM »
Zap,

  Wow that was quick!!

So in reading this I want to make sure I read it right.

Using 24Vdc and 3.9Ahr battery pack, you were able to go about as far as the 24Vdc at 10Ahr pack? and saving 8lbs of weight at the same time..

Cool !!!


Bruce S

« Last Edit: September 11, 2008, 09:26:00 AM by Bruce S »
A kind word often goes unsaid BUT never goes unheard

Slingshot

  • Full Member
  • ***
  • Posts: 231
Re: Building a NiCd battery pack
« Reply #3 on: September 11, 2008, 10:02:58 AM »
That's interesting, and a good result.  


I had always been under the impression that it is difficult to obtain good results when paralleling NiCads or NiMH cells.  Because they are generally charged by controlling current, as opposed to a float voltage such as for lead-acid, presumably the cells would not charge-discharge uniformly in a parallel arrangement.


Anyone else?

« Last Edit: September 11, 2008, 10:02:58 AM by Slingshot »

zap

  • Hero Member
  • *****
  • Posts: 1107
  • There's an app for that
Re: Building a NiCd battery pack
« Reply #4 on: September 11, 2008, 11:46:44 AM »
Norm:

I've done packs with solid wire and I like your idea for wrapping the wire with the left over tabs.  That should give a good connection and also help to keep the heat from soldering away from the cell.  I wanted to keep this pack as 'tight' as possible so that's why I used the strips.

Once upon a time I cut some strips off of some old duct work off of an old stove vent hood, it must have been about 35 or 36 gauge steel.  I then hit it with a propane torch and tinned the whole thing which gave me plenty of connecting bars.  It was nice and thin and the soldering gun could heat it up quickly once I started connecting cells.


You can't see it in the photos but the pack doesn't fit as well as I would have hoped.  There's a 3/4 inch space on the bottom between the pack and the frame but the top lined up almost exactly with the original SLA.

I also should have shown the connections for hooking the NiCd pack to the original bag.  I had some crimp on spade connectors but I really didn't want to solder on a length of wire then crimp on a connector so I ground down the plastic off of an old SLA and took those two spade connectors and soldered them to the NiCd pack... it worked well.


Bruce:

Yeah... I told you other projects would get shelved when you sent those packs! : )


Yes, you read it right but in all fairness I should say that I don't know how good a shape the SLAs are in.  At some point I need to do a load test on them.  The gal I got the bikes from said she had new batteries put in last year and that the bike shop also did tune ups on both bikes at that time.  The bikes sat in a garage but it seemed to me there was just too much dust on them for them to have only been sitting one year.


Like I was telling you, having the SLAs on the SG4 for about a week brought them up and they held at 13.2vdc so I have a feeling they're in pretty good shape.

You could get more out of the SLA's but personally I felt very uncomfortable even taking them down to 20vdc and probably even 22vdc would probably severely limit their life.  If I had stopped the test at my comfort level the NiCds would have been even more impressive.

Thanks again for the packs!!!


Slingshot:

Big problems certainly can come from paralleling cells. Cell imbalance can lead to big trouble.  I have a feeling these are quality cells and being used in medical equipment probably undergo a close scrutiny before acceptance.  I still keep a close watch on them during charge and discharge but so far so good.


I'm using the ebikes original SLA charger on the built pack.  I watched it like a hawk the first few times charging up and was even sticking a heat probe here and there to keep an eye on things.  So far it's performed like a champ and it even takes itself down to a maintenance charge after it's reached capacity.

« Last Edit: September 11, 2008, 11:46:44 AM by zap »

Bruce S

  • Administrator
  • Super Hero Member Plus
  • *****
  • Posts: 5376
  • Country: us
  • USA
Re: Building a NiCd battery pack
« Reply #5 on: September 12, 2008, 07:37:12 AM »
Slingshot;

   I will add a little to what Zap said. I have found that to keep cross cell problems to a minimum, it's best to match the cells as best as possible, then like he did watch them to make sure they become a cohesive pack.

By completely charging the set as an entire pack, then using them , then recharging the packs as a whole , helps the entire set become a "one" set pack . Rather than charging the packs as individual packs then having them used , will certainly lead to imbalances.

When these packs are tested at our office they go through a very structured testing.

When I built the packs up for our 48V e-bike they were then retested as a single pack. For us there has not been any problems yet.

So far I've built 2 packs doing this, one pack of 36Vdc rated at 32Ahr & the most recent pack being 48Vdc rated at 16Ahr. Both are still going strong . The first pack is now 2 years old the last being less then 4 months.


Hope this helps;

Bruce S

« Last Edit: September 12, 2008, 07:37:12 AM by Bruce S »
A kind word often goes unsaid BUT never goes unheard

zap

  • Hero Member
  • *****
  • Posts: 1107
  • There's an app for that
Re: Building a NiCd battery pack
« Reply #6 on: September 12, 2008, 11:24:47 PM »
One thing I forgot to say was that keeping the paralleled parts (and the pack as a whole) symmetrical goes a long way towards keeping the charge on all cells level.


If I was only pulling 500ma out of the pack I wouldn't worry much at all.  Depleting the pack in a half hour is probably pushing things a bit too much... hence the reason I've been watching the pack closely for now.

« Last Edit: September 12, 2008, 11:24:47 PM by zap »