Author Topic: #15 coil, 100 turns, size?  (Read 2219 times)

0 Members and 1 Guest are viewing this topic.

nothing to lose

  • Hero Member
  • *****
  • Posts: 1538
#15 coil, 100 turns, size?
« on: June 24, 2006, 12:03:47 PM »
First I want to say I am using used wire here, that is why I choose 98-100 turns, the length of wire. I did not choose that number. I was actually just cleaning it and I ended up with these :)


I had bought used parts from Meltex awhile back and getting ready to use them now. Thanks Mel.

The coils were wound different than I want and also still had fiberglass chips on them from the last casting he did. I built a wood coil winder and mounted a block of wood with holes drilled so the wire was a tight fit. When winding the coils I fed the wire through a hole in the block and that popped off the fiberglass chips as well as help straighten the wire and hold some tension.


My daughter walked across the yard un-wrapping the used coils as I was winding it at the same time.


What I ended up with was 7 of these so far. Other 2 coils I had cleaned same way but made round a day earlier before I made the new center for the coil winder.


This photo is only supposed to be 52KB but looked large when I previewed it.


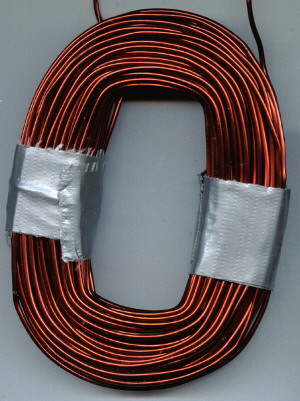
Aproximate measurements as they do vary slightly,

Center height 2.25"

Center width 1.08"

width of coil legs each around 0.8" - 0.9"

Outer coil width on sides 2.8"

Total coil height OD 3.9"

Thickness 0.73" but can be mashed a little thinner.


I measured the wire with calipers and checked the dia in a chart and it shows to be #15 wire.

 Being as I was just cleaning and straighting the wire to begin with and checking for knicks and scrapes I did not count turns as well as I should have maybe, I got mostly 100. I think I had a 98 and one at 102 though.


They all show 0.8 when I check resistance with a meter.


Magnets to be used are 2"x1"x0.5" supposed to be N42. Not sure why I got them so cheap but it was a deal I could not pass up.


Disks are 12"dia 1/4" thick.


I plan to carve blades for a 10 footer but that may be awhile so I may try my ART 8' ones just to see what it does. If I need to go 12' or so I could carve those as badly as 10' I geuss.


I plan to leave the wires exposed to wire the coils various ways but the plan for now is 48V charging.


Any opinions on the coils as is? Normally I would try a test coil etc.. however being as this is used wire from other coils it's already been cut to length and any I cut off will be scrap and of course it's kinda hard to lengthen it too. Will be a few days I think before I can mount mags to disks to actauly test these.

 One thought if I need to would be that I could cut it in half, maybe 2 in hand #15 and get 50 turns instead of 100? I have 12V 24V and 48V stuff I can power so what voltage I need is not much of a question for me, it's more of where I can get the most power and least losses from what I have to work with for this first one.


The coils seem to fit nicely at this time when I layed them out roughly around the disks, but 0.73" is a bit thicker I think than I wanted for 0.5" thick magnets.

« Last Edit: June 24, 2006, 12:03:47 PM by (unknown) »

nothing to lose

  • Hero Member
  • *****
  • Posts: 1538
Re: #15 coil, 100 turns, size?
« Reply #1 on: June 24, 2006, 06:11:07 AM »
By the way, I have not yet converted from motor conversions to dual rotors, but I have all this stuff sitting around and the wife is a bit grouchy when I suggest I need more STUFF so I figure I better build this one and use some STUFF :)
« Last Edit: June 24, 2006, 06:11:07 AM by nothing to lose »

Norm

  • Hero Member
  • *****
  • Posts: 1841
  • Country: us
  • Ohio's sharpest corner
stuff....
« Reply #2 on: June 24, 2006, 06:50:15 AM »
    I don't understand...my wife gets grouchy

about my stuff too but she don't want me too

get boxes to put the stuff away she don't like

boxes...and I tell her ....drawers are boxes

that you put on shelves or guides

    she has the final say....Get Rid Of It !

LOL

                 ( :>) Norm

 
« Last Edit: June 24, 2006, 06:50:15 AM by Norm »

Flux

  • Super Hero Member Plus
  • *******
  • Posts: 6275
Re: stuff....
« Reply #3 on: June 24, 2006, 07:58:35 AM »
Assuming 12 pole 9 coil, this looks to be nice for 48V ( perhaps a bit fast for 10 ft but ok)


Should work with the 8ft blades but will stall and need line resistance.

Flux

« Last Edit: June 24, 2006, 07:58:35 AM by Flux »

nothing to lose

  • Hero Member
  • *****
  • Posts: 1538
Re: stuff....
« Reply #4 on: June 25, 2006, 01:33:11 AM »
Sorry, Yes this is a 12/9

 Thanks,


Something I found today. My last two coils have some knicks, mostly all at one end, not sure if I will lose wire or can just get a can of spray coat and re-insulate. I'll know when I rewind those two if a deep cut or not.


If I lose a few turns on those, would I be better to just remove a couple from the other coils already done and go with say 95 turns or rewind them all? If I remove a couple turns, is from center or outer better or would it even matter.


Also after laying out the coils onto a 12" disk today with magnets just stuck in place I have room for a 10th coil it looks like. Would I be alot better off to rewind the coils thinner and use that space? I am thinking a thinner coil will be wider and have less turns, Same amount of wire, smaller airgap maybe.


Being I don't want to bend the wire back and forth so many times as to stress and crack the varnish or break the wire I am wondering rather it's worth the risk winding again since these turned out better than I expected so far.

 If I make them too large next time and have to rewind a 3rd time, that's 3 winds 3 unwinds for me (only once each so far though) and at least once wound before I got the wire. How many times can I bend a #15 before I have to worry about breaking it or cracking up the varnish? Is that even anything to worry about since the bends aren't really that sharp?

« Last Edit: June 25, 2006, 01:33:11 AM by nothing to lose »

Flux

  • Super Hero Member Plus
  • *******
  • Posts: 6275
Re: stuff....
« Reply #5 on: June 25, 2006, 02:12:04 AM »
You are taking a chance with used wire. The more you mess about with it the greater the chance of more damage.


The risk is from shorted turns. One bare spot will not matter as long as it can't touch another one. If removing 2 turns will significantly reduce the risk of bare patches touching, do it. Only do it where there is obvious damage, there is no point in removing turns from the good ones.


If you were not re-using wire and you had room for an extra coil the normal procedure would be to use a thicker wire. If you only had the same size wire you would gain a little bit by making the coils thinner so you would need less turns for the same cut in speed. This would likely save a bit of resistance but the turns would be longer and it would be difficult to see if you would gain much.


With your sick wire, don't risk it.


Flux

« Last Edit: June 25, 2006, 02:12:04 AM by Flux »

nothing to lose

  • Hero Member
  • *****
  • Posts: 1538
Re: stuff....
« Reply #6 on: June 26, 2006, 03:19:37 PM »
Thanks again.

 Kinda what I thought mostly but wasn't certain.


On the two with bad spots pretty sure I will lose a couple turns on at least 1 coil maybe both. So I gather then from what your saying is it won't be a big deal if 2 coils are just a couple turns less than the other 7 coils. So I am done now with 7 coils and will wind the other 2 the same now.


I have a spool of new #14 I will use for the next gennie, but this one I am using up used parts laying around.

« Last Edit: June 26, 2006, 03:19:37 PM by nothing to lose »

nothing to lose

  • Hero Member
  • *****
  • Posts: 1538
Re: #15 coil, 100 turns, size?
« Reply #7 on: June 30, 2006, 03:27:33 AM »
Today was mostly a waisted day, too much running around had to be done.


I did get some 6" 1/2" carrage bolts for jacking bolts, not that I wanted them but only thing I could find threaded to the head. All other bolts in several stores were threaded about 2" only.


Anyway I got my 2 rotors together on the hub now for testing coils. Did not have time to set up anything for good testing but I did hold a coil in the airgap and give it a spin. Getting over 2V and 3V AC open easily. Airgap is too big, I only had time to toss it together tonight, no real adjustments, so it's about 1" between magnets on the 2 rotors. I hope to set it up right and make a testing jig to hold coils in the next couple days and test under a load, maybe charge Bruce batteries with it for the load.

« Last Edit: June 30, 2006, 03:27:33 AM by nothing to lose »

TomW

  • Super Hero Member Plus
  • *******
  • Posts: 5130
  • Country: us
Ready Rod....
« Reply #8 on: June 30, 2006, 03:48:28 AM »
NTL;


Just curious if you considered ready rod [threaded rod]?


Not sure about there but here it is pretty common. Even comes in 2 grades "expensive" and "expensiver",

at least compared to $.89 a # common bolts. I would be concerned with carriage bolts and strength. Anyway, just a thought at 5 AM.


Cheers.


TomW

« Last Edit: June 30, 2006, 03:48:28 AM by TomW »

nothing to lose

  • Hero Member
  • *****
  • Posts: 1538
Re: Ready Rod....
« Reply #9 on: July 04, 2006, 05:13:21 AM »
Thanks.

 Thats probably what I may do later, allthread and weld or double nut it at one end.


If I use allthread I may put a T handle on the head so I can just turn them by hand instead of using a wrench and also a nut incase I do need a wrench like if one binds or something unexpected.


I only need 1/2" for this one, when I get my other disks I am having the jacking holes made 1/2" they will need 9/16" or 5/8" jacking bolts after tapped. The reason is not for larger bolts but because I am having 2 different bolt patterns put on the same disks so I can choose between 2 different hubs.

« Last Edit: July 04, 2006, 05:13:21 AM by nothing to lose »