Author Topic: Alittle bit on the 6" genny  (Read 2182 times)

0 Members and 1 Guest are viewing this topic.

nothing to lose

  • Hero Member
  • *****
  • Posts: 1538
Alittle bit on the 6" genny
« on: January 11, 2007, 03:43:35 AM »
Well back to work on the 6" genny.

I finnally bought myself a decent camera, now to learn to use it better. Most pictures turn out great, but some things under the CFL lights don't yet. I think there is a setting for that though, have to learn how to use it.


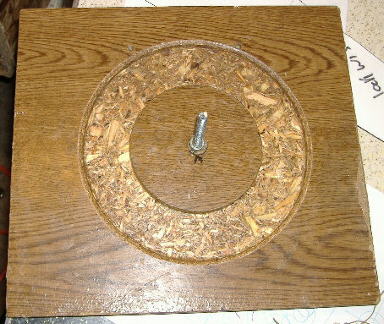
 Today I turned the mold on the lathe for the stator. 4.5" center, 8" Dia outer.

This was the door off an old desk or something. I thought it would be sawdust and glue, but it was more like waferboard.

 I sanded the inner area after turning it. To keep the resin from sticking I waxed it very well.

To wax it I used a large candle. I heated the mold with a heat gun and then the candle to melt it. I ran the melted wax all around the inside of the warm mold letting it soak in. Then I took a softend wax chunk and rubbed all around the inside and the edges.

The bolt in the center was how I mounted it in the lathe, but then it stuck out the backside. I drilled the center hole a little smaller than the carraige bolt and threaded in the bolt, I used a double nut to lock onto the threads and draw the head into the wood by screwing the bolt in tight, then I ran 1 nut and a washer up tight to the wood to lock everything tight.


Mold.jpg


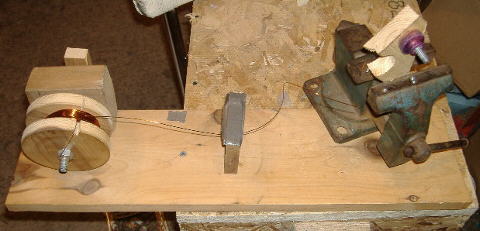
Next time I will make a crank type winder like normal. I figured with such small coils I would just wind by hand, my fingers are still sore. I just pulled the wire around the 1/2" spool I made by hand and tight too! 70 turns per coil, 18 coils!

In the pictures the left side is part of my normal winder, that is the spool and handle for winding the coils for the 10'.

In the vice on the right the purple thing with bolt sticking out is the 1/2" spool for these coils, front and nut removed.

 I wound that wire onto the left spool from a 4lb 7oz cloth and resin coated coil I got at the scrapyard, that full spool did not make a dent in the coil.


6inparts.jpg


Here are the 18 coils. When I was winding these and checking with the template they appeared to be comming out correct at 70 turns, untill I got to about 12, then I could see they were running on the large side. When done I had 17 coils and room for about 1/2 of number 18. The coils have a 1/2" center hole and the wire is 1/4" thick. This gave me a coild about 1" OD, I figured it out and I needed about 0.95 OD each to fit in 18.  Well, remember that vice in the other picture? I placed the coils one at a time into the vice and crushed in the sides a little bit to make 0.95 roughly. But this also caused the coils to get a bit loose and sloppy. When laid in the mold 17 fit perfect! WHAT!!!

 Ok, now it was go for a loose 16 coils and change everything or get creative.

While looking for some sewing thread to wrap and tie up the coils I found something FAR better!

Artificail Sinue. Left over from when I did leather working a bit I had a nice large spool. Now if you don't know what that is and with my bad spelling you may not, Artificial Senue is a very strong waxy type string basically and sticky too.

 That was perfect! I tied the coils very tight on each leg to crunch them thinner and very tightly together leg to leg to crunch them in width. I made basically a straight string of coils then pulled them around in a circle.


Coiltied.jpg


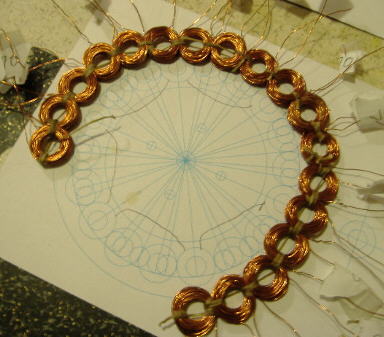
Sinue is very strong but thin, and being sticky pulled tight and onto itself it holds well and knots are thin and hold well also. Being sticky it does not slip around on the coils like thread or plain string would.

 After I had tied all 18 coils I place them in the mold, hey geuss what, THEY FIT!

Actually instead of being too large as before now they were a tiny bit short for the full circle. I tied the two ends together tightly and It's a perfect fit and tight on the center.


18coil.jpg


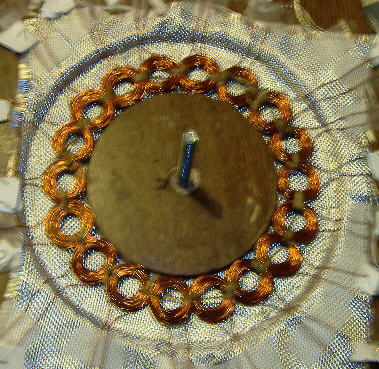
As you can see, I plan to bring all ends to the outside of the stator. I hope this works for me. 18 coils, 36 ends, going to be easy to make a mistake wiring them so I'll really have to watch that close.

 I have tagged all of the end wires with a paper and bent over the end also to tell which is start or ends. I tried to place the 2 wires for a coil comming out above that coil and have them taped down with Scotch tape for now.

I was going to cast some resin just to hold everything in place for now and bond it all together tight. Not casting the full stator. I think I will make another mold to cast the full stator. I would like more room in the center for some resin, maybe 3.5" center instead of 4.5" to give it more strength, and perhaps a 9" dia to have more room for mounting points further out away from the coils. The stator should be just about 1/4" thick when done.


taped.jpg


Sparkey says, "Heck the other guys get PIZZA, all I got was a Brawt"


« Last Edit: January 11, 2007, 03:43:35 AM by (unknown) »

Jerry

  • Hero Member
  • *****
  • Posts: 1519
Re: Alittle bit on the 6" genny
« Reply #1 on: January 10, 2007, 10:10:18 PM »
Hi NTL.


Looks like the littel project is comming along nicely. Bring me up to speed here. I'm sure you've posted the info in an earlyer story.


18 coils 70 turns and what gage wire? Magnet size and count? Alt voltage and wire configuration, star, delta ect?


Will you be able to do a laithe test befor you fly it. Great story and thanks for the pix. I'm working on a 5.25 inch 8 magnet unit also. My magnets are the 1"X1/2"X.25". I'll be trying both single and dual rotor with this one.


Againg thanks and keep the story and photos comming. These littel alts are fun to make.


                     JK TAS Jerry

« Last Edit: January 10, 2007, 10:10:18 PM by Jerry »

nothing to lose

  • Hero Member
  • *****
  • Posts: 1538
Re: Alittle bit on the 6" genny
« Reply #2 on: January 11, 2007, 12:24:29 AM »
Hi Jerry,


I am shooting for a 6" 24pole and 18 coils, #23 wire and 1/2"x1/8" disk Neos N42.

I am using about 1/8" steel plates on a bicycle hub. I don't seem to be losing much if any flux from the rear of the plates in daul rotor mode. When I tested the plates before mounting though there was flux loss!

So for a single rotor a thicker plate may be needed than for a daul rotor. A wrench or screwdriver would stick to a single rotor but not when mounted as daul rotor. I thought that was interesting myself.


I do have 100 1/2"X 1/4" N42 disks also and 1/4" plates, but to make those fit I'd have to do some work on the bicycle hub or make a new longer axle or such.

Also if this works as planned I am giving it away to a friend later after testing it well. They need it for low winds in AZ. on a camper when they go there to live.


Here is the first post on it from over a month ago!

http://www.fieldlines.com/story/2006/12/5/42627/7096


Nov. was not that good for me and Dec. even worse! But I am getting started up again now.


I made a jig for my PVC blades I may post that you might like, for a bandsaw though, and I have a 6 pole motor I may post and would like your opion on. More like something you have done than what I have done.


Beware, I bought myself a good camera and after all these years of not being able to post a decent picture I just may go bananas with it :)


A new picture of the 6" rotors and hub/axle. Here you see the roll of artificail senue I spoke of. No artificail animals were harmed in the making of this artificail senue :)

Senue itself is made from animal tendonds for those that did not get the joke. Although I should check for properer spellin of it I guess. :)

Also I think you can see the template for laying out the 24 magnets there.

The front of the rotor looks odd because I put electrical tape on the front (now peeling off) so that the laser tach would read the speed better when testing coils. Black with a reflective spot, I think you were the one that got me interested in getting one long ago Jerry, Thanks, I use it alot for various things.


Another shot, the plan is to have the genny on the back side and the blades on the front side, lock down the hub for mounting. I will probably make PVC blades for this.


Maybe better view of coil setup. If I figure out the camera settings and CFL lighting I could do better! Then agian it could just be the white Fiberglass and the pattern it makes. I think this is the best picture I took so far and you can sortof see how I tied the coils.


« Last Edit: January 11, 2007, 12:24:29 AM by nothing to lose »

nothing to lose

  • Hero Member
  • *****
  • Posts: 1538
Re: Alittle bit on the 6" genny
« Reply #3 on: January 11, 2007, 12:42:10 AM »
Hey Jerry I'll be very interestered in yours also you know.


1"X1/2"X.25"? 8 poles?

I have that 100 1/2"x.25" disk neos on hand myself! So 16 of those kinda makes

1"X1/2"X.25" if I double them in length.

« Last Edit: January 11, 2007, 12:42:10 AM by nothing to lose »

richhagen

  • Hero Member
  • *****
  • Posts: 1597
  • Country: us
Re: Alittle bit on the 6" genny
« Reply #4 on: January 11, 2007, 04:08:50 AM »
Hi NTL,

It looks good so far.  I think that when you added the second rotor, you changed the flux path a bit, which linked the flux through the backside plate on adjacent magnets a little better in completing the magnetic circuit.  I wonder if making the center of the coils a little thinner, and making the coils a little bit oval would make packing them in there a little easier and not hurt their efficiency that much.  See Dan's 7 footer with the round magnets and oval coils here:  http://otherpower.com/7windturbine.html


or the vanzant generator from the small science fair wind turbine page for examples of oval coils.

Also, I used a new wax ring for a toilet on one of my molds with good results.  As a landlord, I had a few of them around, and they don't have to be very warm to be plyable to smear on the mold.  I think a tub of bearing grease would probably work well as well.  I will follow with interest as I have those 6" plates you gave me to use on a project.  I have to send Ghurd out a set of those still.  


Things have been getting done slowly for me here lately, my projects got pre-empted for a pinewood derby car again.  This years is a replica of a space ship from Star Wars, hopefully it will perform a bit better than last years shark.  Rich

« Last Edit: January 11, 2007, 04:08:50 AM by richhagen »
A Joule saved is a Joule made!

tecker

  • SuperHero Member
  • ******
  • Posts: 2183
Re: Alittle bit on the 6" genny
« Reply #5 on: January 11, 2007, 07:11:42 AM »
It will be good to see how the round coils perform .Looking forward to your data . Round coils  punck out early in the charging cycle . The radical angle and the area out of the flux path store the charge and amperage is posted as the charge is redistibuted into the circuit. ie oval or square coils ..Take a look at a transformer Why square of the coils there with half of the coil area out to the side and a space away from the core .
« Last Edit: January 11, 2007, 07:11:42 AM by tecker »

Walter

  • Newbie
  • *
  • Posts: 12
Re: Alittle bit on the 6" genny
« Reply #6 on: January 13, 2007, 07:18:24 AM »
I built a fiber glass boat once using another fiber glass boat as a mold. For a release agent I used Johnson's floor wax. It worked well.
« Last Edit: January 13, 2007, 07:18:24 AM by Walter »