Author Topic: Christmas Windmill Time  (Read 29275 times)

0 Members and 2 Guests are viewing this topic.

SparWeb

  • Global Moderator
  • Super Hero Member Plus
  • *****
  • Posts: 5452
  • Country: ca
    • Wind Turbine Project Field Notes
Re: Christmas Windmill Time
« Reply #165 on: July 09, 2021, 12:28:22 AM »
Ah the setbacks and allowances for the sheet metal brake...
I don't have a chart for silicon steel.

Hope you can find a way to make them all nest together nicely...  tricky...
No one believes the theory except the one who developed it. Everyone believes the experiment except the one who ran it.
System spec: 135w BP multicrystalline panels, Xantrex C40, DIY 10ft (3m) diameter wind turbine, Tri-Star TS60, 800AH x 24V AGM Battery, Xantrex SW4024
www.sparweb.ca

taylorp035

  • Hero Member
  • *****
  • Posts: 1206
  • Country: us
  • Stressed spelled backwards is Desserts
Re: Christmas Windmill Time
« Reply #166 on: July 21, 2021, 10:10:47 PM »
I have 10 coils wrapped now.  I was looking at my test shim today and I'm pretty sure the grain direction is visible with the naked eye.  I'm assuming I need to orient that in the direction of travel for the flux.

Also, what do people think of putting a thin layer of primer and paint on the metal shims to help protect them from moisture and to isolate the layers?

SparWeb

  • Global Moderator
  • Super Hero Member Plus
  • *****
  • Posts: 5452
  • Country: ca
    • Wind Turbine Project Field Notes
Re: Christmas Windmill Time
« Reply #167 on: July 22, 2021, 09:53:33 PM »
I'm not sure that it matters, but I've never thought about it before, either.  If the datasheets for the metal includes magnetic permeability but doesn't give two numbers for MP that depend on grain direction, you shouldn't expect it to matter.

These guys made a FEM analysis and built a test transformer.  Not a word about grain direction in the whole article.  I am not convinced they new what they were doing however, and may just be undergrads with stupid paper to write:
https://www.grdjournals.com/uploads/conference/GRDCF/005/040/GRDCF005003.pdf


On the other hand, here is a Matweb page about a non-oriented Si-Steel material:
http://www.matweb.com/search/datasheettext.aspx?matguid=2d0597fc0d8940c480fb3a7916a4ccb3


If you can't find a discussion of it on a site like this, it's not important.
http://www.protolam.com/page7.html
No one believes the theory except the one who developed it. Everyone believes the experiment except the one who ran it.
System spec: 135w BP multicrystalline panels, Xantrex C40, DIY 10ft (3m) diameter wind turbine, Tri-Star TS60, 800AH x 24V AGM Battery, Xantrex SW4024
www.sparweb.ca

SparWeb

  • Global Moderator
  • Super Hero Member Plus
  • *****
  • Posts: 5452
  • Country: ca
    • Wind Turbine Project Field Notes
Re: Christmas Windmill Time
« Reply #168 on: July 22, 2021, 09:54:54 PM »
Primer and paint - not for protection - more importantly to prevent them from vibrating!  If they're all loose, they're gonna HUMMMMMM
No one believes the theory except the one who developed it. Everyone believes the experiment except the one who ran it.
System spec: 135w BP multicrystalline panels, Xantrex C40, DIY 10ft (3m) diameter wind turbine, Tri-Star TS60, 800AH x 24V AGM Battery, Xantrex SW4024
www.sparweb.ca

MattM

  • Hero Member
  • *****
  • Posts: 1178
  • Country: us
Re: Christmas Windmill Time
« Reply #169 on: July 26, 2021, 07:11:16 AM »
I'd be worried the steel parts could rub the epoxy on the wire and cause a short.

taylorp035

  • Hero Member
  • *****
  • Posts: 1206
  • Country: us
  • Stressed spelled backwards is Desserts
Re: Christmas Windmill Time
« Reply #170 on: August 08, 2021, 09:58:53 PM »
I'd be worried the steel parts could rub the epoxy on the wire and cause a short.
  I'll make sure to try and avoid having direct contact with the shims vs. the coils.  This should be fairly easy given this design.  I can put a thin piece of plastic on the most sensitive ends of the shims and maybe on the inner shim.

And here are the pictures you have been waiting for.  6 weeks of winding and a little bit over 5 lbs of of 17 gauge wire (~800 feet).  I'm sure this is a lot more work than an axial flux design, as I had about 2 hours into each coil.  My next step is to check the resistance of each coil before cutting the zip ties and getting it ready for some drill press testing without the shims.

For scale, the center of the coils is 4" and the OD of the alternator will be right at 6".
14239-0

14240-1

14241-2

taylorp035

  • Hero Member
  • *****
  • Posts: 1206
  • Country: us
  • Stressed spelled backwards is Desserts
Re: Christmas Windmill Time
« Reply #171 on: August 10, 2021, 10:42:57 PM »
I measured the resistances of all the coils using a voltmeter and a power supply at about 5 amps.  It looks like I did a good enough job making them equal enough.  The most imbalance once I put the correct coils in series is about 5% in resistance.  The average resistance for each 17 gauge coil (5.064 ohms/1000 feet) was 0.302 ohms.  It didn't appear that I had any shorts in my new coils.

It also works out to 717 feet of total copper, which seems about right for what is on the roll still if I threw out 30-ish feet and I started with 1184 feet. 

I also figured out that it should work out to about 68 turns per coil on average.  My optimistic perfect answer was going to be 86 turns, so 79% of my target.   If all of the numbers work out, this means a cut in of 74 rpm using a 2 in series x 2 in parallel layout for each phase.

The blades have been re coated with polyurethane, so the next step is to try the alternator out on the drill press without shims and then actually cut out the shims and install them + re-test.

SparWeb

  • Global Moderator
  • Super Hero Member Plus
  • *****
  • Posts: 5452
  • Country: ca
    • Wind Turbine Project Field Notes
Re: Christmas Windmill Time
« Reply #172 on: August 11, 2021, 08:46:58 AM »
Looking good Taylor!
Even a splash of colour.

You got me thinking ahead to your shaft and bearing mount.  Some ideas coalescing in my head that you could try...  or have you already mentioned how you will do that (...and I forgot)?
No one believes the theory except the one who developed it. Everyone believes the experiment except the one who ran it.
System spec: 135w BP multicrystalline panels, Xantrex C40, DIY 10ft (3m) diameter wind turbine, Tri-Star TS60, 800AH x 24V AGM Battery, Xantrex SW4024
www.sparweb.ca

taylorp035

  • Hero Member
  • *****
  • Posts: 1206
  • Country: us
  • Stressed spelled backwards is Desserts
Re: Christmas Windmill Time
« Reply #173 on: August 11, 2021, 10:25:28 AM »
I have some photos on page 5 of this thread showing the bearing mounts.  I plan on having several blocks of wood to touch the plastic arms coming off the bearing to counteract the torque.  The math says about 5 ft*lbs.

As for attaching to the shaft to get the torque into the magnet rotor, I have a shoulder bolt that should be more than adequate.  I already have the counterbores and threads in the plastic of the rotor for it.  I will need to drill a hole through my 1" steel shaft once I decide on the location of everything.

SparWeb

  • Global Moderator
  • Super Hero Member Plus
  • *****
  • Posts: 5452
  • Country: ca
    • Wind Turbine Project Field Notes
Re: Christmas Windmill Time
« Reply #174 on: August 11, 2021, 02:16:43 PM »
Now I remember those spiders.  :)
No one believes the theory except the one who developed it. Everyone believes the experiment except the one who ran it.
System spec: 135w BP multicrystalline panels, Xantrex C40, DIY 10ft (3m) diameter wind turbine, Tri-Star TS60, 800AH x 24V AGM Battery, Xantrex SW4024
www.sparweb.ca

taylorp035

  • Hero Member
  • *****
  • Posts: 1206
  • Country: us
  • Stressed spelled backwards is Desserts
Re: Christmas Windmill Time
« Reply #175 on: September 05, 2021, 09:08:00 AM »
Big update -

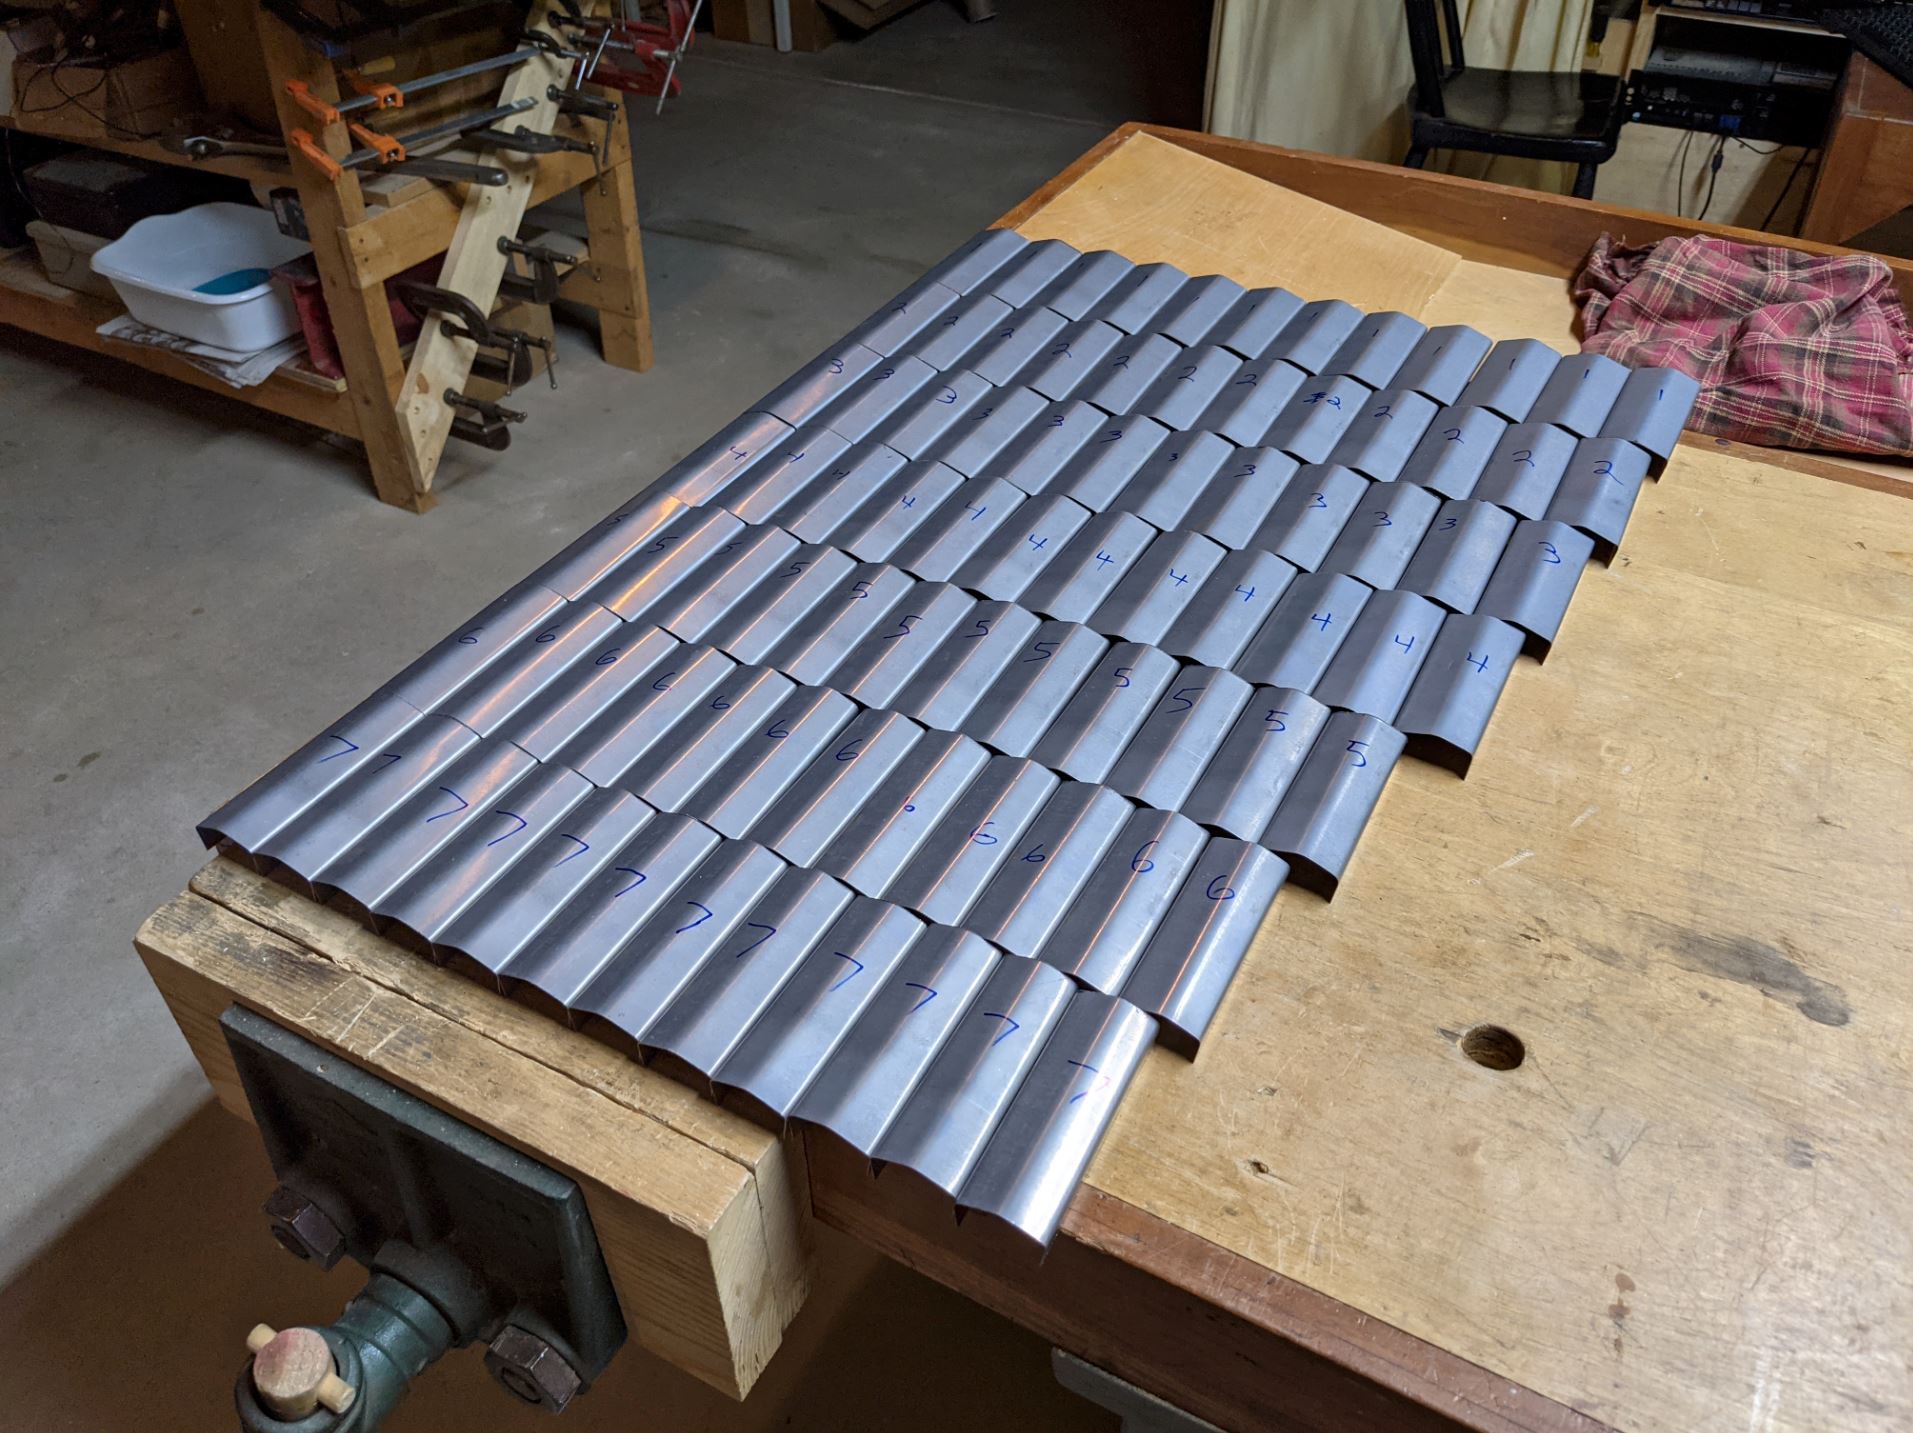
Bending the silicon steel shims turned out to be a large amount of work.  84 shims (7 layers x 12 coils) and 3 bends per shim.  First I went to a friend's house to use their sheet metal shear.  Next I did the middle bends with just a board and me eyeballing the angle until it matched the previous shim. Then I made a special wood fixture to get the legs of the shims bent to the right angle, which was super challenging since the width of the center and the legs all needed to be correct within about 0.010", else they wouldn't nest into each other properly.  This meant there was a lot of tolerance stackup from the original blank piece of steel to the final width.   I tried really hard to get them as perfect as possible.
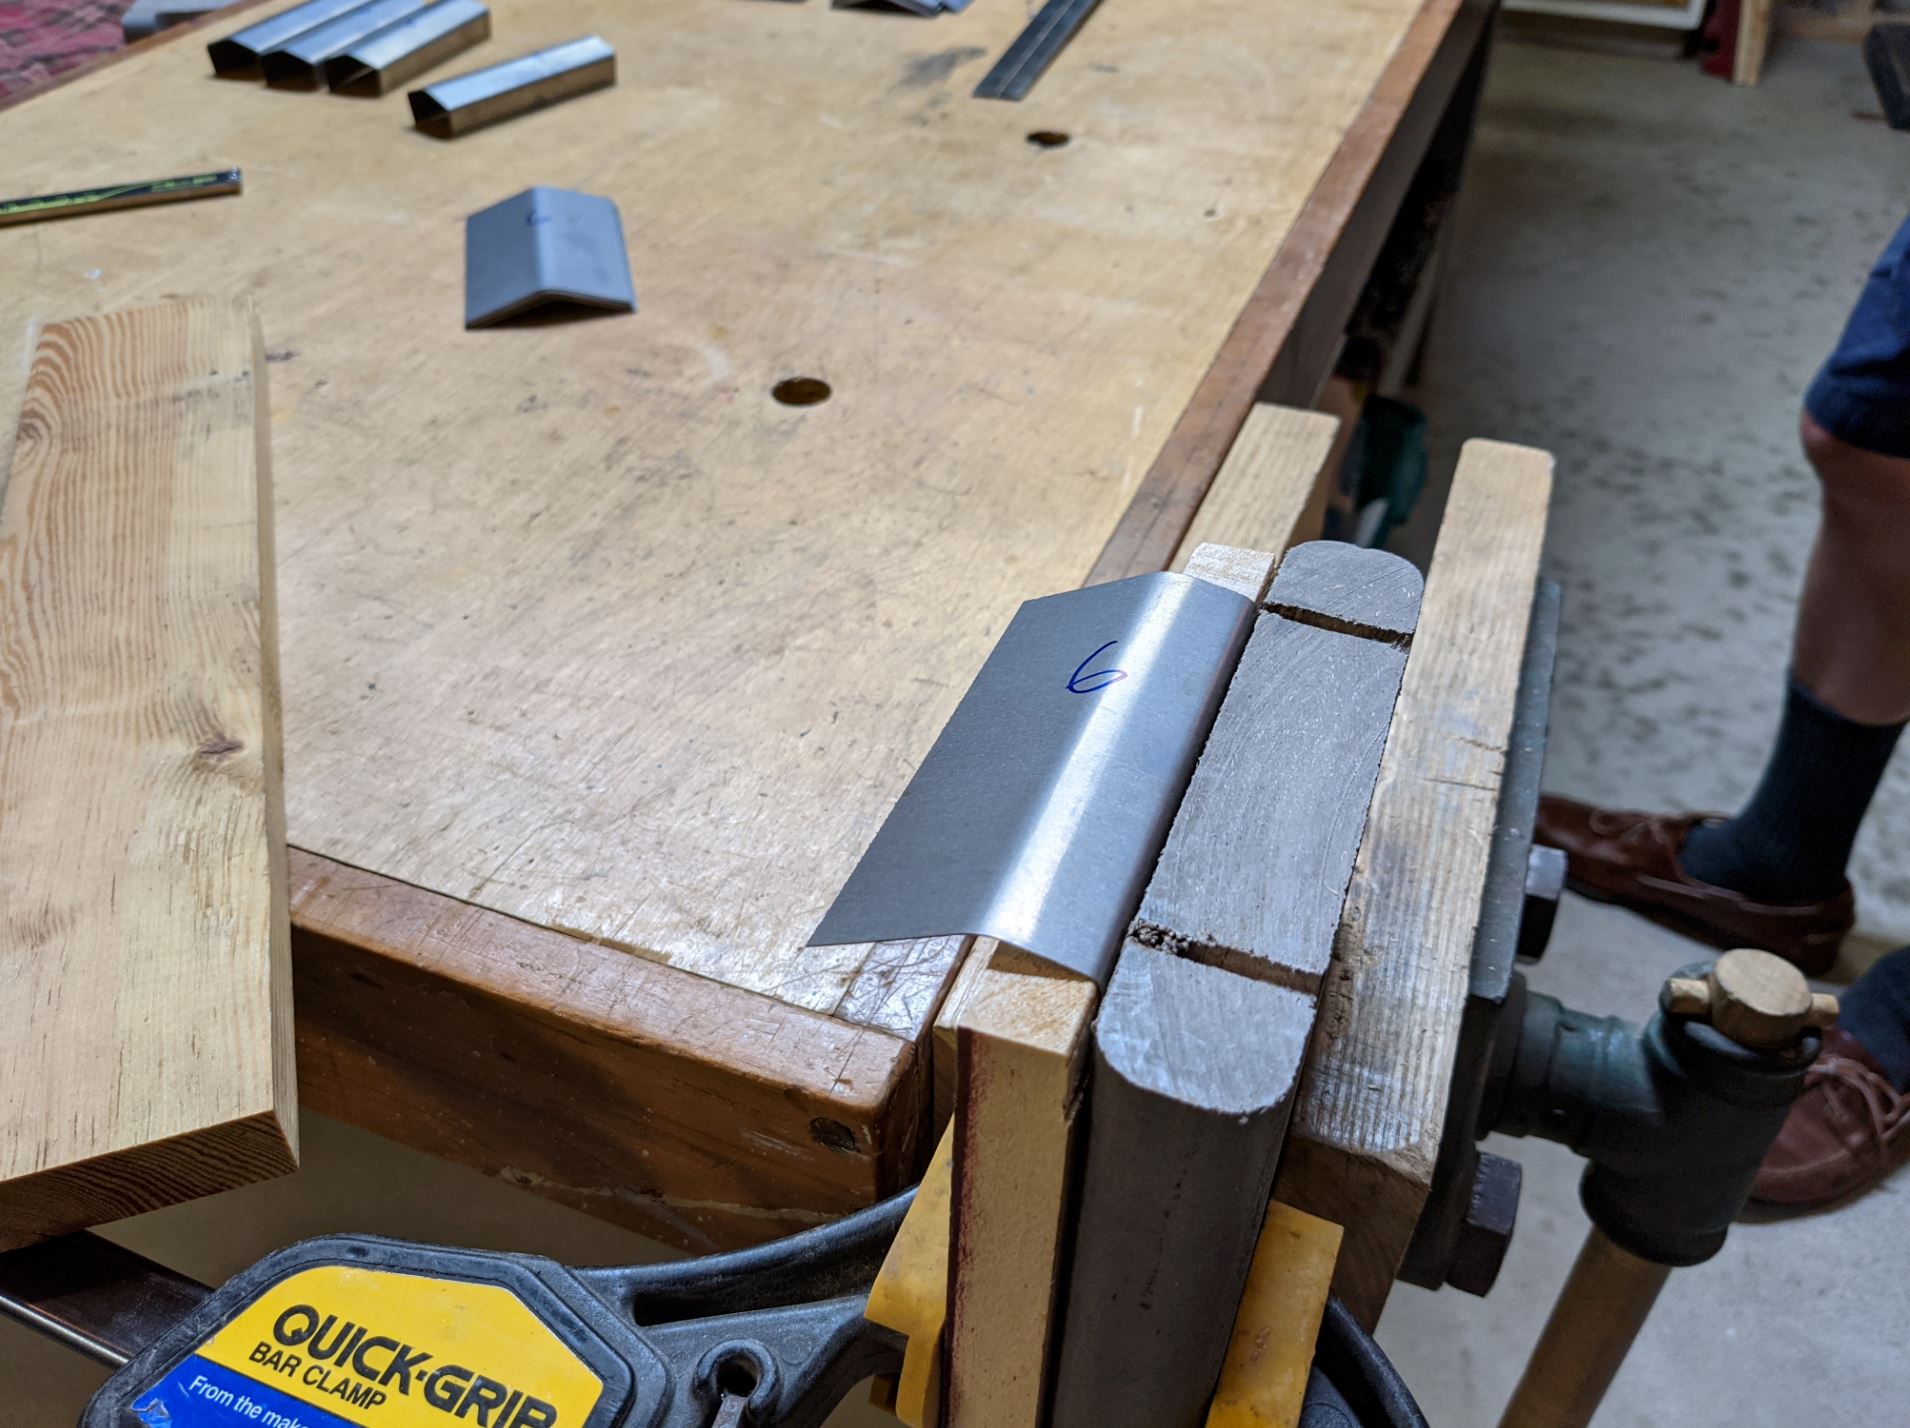
14280-0


Here's the final line up.
14281-1


This is after I spray the shims with clear lacquer and then assembled them.
14282-2

After taking off the zip ties from the wires that held them to the stator, I tied a long 1/4" rope around the whole thing to keep the wires from jumping off.  I then took some Gorilla tape and made a 1/4" wide hoop of it on the very outsides of the coils so I could take the rope off.  The next step was to add two rows of packaging tape around the center of it and then slice each slot with a razor blade before adding the shims in.  I found that all 7 shims weren't going to fit due to the total circumferential stack up around the alternator.  Else, the shim legs wouldn't touch the bottom of their slots (think Roman arch with one too many rocks or keystones).  I ended up settling on leaving shim numbers 1 and 2 out, for a total of 5.
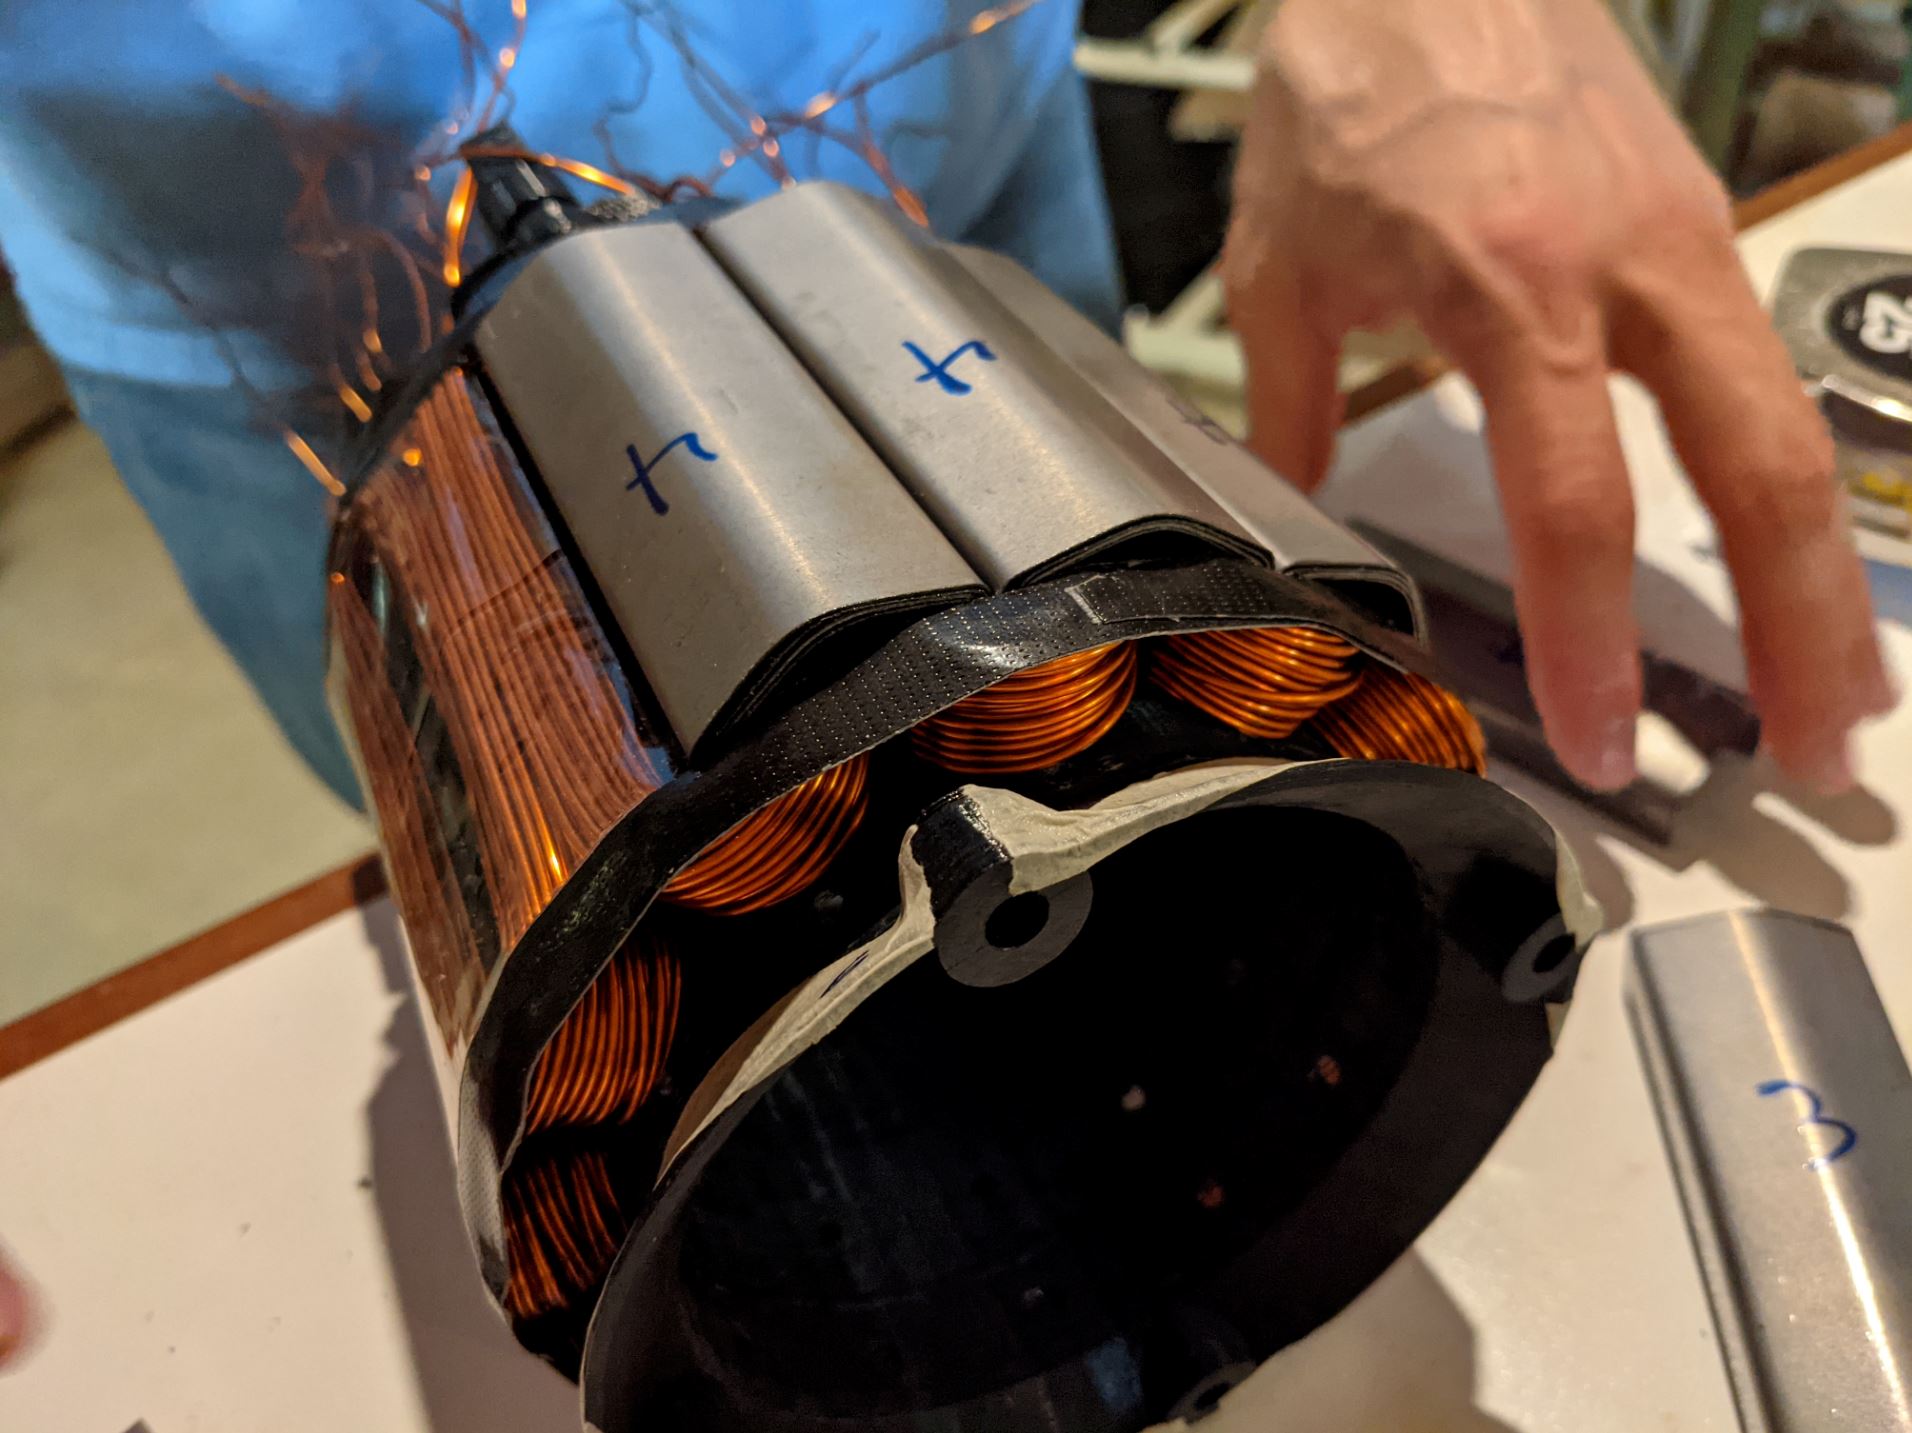
14283-3

14284-4


The next challenge was how to squeeze the shims into their final position.  I was initially thinking some vinyl coated 1/16" or 1/8" steel cable to wrap around the whole thing, but while at the hardware store, I came across some 24", 175 lb, 85C rated zip ties.  9 of them seemed to do just the trick.
14285-5


Last night I took a swing at balancing the steel hubs.  I put some large washers and 3/8" bolts in the various holes until I balanced it.  I spun it up with my RC car battery charger and the original treadmill motor to about 400 rpm.  It seems like I was off by about 300 inch*grams (today I'm going to hunt down a food scale to get the accurate number).  My blades are off by about 360 inch*grams, so I might get away with just putting the right blade in the right position.  We shall see.  Spinning the full blade assembly up to speed in my basement is possible, but it has to be solidly mounted to my workbench, which then I can't feel how strong the vibrations are.  While on the floor in this photo, it would move around like a floppy fish until I got it balanced.
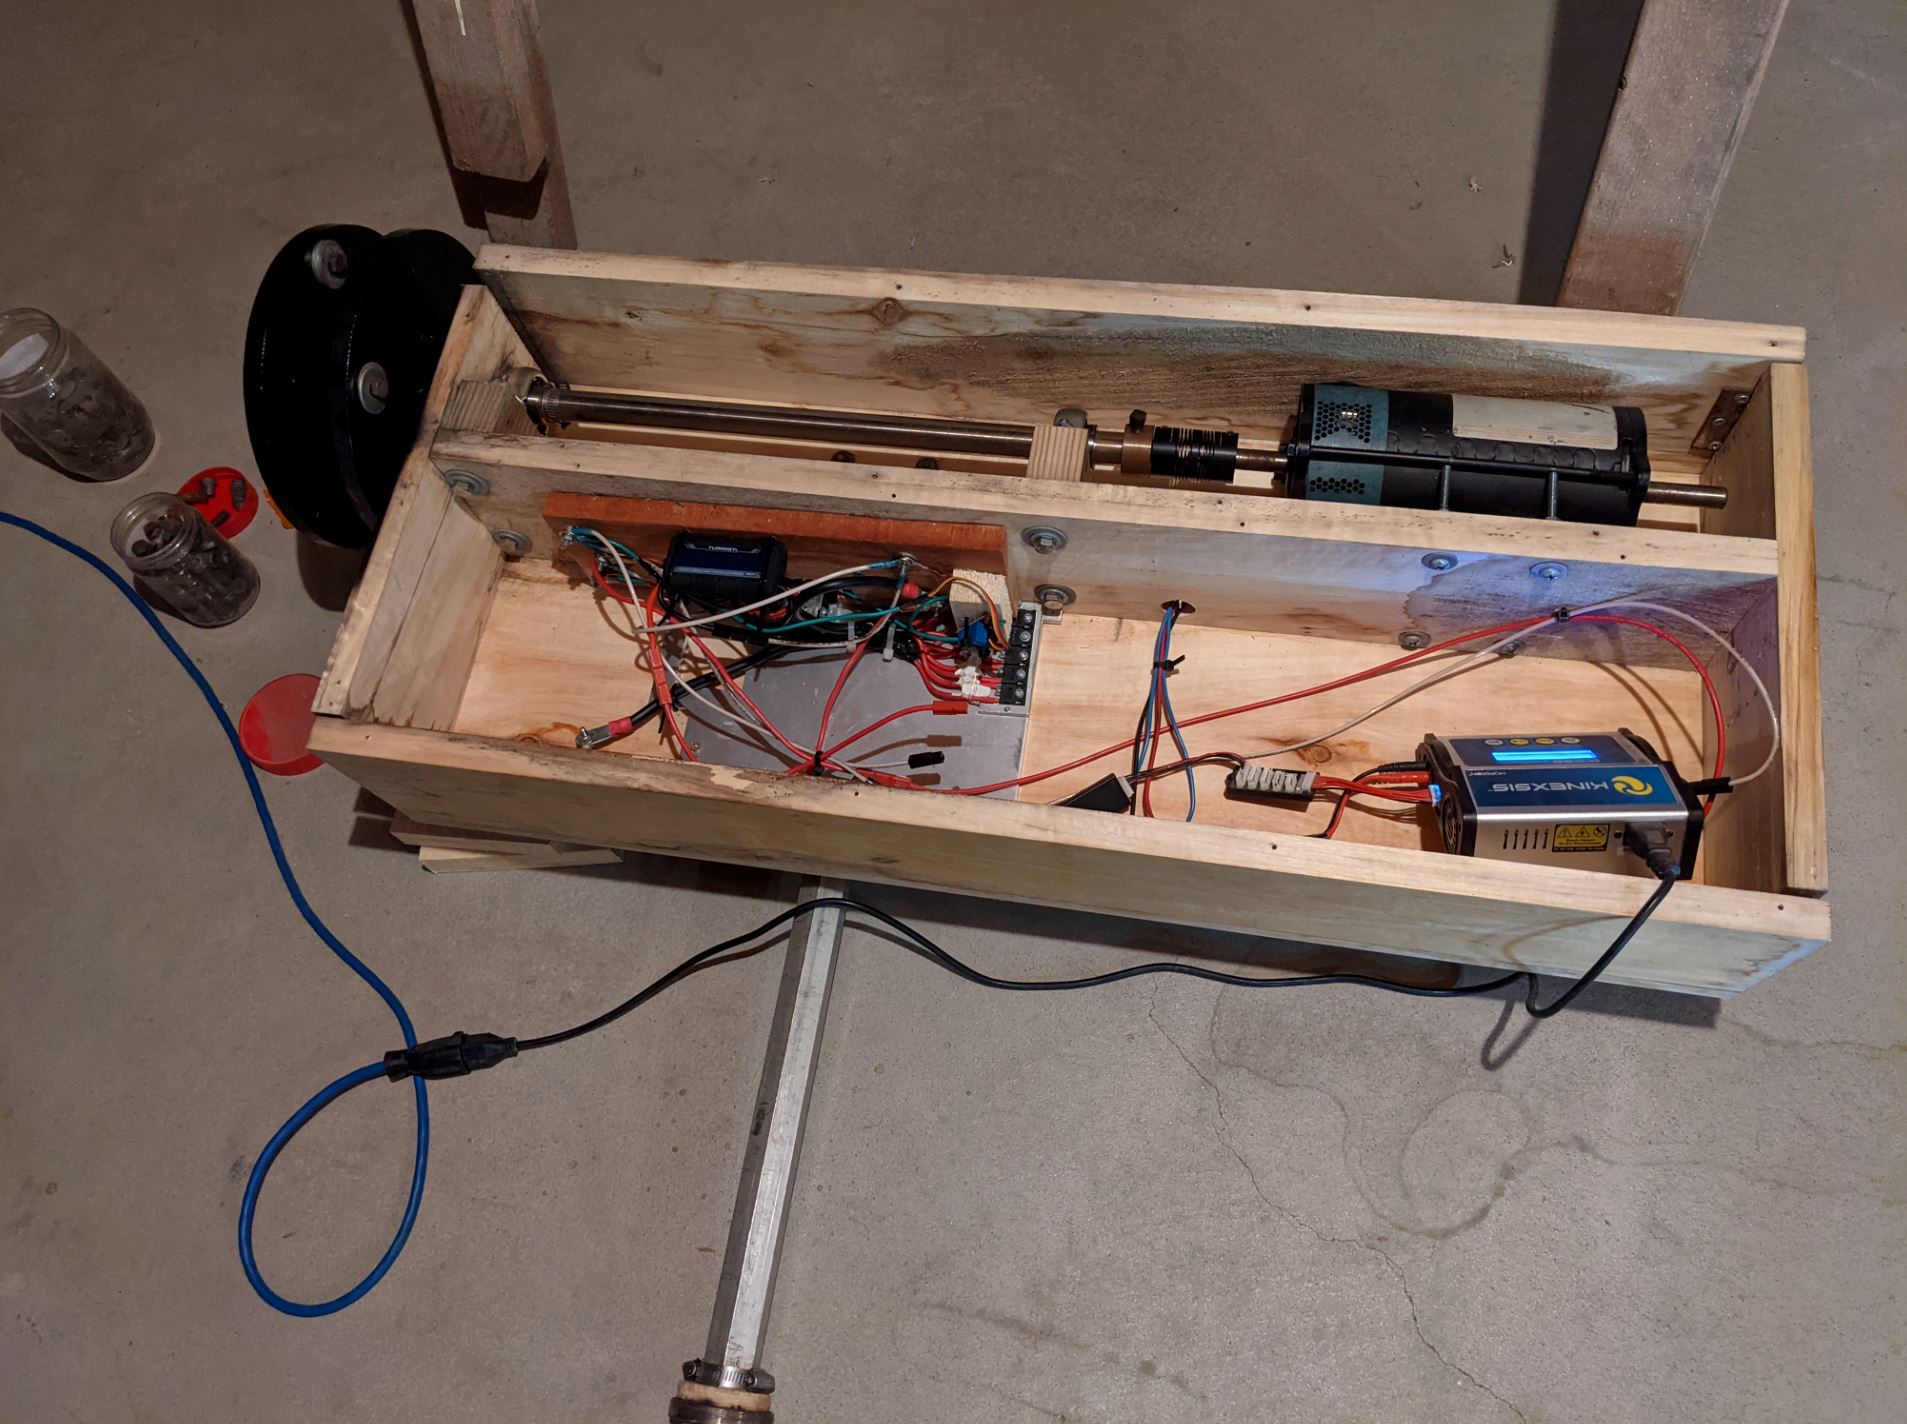
14286-6


The next challenge is making sure the magnets don't stick to the inside edge of the stator.  My wood test shaft, along with the poor fit with the bearings is letting it move a lot, so it won't spin yet.  There is enough clearance, but not much to spare.  Once I figure that out, I should be able to test the alternator.  I don't think I'll be able to put it in the drill press, but I should be able to put it into the windmill and drive it with the treadmill motor.

SparWeb

  • Global Moderator
  • Super Hero Member Plus
  • *****
  • Posts: 5452
  • Country: ca
    • Wind Turbine Project Field Notes
Re: Christmas Windmill Time
« Reply #176 on: September 05, 2021, 11:27:55 AM »
Sucks that you couldn't get in all the steel you wanted to.  Should work with less, but the effect will be substantial.

I'm really looking forward to seeing this work.  I hope you're set up to do some measurement tests of this motor/generator before flying it on the turbine.
No one believes the theory except the one who developed it. Everyone believes the experiment except the one who ran it.
System spec: 135w BP multicrystalline panels, Xantrex C40, DIY 10ft (3m) diameter wind turbine, Tri-Star TS60, 800AH x 24V AGM Battery, Xantrex SW4024
www.sparweb.ca

taylorp035

  • Hero Member
  • *****
  • Posts: 1206
  • Country: us
  • Stressed spelled backwards is Desserts
Re: Christmas Windmill Time
« Reply #177 on: September 09, 2021, 10:22:44 PM »
I assembled the alternator on the shaft tonight and to my surprise, the magnet rotor didn't stick to the side of the alternator where the steel shims are.  My new concern is about how strong the cogging is at start up.  I'm questioning at what speed it's going to take to over come this (probably 10+ mph), even with my much steeper pitch on my blades.  We shall see.

I also wired up two of the coils in series out of the 12 and hooked it up to a single phase rectifier with a bunch of alligator clips.  Spinning it over by hand yielded about 4 volts.   I then hooked up 24v to the treadmill motor and it spun at what seemed like 2 rev/second (120 rpm).  This provided 3.8 volts.  If this voltage vs. the full 3 phase rectified voltage is about 1.6x higher (I thought I read this somewhere), then my cut in would be 78 RPM at 4 volts.

The next step is to work on securing the alternator to the frame of the windmill and also wiring everything up to the 3 phase rectifier in my planned 2x2 coil per phase arrangement.  I'm going to leave the series/parallel connections outside of the alternator so I can wire it in series at a later point if I so desire.   I'm also going to look into getting some real thermally rated potting compound, as it currently shakes quite a bit as the magnets pass each shim and I don't want to wear through any of my 3 layers of insulation.

taylorp035

  • Hero Member
  • *****
  • Posts: 1206
  • Country: us
  • Stressed spelled backwards is Desserts
Re: Christmas Windmill Time
« Reply #178 on: September 10, 2021, 08:51:38 PM »
I labeled all of my wires today in preparation to put it into a star pattern.  I decided to check my coils to make sure they were labeled correctly and not shorting to their neighbors.  Well.... I found several coils that were shorted out.  I'll have to see what I can do to take the zip ties and shims off and better isolate everything.  Better to fix it now.

SparWeb

  • Global Moderator
  • Super Hero Member Plus
  • *****
  • Posts: 5452
  • Country: ca
    • Wind Turbine Project Field Notes
Re: Christmas Windmill Time
« Reply #179 on: September 10, 2021, 10:32:19 PM »
Indeed!
No one believes the theory except the one who developed it. Everyone believes the experiment except the one who ran it.
System spec: 135w BP multicrystalline panels, Xantrex C40, DIY 10ft (3m) diameter wind turbine, Tri-Star TS60, 800AH x 24V AGM Battery, Xantrex SW4024
www.sparweb.ca

taylorp035

  • Hero Member
  • *****
  • Posts: 1206
  • Country: us
  • Stressed spelled backwards is Desserts
Re: Christmas Windmill Time
« Reply #180 on: September 15, 2021, 07:35:46 PM »
Last night I added 12 plastic dividers between each coil in hopes to fix my shorting issue.  I made them out of a plastic orange juice container and they are easy to install since they were flexible, but stiff enough to not collapse as I inserted them.

Unfortunately, this didn't fix any of the shorts, which wasn't super surprising.  So the next challenge is to better permanently isolate the shims from digging into the coils.  I ended of thinking about these sheathing connectors used for house wiring.  I had one of them and plan on obtaining more.  I also plan on better isolating the center of the coils with more tape than I did the first time.

I can tell you those silicon shims did not want to be pulled away from the magnetic rotor....

14300-0

Mary B

  • Administrator
  • SuperHero Member
  • *****
  • Posts: 3177
Re: Christmas Windmill Time
« Reply #181 on: September 16, 2021, 01:40:07 PM »
How are you measuring the short? Is your digital meter auto ranging or do you have to select the range?

If the shims did cut into the coils insulation they may be ruined, you have winding to winding shorts...

taylorp035

  • Hero Member
  • *****
  • Posts: 1206
  • Country: us
  • Stressed spelled backwards is Desserts
Re: Christmas Windmill Time
« Reply #182 on: September 16, 2021, 08:26:01 PM »
Coil 1 to coil 2 has less than 1 ohm of resistance, as does 12 to coil 1.  The shims have dug into the coils due to the vibration of a few times I've spun it and the large amount of crushing force by the 9 large zip ties + the magnetic force.

I'll probably want to re-measure the coils themselves too by running 5 amps through each coil and measuring the voltage drop.

SparWeb

  • Global Moderator
  • Super Hero Member Plus
  • *****
  • Posts: 5452
  • Country: ca
    • Wind Turbine Project Field Notes
Re: Christmas Windmill Time
« Reply #183 on: September 16, 2021, 11:32:53 PM »
The arc or contact can jump from wire to steel bar, or from wire to wire.  Each will undermine your output, both reducing it and making it more erratic.  Try inspecting the wire carefully and find out if it needs to be discarded before bonding everything into place.
No one believes the theory except the one who developed it. Everyone believes the experiment except the one who ran it.
System spec: 135w BP multicrystalline panels, Xantrex C40, DIY 10ft (3m) diameter wind turbine, Tri-Star TS60, 800AH x 24V AGM Battery, Xantrex SW4024
www.sparweb.ca

taylorp035

  • Hero Member
  • *****
  • Posts: 1206
  • Country: us
  • Stressed spelled backwards is Desserts
Re: Christmas Windmill Time
« Reply #184 on: September 23, 2021, 10:21:26 PM »
I'm going to need to go out and purchase some glue to pot the coils.  What should I get for this?   I've purchased lots of 2 part epoxy for carbon fiber, but I was wondering if there was something better for an alternator that gets hot.  It also needs to be somewhat thin to get into all the nooks and crannies between the coils.  I'll have to remove the magnets so I can seal off the 48 holes I drilled for the zip ties.

I'm about halfway done tearing the shims out and fixing the shorting issues once and for all.  The first 5 sets have gone well and it was fairly evident the shims dug into the coils pretty hard on the one side.  I glued over the missing insulation in the damaged areas and then added 2 layers of plastic + the red protective cap at the ends (so a total of 4 layers of insulation per spot).

Mary B

  • Administrator
  • SuperHero Member
  • *****
  • Posts: 3177
Re: Christmas Windmill Time
« Reply #185 on: September 24, 2021, 01:32:29 PM »
Manufacturers use a varnish for this... I always kept a bottle of this in the TV repair shop to quiet down noisy TV flyback transformers and the yoke windings on picture tubes.  https://www.amazon.com/MG-Chemicals-GLPT-Insulating-Varnish/dp/B00S4H8V1Q  no it is not cheap.

SparWeb

  • Global Moderator
  • Super Hero Member Plus
  • *****
  • Posts: 5452
  • Country: ca
    • Wind Turbine Project Field Notes
Re: Christmas Windmill Time
« Reply #186 on: September 24, 2021, 08:08:10 PM »
Yes.  It is specialized stuff and don't you also need to bake it to harden it?
That would be hard to do wrapped around these thermoplastic materials.
Unfortunately I don't know of anything better. 

I think you will either have to tolerate the heat and pot with what you have (a perfectly fine course of action) or rewind the coils.   If you pot them with anything, you just won't be able to trust the wire isn't much much hotter on the inside than on the outside.
No one believes the theory except the one who developed it. Everyone believes the experiment except the one who ran it.
System spec: 135w BP multicrystalline panels, Xantrex C40, DIY 10ft (3m) diameter wind turbine, Tri-Star TS60, 800AH x 24V AGM Battery, Xantrex SW4024
www.sparweb.ca

SparWeb

  • Global Moderator
  • Super Hero Member Plus
  • *****
  • Posts: 5452
  • Country: ca
    • Wind Turbine Project Field Notes
Re: Christmas Windmill Time
« Reply #187 on: September 24, 2021, 08:09:55 PM »
If you intend to bench test, it will be much easier to find the temp limit.
No one believes the theory except the one who developed it. Everyone believes the experiment except the one who ran it.
System spec: 135w BP multicrystalline panels, Xantrex C40, DIY 10ft (3m) diameter wind turbine, Tri-Star TS60, 800AH x 24V AGM Battery, Xantrex SW4024
www.sparweb.ca

taylorp035

  • Hero Member
  • *****
  • Posts: 1206
  • Country: us
  • Stressed spelled backwards is Desserts
Re: Christmas Windmill Time
« Reply #188 on: September 25, 2021, 09:20:36 PM »
I just placed an order of this stuff to pot the coils.  I looked for about 2 hours at different options.  I was tempted by the cheaper 2 part epoxy that I've used for carbon fiber, but I know it doesn't hold up well to high temps and probably had a thermal conductivity of rough half of what I purchased.

https://www.amazon.com/MG-Chemicals-Encapsulating-Potting-Compound/dp/B005T8PYZ4/ref=sr_1_2?dchild=1&keywords=coil%2Bpotting%2Bcompound&qid=1632610167&sr=8-2&th=1

Here's the data sheet.
https://m.media-amazon.com/images/I/710vSC7+WaL.pdf

Ideally I wanted some LORD COOLTHERM EP-3500, but the smallest quantity I could find for sale was $1600.  It's thermal conductivity was almost 10x of what I bought.  They also had some $170 stuff that was 2x.

taylorp035

  • Hero Member
  • *****
  • Posts: 1206
  • Country: us
  • Stressed spelled backwards is Desserts
Re: Christmas Windmill Time
« Reply #189 on: September 29, 2021, 08:29:39 PM »
https://youtu.be/SuQNjkxhT8k

Here's a video of it all wired up and spinning!  I hooked up each single phase to a bridge rectifier and tested it before going to the 3 phase rectifier.  I was quite impressed at the voltage and amperage I was getting turning it over at a medium speed by hand.

There is a lot of deflection of the shims as the magnets go by. I later added the zip ties back on and that helped.  I'll have to see how stiff it is after the potting compound is applied.  I may add some additional bracing around the OD of the alternator if required.
« Last Edit: September 29, 2021, 10:28:28 PM by taylorp035 »

Astro

  • Sr. Member
  • ****
  • Posts: 280
  • Country: us
Re: Christmas Windmill Time
« Reply #190 on: September 29, 2021, 09:25:47 PM »
I was following this before I joined. Nice project!

Mary B

  • Administrator
  • SuperHero Member
  • *****
  • Posts: 3177
Re: Christmas Windmill Time
« Reply #191 on: September 30, 2021, 01:14:13 PM »
https://youtu.be/SuQNjkxhT8k

Here's a video of it all wired up and spinning!  I hooked up each single phase to a bridge rectifier and tested it before going to the 3 phase rectifier.  I was quite impressed at the voltage and amperage I was getting turning it over at a medium speed by hand.

There is a lot of deflection of the shims as the magnets go by. I later added the zip ties back on and that helped.  I'll have to see how stiff it is after the potting compound is applied.  I may add some additional bracing around the OD of the alternator if required.

What is the clicking noise???

taylorp035

  • Hero Member
  • *****
  • Posts: 1206
  • Country: us
  • Stressed spelled backwards is Desserts
Re: Christmas Windmill Time
« Reply #192 on: October 01, 2021, 11:13:04 AM »
I'm 100% sure.  I believe it's the shims vibrating since I don't seem like anything else is hitting.  I added the zip ties back on later and it was quieter, though still had some clicking.  I plan on adding the potting compound tomorrow.

taylorp035

  • Hero Member
  • *****
  • Posts: 1206
  • Country: us
  • Stressed spelled backwards is Desserts
Re: Christmas Windmill Time
« Reply #193 on: October 18, 2021, 10:07:35 PM »
10 months of building the alternator has finally come to an end!  Certainly could of built one like the rest of you guys, but I decided to give myself a spatial constraint to make it harder.

First, the bench testing figures.  I did some testing with the treadmill motor driving it and some with a 1/2" brushless DeWalt drill.  For RPM, I used a Go-Pro to take the video and measured how many frames it took to do one revolution.  This turned out to be quite accurate and handy for recording power figures.   All power figures are through the meter, going into the battery, so this is after any losses in the wires leading up to it or the diode (~0.7-1 volt drop, which is significant when running at 4 volts).

14371-0

I'm really pleased with the results.  In the original configuration, it wouldn't get past 400 RPM (~4 amps from the treadmill motor) right before furling.  So it looks like things are going to be quite safe out of the gate here.  My power electronics are rated for 40A continuous.


I will also note, I finished up adding the potting compound to the coils.  It took two 375 mL containers to fill the whole thing, but I can positively say those wires are never going to move again.  It dried really hard and made the whole alternator quite stiff like I wanted it to be.  The ends of the zip ties proved to be useful, as they were a great place to make an anti-rotation block.  I even added a hard piece of rubber between the block and the alternator to help the longevity of everything.

I finished off all of the new wiring with 12 gauge running from my dual 17 gauge hot wires from the star pattern, to the 3 phase rectifier.  I used thermal paste and mounted the rectifier to my large aluminum plate inside the box.

SparWeb

  • Global Moderator
  • Super Hero Member Plus
  • *****
  • Posts: 5452
  • Country: ca
    • Wind Turbine Project Field Notes
Re: Christmas Windmill Time
« Reply #194 on: October 19, 2021, 01:34:44 AM »
Did you also bond the steel sheets together?

I just scrolled back to the calcs you did for the blades last year.  Are you sure the power curve for the generator matches the power curve of the blades?
No one believes the theory except the one who developed it. Everyone believes the experiment except the one who ran it.
System spec: 135w BP multicrystalline panels, Xantrex C40, DIY 10ft (3m) diameter wind turbine, Tri-Star TS60, 800AH x 24V AGM Battery, Xantrex SW4024
www.sparweb.ca

taylorp035

  • Hero Member
  • *****
  • Posts: 1206
  • Country: us
  • Stressed spelled backwards is Desserts
Re: Christmas Windmill Time
« Reply #195 on: October 19, 2021, 08:43:13 AM »
Quote
Did you also bond the steel sheets together?
Yes, I taped around my zip ties and down to the bottom flange to make a cavity to pour the potting compound into.  This filled in all of the wires and shims, so there shouldn't be any hollow spots.  I'll have to upload a photo.

Also, I think the calculations are correct.  Last year I had the wind velocity squared instead of cubed.   Power = 1/2 * air density * efficiency * Pi * R^2 * V^3  is what I have now in column G.   As long as Column H is less than 1, the windmill will spin slower than the RPM listed in Column A. 

taylorp035

  • Hero Member
  • *****
  • Posts: 1206
  • Country: us
  • Stressed spelled backwards is Desserts
Re: Christmas Windmill Time
« Reply #196 on: October 19, 2021, 11:47:10 AM »
I made a short video of me carving the blades for this windmill.

https://youtu.be/nI3PXLxfYGo

SparWeb

  • Global Moderator
  • Super Hero Member Plus
  • *****
  • Posts: 5452
  • Country: ca
    • Wind Turbine Project Field Notes
Re: Christmas Windmill Time
« Reply #197 on: October 20, 2021, 11:40:17 PM »
OK.
From a different perspective, I'm seeing 44 watts of electricity being generated at 180 RPM. 
If the generator is 50% efficient, then in needs 88 Watts of mechanical power to be turned.
The 7-foot rotor will have 88 Watts mechanical power in 10 mph wind if the rotor is 40% efficient.
That seems to lead to a TSR = 4.5

Back of the envelope, it seems to match.

I'm looking forward to seeing it all working together!
No one believes the theory except the one who developed it. Everyone believes the experiment except the one who ran it.
System spec: 135w BP multicrystalline panels, Xantrex C40, DIY 10ft (3m) diameter wind turbine, Tri-Star TS60, 800AH x 24V AGM Battery, Xantrex SW4024
www.sparweb.ca