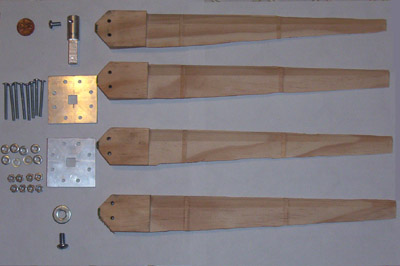
A while back I posted about the blades. I put one set together about a month ago and connected it to a NEMA 17 stepper motor. The stepper motor contains a magnet rotor and it is two phase. This configuration does not require brushes. I do not know the operating voltage of the motor but I would venture that it is not too high based upon the results.
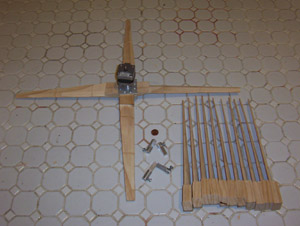
Below is a picture of the hub components I put together.

I coated the blades liberally with linseed oil, soaking them through for the most part. I decided on using a 4 blader because I was concerned that there would not be enough start up torque from these as a 3 blader. I made the blades from 1 by 2 inch stock, and that is thinner that what the blade designers call for in a 3 blade set with a reasonable tip speed ratio. The shaft adapter that attaches to the motor was made out of 1/2 inch round stock aluminum. the generator end was bored out to .2 inches. That was a mistake on my part for the stepper has a .185 inch shaft. I added more set screws which worked for this one, and that problem will be corrected on the next batch of these. The set screw hole was bored with a #21 bit and threaded to accept a 10-32 thread. The blade end of the shaft adaptor is milled to a .34 inch square on the outer 1 inch to hold the rotor disks (squares in this case) and the blades. The end is drilled with a #7 bit and tapped 1/4 inch 20 threads per inch. The Rotor Disks are actually squares which I milled from 2 inch by 1/8 inch stock on my mini-mill. I made two holes per blade to bolt the blades through and a square .34 inch hole in the middle to fit the shaft adaptor. I hit that lightly with a file to square the corners and make it fit as it was usually a tad small and the corners were rounded right off of the machine. The assembly was put together and the blades lined up, I snugged up the bolt in the end enough to hold the blades and lined them up as best I could. I then tightend the end bolt a little and drilled the blades on my drill press with a 9/64ths bit through the existing holes in the rotor disks (squares). I then bolted each blade on with two 1/8 inch screws 1 and 1/2 inch in length, held with a washer and nut. I later added additional washers in an attempt to balance it. I never did get it perfect. It has a slight vibration at higher speeds.
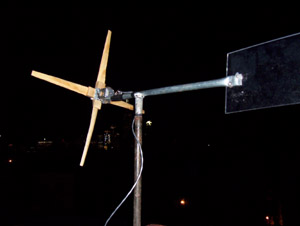
Below is a picture of the mill on my roof on the test stand that has been its home for a month or so now.

The stand was made using a couple of ten pound weights that came free in the basement of a building I purchased. The pole is a 3/4 inch schedule 40 pipe and is about 4 feet in length. The pipe is welded to the weights at the bottom. The pipe is topped with a piece of 1/2 inch EMT welded into the pipe sticking out another couple of inches. The Mill is mounted on a piece of 3/4 inch EMT which has been smashed in a vise at both ends and a little in the middle and attached to the top of a piece of 3/4" galvanized pipe with a washer welded to the top of it. The pipe over pipe bearing is well greased with axle grease. The tail is made from a piece of scrap acrylic, and the stepper motor is clamped to the EMT with hose clamps. I made two bridge rectifiers out of scrap 4007 diodes and soldered them together. I simply taped this assembly to the 3/4 inch EMT for the testing and soldered the leads to the motor and to the wire carrying down the DC. The lead wire is allowed to rap around the tower.

I had tested the assembly before I put it up and found that at approximately 60 rpm it only puts out just under 3 volts or so. The test turbine was ineffective for charging 12 volt banks because the required rpm was just too high. But I figured it might be useful to light some LEDS, or for an ornamental type wind turbine, or even a remote out house light.
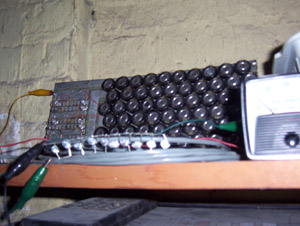
I had a pre-existing wire from the roof to my laundry room which was about an 18 or 20 guage two conductor wire. I connected that to the mill on the roof and to a test rig in the laundry room consisting of a volt meter, a 15 farad 15.3V capacitor bank, and about 10 LEDS connected in parallel. I added a bunch of 3.9V zeners to limit the voltage to 3.9 volts later after I cooked a couple of LED's.
At approximately 60 rpm it only puts out just under 3 volts or so. The test turbine was ineffective for charging 12 volt banks because the required rpm was just too high.
One day, shortly after I put it up, I noticed there was no output and the capacitor bank had gone down to about 2.5 volts. I walked out and away from my building so that I could see the turbine on the roof. It wan't there! I climbed up and found that the wind had apparently blown hard enough to knock the mill over. To my amazement, the blades were not broken. I figure they had to be going at a pretty good clip! The blades were however bent. It appears that the Linseed oil made the blades resilient enough to not break, and maybe it fell in such a way that the skimmed the surface of the roof. They were marked in black where they had apparently rubbed the roof. I set it back up and kind of bent the two bent blades kind of back to straight and it started up. I moved a large planter and weighted it on the edge of the iron weights that form the base of the mill, and since then no problems with that.
Another day, I noticed no power, and climbed up on the roof. The blades had become disattached from the hub. I guess the set screw had not been tight enough, or the vibration of the machine was enough for them to work loose. I found the blades on the roof, again not broken and re-attached them. The tips are a little scuffed up and one of the blades is still a little bent from the first mishap, but other than that the are fine. This blade set has nine lives, or maybe thats just three so far. I am amazed the blades didn't break, and really have to attribute that to luck---and linseed oil (Thanks DanB)
They spin well most days, and provide a little more light in my laundry room, but it is really only practical as a toy, or an intermittent utility light or something. I like to keep the little mill busy so I've made a few blade sets over the past few weeks when I didn't have something else to make.

Ghurd, the assembled set in the photo is yours.
Anyway, it was a fun little project, hope you enjoyed the post. Rich Hagen