Author Topic: A small energy system design  (Read 12437 times)

0 Members and 1 Guest are viewing this topic.

hvirtane

  • Hero Member
  • *****
  • Posts: 712
    • About Solar Cooking
A small energy system design
« on: June 02, 2004, 04:30:21 PM »
The system is going to

utilize electric generators

to convert wind energy,

solar energy, biomass energy

(biogas, wood gas, vegetable oils)

and hydro energy and as well

the energy storage

into electricity.  


The system is going to be

made of really simple

constructions,

which can be mostly made by anyone.


The energy storage

will consist either of

a water tank

or batteries.


---


First a generator design will be discussed.


One of the best and best known

self made generator was introduced

by Colin Forbes in his book

'Homebuilt Dynamo'.


His design is basically

rather similar

as my design drawing

in the following picture.


Various sizes of this kind of generator

can be made. The generator can be build also

modular by adding more disks on the same axle.


- Hannu

« Last Edit: June 02, 2004, 04:30:21 PM by (unknown) »

hvirtane

  • Hero Member
  • *****
  • Posts: 712
    • About Solar Cooking
Re: A small energy system design
« Reply #1 on: June 07, 2004, 12:15:50 PM »
Last week I did some research on different

materials. It seems to be the case that it

isn't easy beat industrial formica for making

the magnet disk of this Alfred Forbes design

or making a stator for a 'otherpower' design.


Then the next material to consider

is the laminates.

Silicon steel is available

but costly. Would it be possible to use

metal from empty canned food cans?

Scrap metal?


Otherwise this Alfred Forbes design

isn't so difficult to make.

And I think that it will get more

power out from the magnets

than 'the otherpower' car wheel design...


- Hannu

« Last Edit: June 07, 2004, 12:15:50 PM by hvirtane »

hvirtane

  • Hero Member
  • *****
  • Posts: 712
    • About Solar Cooking
Pumping water
« Reply #2 on: June 07, 2004, 01:17:42 PM »
In general one of the easiest ways to utilize

wind energy or solar energy is to use those

energy sources to pump water up and then utilize

the stored energy by using a small hydro turbine.

For a hydro turbine an electric generator

is a quite good partner, because the water hydro

can run all the time with a constant speed

and then it is possible

to design the generator

to be efficient exactly

at that speed.


a)

Especially centrifugal water pumps would

be good for wind turbines,because the load

on the pump is rising according to the cube law

as is the power available from the wind, when

the wind speed is rising.


b)

But first I will make some simple drawings

for a rope pump, which is especially low

technology and suitable for local craftsmen

anywhere in the world.


---

---


This rope pump is based

on the ideas as used

for example in Nicaragua.

These kinds of pumps were originally

utilizing muscle power for example

in the means of bicycles.

In the place of the rear wheel

of the bicycle there is

fixed a (V-)belt wheel suitable

for a rope.


The rope is with knots and rubber

valves made of old inner tubes

of car tires attached on the knots.

The rope is a loop, which is long enough

to reach the water of the well.

The part of the rope loop,

which is running upwards,

is inside a PVC water tube.

The tube dimension is

big enough so that the rope knots and

rubber valves attached on them

inside the tube are just

so tight that the rope can

move freely inside.


Inside the well there is a system

to guide the rope

inside the tube leading upwards.

That system can consist

of a wheel or it can be made

to be a slide guide for the rope.

When the rope is moving because

of the bicycle wheel movement

it carries water

out of the well.


According to various experiments

and measurements

the efficiency of this kind of pump

reaches even 70%.

It can lift water even 50 m up.


Please see:


A construction manual


Motorized pumps in Nicaragua


In African countries


In El Salvador


Recently various kinds of wind turbines

have been used the run the rope pump.

Small combustion engines have been used, too.


This drawing is based on utilizing a simple vertical axis wind rotor.

The wind rotor can be a Savonius rotor

or it can be Darreius or

as well a Lenz turbine.


On the axle of the wind turbine

a permanent magnet

axial generator or another type

of a generator can also be fixed,

for charging batteries.


- Hannu

« Last Edit: June 07, 2004, 01:17:42 PM by hvirtane »

hvirtane

  • Hero Member
  • *****
  • Posts: 712
    • About Solar Cooking
Re: Pumping water: OOPS!
« Reply #3 on: June 07, 2004, 03:48:00 PM »
The last links,

for rope pumps in Africa

and in El Salvador

came for some reason wrong.


Here are the correct links:


http://www.pumpaid.org

http://fssca.net/projects/irrigation


- Hannu

« Last Edit: June 07, 2004, 03:48:00 PM by hvirtane »

hvirtane

  • Hero Member
  • *****
  • Posts: 712
    • About Solar Cooking
Wind rotors
« Reply #4 on: June 08, 2004, 01:04:51 PM »
There are several ways to make

the wind rotor really easy.


One possibility is to use straight wooden

boards. I'm calling this type of the wind

rotor 'Reinikainen design', because of

the name of the builder of this turbine.


This rotor has been up more than ten years

in Finland, without any problems.

It is only 7,5 m diameter,

but during a storm the electric

generator fixed to it produced 25 kW.

There is no storm protection for

the wind rotor besides loading

the generator more

the more there is power from the rotor.


---


We made with Taisto Suihonen something similar

with 3 m long 100 mm x 10 mm wooden boards.


We used four blades only.

For each blade there are seven boards

on the top of each others.

On the tips the boards are 25 mm on the top of

each others.  

We cut every second of each of

the crossing boards to get

the blades on the same plane.


Taisto used a power plane to smooth

the blades.

We used normal white glue and some screws to

to fix the boards.

Finally we used a lot of linseed oil

and oil paint on the top.

On the tips we used some fiberglass resin

to protect them.

In the center there are two plywood disks

of 8 mm thick on the both sides of the

wind rotor.

The wind rotor is fixed through the center

by five bolts to the nacelle of a

permanent magnet generator.


The wind rotor stood all the bad weather

and storms of the Finnish winter

2003-2004 without any problems.


The advantages seems to be

that it never goes very fast

and it starts really easily

with low wind speeds.


On slow wind speeds it works better

than a perfect airfoil three blade wind

rotor with a little bit bigger dimensions,

which was used before this rotor.


- Hannu

« Last Edit: June 08, 2004, 01:04:51 PM by hvirtane »

hvirtane

  • Hero Member
  • *****
  • Posts: 712
    • About Solar Cooking
Re: A small energy system design
« Reply #5 on: June 09, 2004, 05:33:57 PM »
Another really simple wind rotor

is the so-called 'Cretan sail wing' rotor.

It consists of triangular sail wings

on wooden or metal rods. The rods

are supported by wires or ropes connected

to the extended axle and other

wires connect the rods with each others.


- Hannu

« Last Edit: June 09, 2004, 05:33:57 PM by hvirtane »

hvirtane

  • Hero Member
  • *****
  • Posts: 712
    • About Solar Cooking
Re: A small energy system design
« Reply #6 on: June 09, 2004, 05:39:29 PM »
There are also some really simple plans

for the wind machine frame.


This wooden frame

with a furling system

is based on German designs.


- Hannu

« Last Edit: June 09, 2004, 05:39:29 PM by hvirtane »

hvirtane

  • Hero Member
  • *****
  • Posts: 712
    • About Solar Cooking
Re: A small energy system design
« Reply #7 on: June 10, 2004, 03:39:32 PM »
In that picture the alternator

as pictured is a modified

car alternator.


Basically there are two kinds

of quite easy modifications,

which you can make for

car alternators so

that you can better

use them with

wind machines.


The first thing to do is to

make new windings for the

stator with thinner wires

to get more turns in

the stator.

That will make the alternator

able to give out higher

power at slower turning speeds

so that the alternator can work

as a direct drive alternator

for a wind machine.


The details for that modification

can be found here:

http://www.mtmscientific.com


Another modification

possible to do is to

make a new rotor with

permanent magnets attached

to it. Then the alt will

not need any current for

the rotor and it will

be more efficient at

slow speeds.

Good measurements and building

details can be found here:

http://www.windstuffNow.com


- Hannu

« Last Edit: June 10, 2004, 03:39:32 PM by hvirtane »

hvirtane

  • Hero Member
  • *****
  • Posts: 712
    • About Solar Cooking
Re: A small energy system design
« Reply #8 on: June 11, 2004, 01:24:07 PM »
The other main alternative for

a horizontal wind rotor is

a vertical axis rotor.


There are several types of

vertical axis wind rotors,

the main types are Savonius

rotors and Darreius rotors.


Probably the easiest rotors

to build are Savonius rotors.


Sometimes Savonius rotors are

made of old discarded oil drums.

There are better shapes for

Savonius rotors available,

however.


Many pictures of homebuilt

Savonius rotors can be

seen on this Australian site:

http://www.southcom.com.au/~windmill/


A really simple and effective

Savonius rotor type drawing for a

home constructor is available at:

http://www.picoturbine.com/projectlist.htm

Please see: 'PicoTurbine 250 Blade Design Plan'


Another type vertical axis wind turbine,

which is a kind of Darreius development

and which seems to be a good

choice for a home constructor is

the recent development by Ed Lenz:

http://www.windstuffnow.com/main/vawt.htm


- Hannu

« Last Edit: June 11, 2004, 01:24:07 PM by hvirtane »

Julio

  • Newbie
  • *
  • Posts: 12
Re: A small energy system design
« Reply #9 on: June 12, 2004, 06:07:11 PM »
Hi Hannu:


I am in the process of obtaining Forbes' book. From just looking at his rotor I think he puts the coils ON the magnets (Thus the need for laminates). I am planning to build an alternator based on his rotor design except that I will set the magnets transversally to the rotor axis and have them project from the rotor material (Industrial Formica) showing a N and a S pole, I will then make two stators facing the magnets. Since I will have 24 magnets I can use 18 coils per stator and thus have a total of 36 coils. My question to you: Are there any possibilities to this?.

Thanks.


Julio.

« Last Edit: June 12, 2004, 06:07:11 PM by Julio »

hvirtane

  • Hero Member
  • *****
  • Posts: 712
    • About Solar Cooking
Re: A small energy system design
« Reply #10 on: June 14, 2004, 03:23:23 PM »
I see no problems concerning your

design plan in principle. Can you make

any drawing of it?


What kind of materials are you going

to use for laminates?


- Hannu

« Last Edit: June 14, 2004, 03:23:23 PM by hvirtane »

hvirtane

  • Hero Member
  • *****
  • Posts: 712
    • About Solar Cooking
Re: A small energy system design
« Reply #11 on: June 16, 2004, 01:29:50 PM »
I started rereading Alfred T. Forbes' book.


His alternator has got 32 magnets.


The rotor is quite like my drawing below

but it has got four-cornered magnets.

(Round ones are easier to draw, so

I put them round in this picture.)

I will make some more drawings about

the coils and laminates later.


- Hannu

« Last Edit: June 16, 2004, 01:29:50 PM by hvirtane »

hvirtane

  • Hero Member
  • *****
  • Posts: 712
    • About Solar Cooking
Re: A small energy system design
« Reply #12 on: June 17, 2004, 11:13:59 AM »
The magnet rotor is made of 3/4" Industrial Formica and the magnets used by Alfred T. Forbes are ceramic strontium ferrite magnets.


The dimensions of the magnets are 1 31/32" x 25/32" x 41/64".


The laminations are made of (some part cut off) 1050 pairs of standard transformer laminations.
The air gaps are 1/16".


20 SWG Enamelled Copper Wire is used for the coils. Every coil has got 88 turns.
In each stator unit the coils are wired in series.
All the stator units are rectified
with full bridge rectifiers
and the rectified currents
wired in parallel.  


The output of the alternator is 1008W 36V 28A  
(DC) at 740 RPM.  560W 20V 28A at 450 RPM.
336W 12V 28A at 301 RPM.  


The necessary voltage for battery charging
could of course be reached at much slower
RPM if a different wiring would be used.


With neodymium magnets the output
would probably be still higher.

A picture below about the general layout.


- Hannu

« Last Edit: June 17, 2004, 11:13:59 AM by hvirtane »

hvirtane

  • Hero Member
  • *****
  • Posts: 712
    • About Solar Cooking
Re: Wind rotors
« Reply #13 on: June 23, 2004, 01:13:28 PM »
I just get an email from my friend in Australia

telling some success stories about this 'Reinikainen' blade design, too. His wind rotor

has now been up about one year' s time.


With Taisto we are now planning for a new bigger

wind rotor. About both of these I will tell

more later, when got more knowledge.


- Hannu

« Last Edit: June 23, 2004, 01:13:28 PM by hvirtane »

hvirtane

  • Hero Member
  • *****
  • Posts: 712
    • About Solar Cooking
Re: A small energy system design
« Reply #14 on: June 24, 2004, 05:28:49 PM »
In pratice in 'village conditions' making laminations like in this Forbes' design isn't

so easy.


One solution might be to make the laminations instead of 'L-shaped' 'half-O-shaped'

so that they would be easier to cut with hand tools.


One possible cheap material might be old cans...

Someone on this OP discussion board suggested that, but I don't know yet,

if the material is good enough.


There are easier ways to make alternators using

permanent magnets. One really good example is Ed Lenz' 'alt from scratch':

http://www.windstuffnow.com/main/alt_from_scratch.htm


It is quite certain that Forbes' design is more

efficient, but the other thing is that Ed's method is really easy and according to his measurements

it is quite good.


- Hannu

« Last Edit: June 24, 2004, 05:28:49 PM by hvirtane »

gibsonfvse

  • Jr. Member
  • **
  • Posts: 51
Re: A small energy system design
« Reply #15 on: July 12, 2004, 12:17:24 AM »
hvirtane,

  Just wanted to let you know that I'm following your diary with interest.  Do keep posting as you learn more.  Unfortunately, I don't have much to contribute (as I've no building experience, and have run no analyses yet) other than to point out the obvious fact that it will be an interesting challenge to balance efficiency with practicality.  Maybe one thing you can do, to gain a handle on what materials are practical, would be to read up on or contact people in some of the regions you'd like to see this turbine flying in, and ask them.  Good work so far; I like your thinking.
« Last Edit: July 12, 2004, 12:17:24 AM by gibsonfvse »

hvirtane

  • Hero Member
  • *****
  • Posts: 712
    • About Solar Cooking
Basic geometry of axial alts
« Reply #16 on: July 24, 2004, 04:11:49 PM »
The general construction of axial

alternators will be discussed

in more details later.

This post concerns mainly

the geometry and the wiring of the coils.


1)

You will use some kind of steel

for the magnet rotor base(s).


The geometry is the same,

if you will make a single

rotor alternator with laminates or

a dual rotor alternator with two

magnet rotors.


- what thickness? The thickness should be that big that you cannot feel the magnets using an iron piece from the other side when they are fitted on the other side.


2)

Axial generator coil layouts with 16 magnets.


It is important that the coils are so big in dimensions that the magnet row can fit inside the coil, when the coil is just on the top of a magnet row. Otherwise the coil loops will cancel each other.
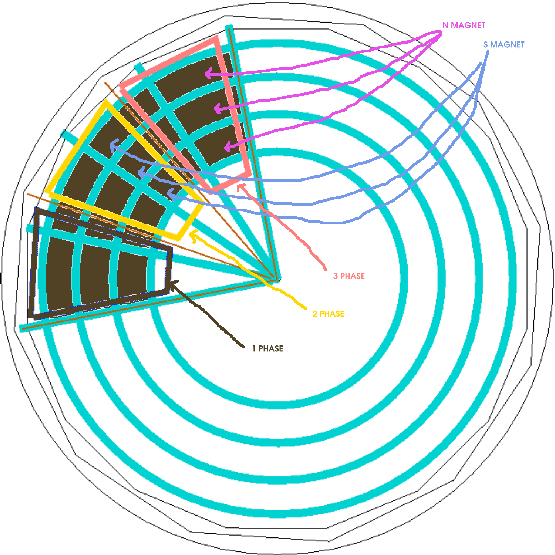


Figure 1.

This picture is to show how you can use small magnets to make of them in effect bigger magnets.


3)

As concerns the number of coil turns. I think that the best way is to make test coils. I cannot know the details of your magnets and the laminates so this is the only way.


  • You should wind a test coil of a thin wire, fix it for testing on the stator disk.
  • Please see the picture here.
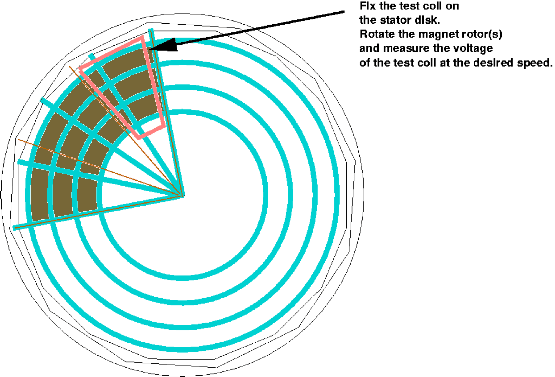


Figure 2.

How to use a testing coil for getting the turns of the coils right.


- Then you will rotate your magnet disk on the top of the stator disk at the desired cut in speed and measure the voltage.


The voltage will rise linearly according to the number of the turns in the coil. The coil wire thickness has no effect for the voltage. A thin wire cannot transfer much current, however.


  • Basically. if your wind rotor is going to be 3,6 m - 4 m in dia with 8 blades, for the wind speed 5 m/s, I would make the generator cut in speed to be about 40 RPM.
  • If your one coil will reach 2 V at 40 RPM you will get this desired result.


( 4 x 2 V) x 1,73 = 13.84 V.


But this is the case, if wired in 'star'.


With 'delta' wiring you will need about 3,5 V for one coil:


4 x 3,5V = 14 V.


-


If 'star' or 'delta is better... it is a quite difficult matter. Because in principle in 'delta' you can get the better power with higher speeds, but you will need more wire to get the voltage to rise enough high at low speeds. That results with higher resistance (and the coils getting hot) at higher speeds.


In practice some people prefer 'delta', some people prefer 'star'. The best method would be to have a switch to change from 'star' into 'delta' at the certain speed, when the voltage has risen up to the point so that 'delta' wiring can charge the battery.


4)

To see, how to make the connections in 'delta' or in 'star' please see figures below.


- You can make the coils of the thin wire as used for testing by using many thin wires parallel in a coil to get them suitable for higher power.


Please see the excellent explanation by Ed Lenz:


http://www.windstuffnow.com/main/3_phase_basics.htm


And a good story about coil testing is here:


http://www.fieldlines.com/story/2004/4/2/92914/49756


Please see also:


http://www.otherpower.com/otherpower_wind_tips.html


http://www.fieldlines.com/story/2004/3/26/172829/368


- You can afterward experiment with using either star or delta wiring, to get your generator matched better, because it is impossible to know beforehand the speed of your wind rotor.


If possible. I think that it would be better to use 'delta'.


In the following pictures I'm assuming that the magnets are made of one piece.


5)

A picture showing the general layout of the generator.


All the angles needed for this layout can be made by compasses and a ruler, because 360 degrees /12 = 30 degrees (= 60 degrees/2) and 360 degrees/16 = 22,5 degrees (= 90 degrees /4).


Figure 3.

The geometry of the generator showing the angles.


Figure 4.

This figure shows how the coils in each individual phase are connected together. In this layout in each phase the individual coils are connected so that the first coil's 'wire in' is let to be free (for the connections as described below) and the first coil's 'wire out' is to be connected to the second coil's 'wire in', and the second coil's 'wire out' to next coil's 'wire in'... IN - OUT - IN - OUT - ... To be sure that the connections are correct, please measure in a test bench that the voltage is rising in each case when you connected one more coil. If you cannot use a voltage meter, you can feel a wrong connection, if the magnet rotor(s) become suddenly much harder to turn.
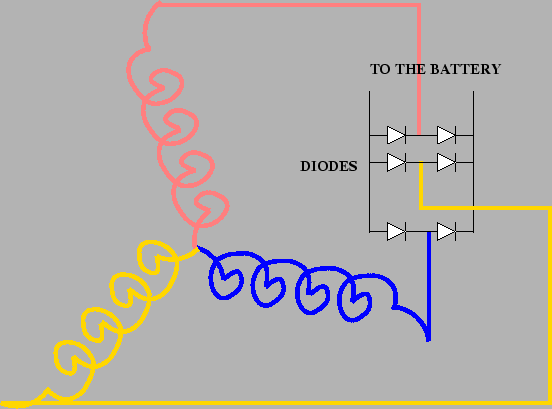


Figure 5.

'Star' connection of the coils. Diodes can be bought from electrical shops. Good usable diodes can be get from car alternators. As second hand they are not costly. Diodes must be checked that they can stand the voltage and the current coming out from the generator.
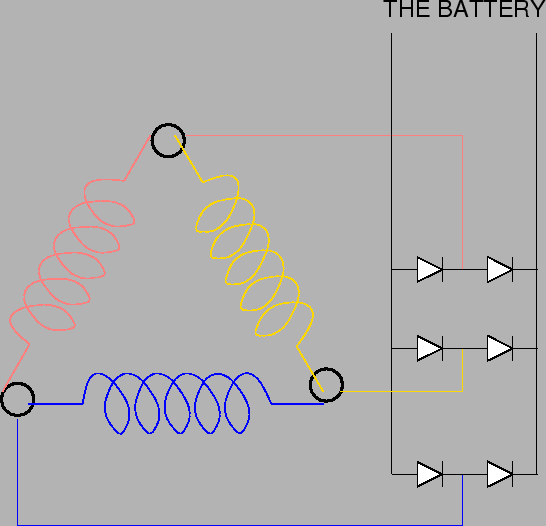


Figure 6.

'Delta' connection.


---


In principle the best power from your alternator can be get, if you'll rectify all the phases separately. But in some cases diodes are costly and if you want to put the diodes on the ground you'll also need more wires. The following picture shows the wiring, if you'll rectify all the phases separately.
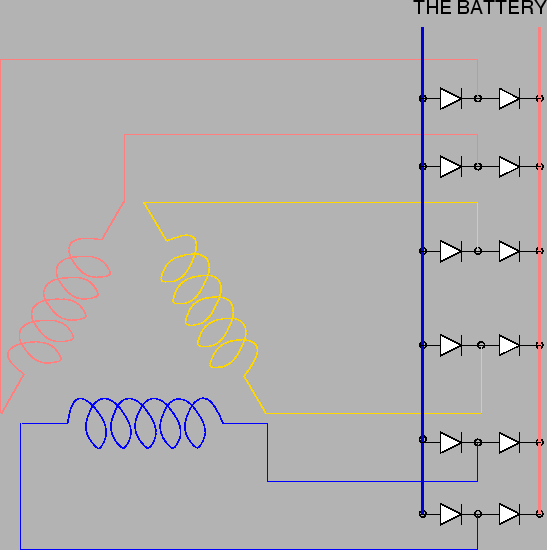


Figure 7.

All the phases rectified separately.


6)

If you will lay the coils on the sides of each others as in the above pictures, it is not easy to get the air gap small. This is because you cannot get many coils on the ring, only 12 in this 16 magnets layout.


7)

Another way is to use stacked coils so that the coils of the different phases are partly laid on the top of each others. Naturally this will lead to another difficulty: how to get them neatly stacked so that the air gap will not again become big. Stacked coils for 16 magnets, three phase layout will look like in the picture below.
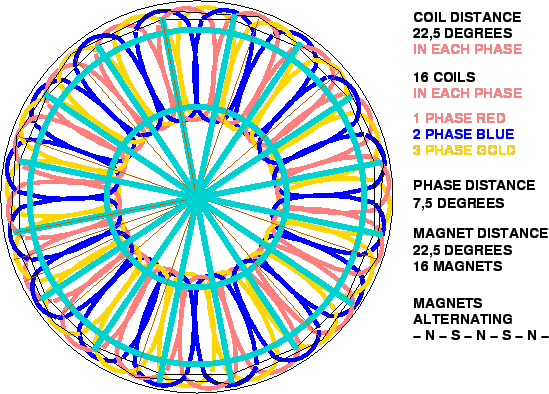


Figure 8.

Stacked coils for 16 magnets and three phase.


The wiring will be the same as in the pictures 4. - 7. above for 'star', 'delta' and 'rectified separately'


8)

There are basically two well-known ways how to make the coils in practice. One method is to make every coil in a jig separately and then connect them. The other method is to use the so-called 'wave-winding', which makes all the coils in one phase at the same time.


Wave-winding is especially suitable for stacked coils and it is generally used with car alternators, for example. Here is the principle of the wave winding of one phase for six magnets.
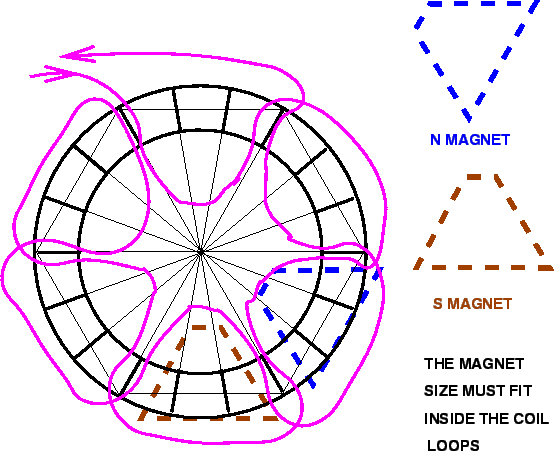


Figure 9.

The principle of the wave winding. The winding is shown for one phase, 6 magnets.


---


For a three phase, 6 magnet layout, the winding looks like in the next picture below.
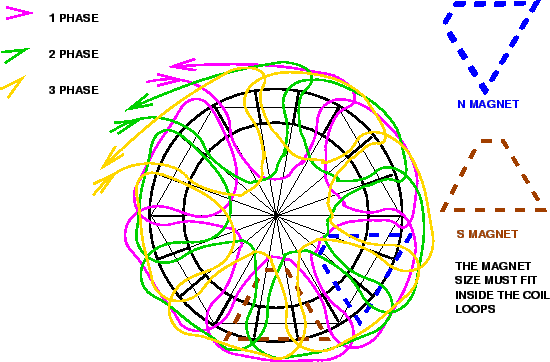


Figure 10.

Wave winding for three phase. Six magnets.


For each phase as many turns are needed as indicated by the voltage tests. To make the work easier you can use instead of one thick wire many thin wires in parallel.


- Hannu

« Last Edit: July 24, 2004, 04:11:49 PM by hvirtane »