Author Topic: coil winder  (Read 9670 times)

0 Members and 1 Guest are viewing this topic.

DaveW

  • Jr. Member
  • **
  • Posts: 62
coil winder
« on: December 30, 2005, 04:29:37 AM »
My first attempts to wind coils was a waste of good magnet wire. So I made a powered winder that holds even tension on the wire, counts the turns for me, and makes neat coils each time. A little shellac and they even stay together when I pop them out of the machine.

« Last Edit: December 30, 2005, 04:29:37 AM by (unknown) »

Old F

  • Sr. Member
  • ****
  • Posts: 309
Re: coil winder
« Reply #1 on: December 30, 2005, 04:10:59 AM »
Dont leave us drooling.Details details.


Looks greats.


Old F

« Last Edit: December 30, 2005, 04:10:59 AM by Old F »
Having so much fun it should be illegal

dinges

  • Hero Member
  • *****
  • Posts: 1294
  • Country: nl
Re: coil winder
« Reply #2 on: December 30, 2005, 04:35:07 AM »
I think someone is going commercial :-)


Very nice machine!


Personally I've got good experience with handwinding the coils (they come out nice too), it's just a drag to do, mindnumbing work, etc. Usually try to spread it out over several evenings (only a few coils at a time).


But with such a machine in my shop, I wouldn't be able to stop winding.


I used to work in a factory that made Tungsten and Molybdenum wires for lighting applications. After the (re-)drawing department, it went to the spooling department where it was wound on smaller spools, that would be inserted in coiling machines. Those spooling machines would be very useable for coilwinding too. If only I had been into RE back then, I could have scrounged one or two discarded machines for free :-( , after they were replaced by much newer (Somatech) machines. You could adjust just about any parameter you wanted: RPM, acceleration, deceleration, various tensions, etc. I do remember we were very afraid of cross-contamination; molybdenum wires couldn't be spooled on tungsten spooling machines and vice versa.


Again, very nice machine!


Peter,

The Netherlands.

« Last Edit: December 30, 2005, 04:35:07 AM by dinges »
“Research is what I'm doing when I don't know what I'm doing.” (W. von Braun)

nothing to lose

  • Hero Member
  • *****
  • Posts: 1538
Re: coil winder
« Reply #3 on: December 30, 2005, 05:31:08 AM »
Wow, that is very nice.

 Great work.


How do you adjust tension on the wire. Is that the flat bar/plate in front of the spool or closer to the coil? Plastic or wood?


Scratching the enamal on the wire is something I worried about when I built a little wood winder, so instead of tension on the wire itself I tighten the spool for more drag. Would be better if I had drag on the wire itself though. But I seldom used it so far.

« Last Edit: December 30, 2005, 05:31:08 AM by nothing to lose »

Waterfront

  • Jr. Member
  • **
  • Posts: 60
Re: coil winder
« Reply #4 on: December 30, 2005, 05:39:32 AM »
Nice Machine!! Professionnal looking setup! You might try posting plans for building one of those, I'm sure they'd be quite popular!!
« Last Edit: December 30, 2005, 05:39:32 AM by Waterfront »

FrankG

  • Full Member
  • ***
  • Posts: 121
Re: coil winder
« Reply #5 on: December 30, 2005, 06:15:38 AM »
Impressive!!!


I can see where a PIC or Basic Stamp could be the next evolution, perhaps stepper driven and solonids for Auto Eject functions and programable drag... No I better stop here...


I like the sheet metal work!!!

« Last Edit: December 30, 2005, 06:15:38 AM by FrankG »

drdongle

  • Hero Member
  • *****
  • Posts: 552
Re: coil winder
« Reply #6 on: December 30, 2005, 06:16:55 AM »
Wow, nice looking machine maybe you could share a few close ups with us?
« Last Edit: December 30, 2005, 06:16:55 AM by drdongle »

wooferhound

  • SuperHero Member
  • ******
  • Posts: 2288
  • Country: us
  • Huntsville Alabama U.S.A.
    • Woofer Hound Sound & Lighting Rentals
Re: coil winder
« Reply #7 on: December 30, 2005, 06:50:18 AM »
Super incredibly nice winder you got there.

Magnitudes better than the one that I built.

The wire tension on this one was my hand squeezing the wire as I guided it into the coil form.


 Hand winding coils does not produce a very uniform wind, so I built an electric coil winder. Got an electric motor from an old Disco Spinner Light (15 rpm). Bought a Coupler for Threaded Rod. Drilled the threads halfway out, And epoxied it to the shaft of the motor. Now my plywood Coil Forms screw directly to the shaft of the motor. It's not any faster but it's easier and makes a much better wound coil. No Turn Counter yet, I have painted one edge of the Coil Form red and count it everytime it goes by. I made the coils with 125 turns and it took about 9 minutes each.

Sitting next to the motor in the picture is my jig for holding the coils in the Airgap of my dual rotor machine for testing.


 I tried many different sizes & shapes of coils. Just cut 1/2 inch plywood to the size of the hole in the coils that I need and two larger pieces to hold the wire in. Bolt the 3 pieces together. It helps to cut some slits in the larger parts of this jig so you can get some string in there and tie it all together before unbolting it to remove the coil.


Here are the coils that I wound for the Genny I built.

« Last Edit: December 30, 2005, 06:50:18 AM by wooferhound »

paradigmdesign

  • Full Member
  • ***
  • Posts: 249
Re: coil winder
« Reply #8 on: December 30, 2005, 07:18:14 AM »
does your winder have the little "guide" for the wire so it does not keep rolling on the same spot?  If it does, can you tell us how you built that?
« Last Edit: December 30, 2005, 07:18:14 AM by paradigmdesign »

electrondady1

  • SuperHero Member
  • ******
  • Posts: 3122
  • Country: ca
Re: coil winder
« Reply #9 on: December 30, 2005, 07:48:49 AM »
your winder looks great! i built a motorized one too

i don't have much shop space so i went vertical. it keeps evolving. i can turn multiple wires at once. i use a foot control from a sewing macine to control a 3/8 drill, this goes through a 5 to 1  gear reduction from a lawnmower . i connected  the tip of a socket driver and socket so i can change coil jigs quickly .i've got the option of runing the coils dry or through a glue bath. next feature, reverse!(coming soon)
« Last Edit: December 30, 2005, 07:48:49 AM by electrondady1 »

electrondady1

  • SuperHero Member
  • ******
  • Posts: 3122
  • Country: ca
Re: coil winder
« Reply #10 on: December 30, 2005, 07:50:30 AM »
ooops!

« Last Edit: December 30, 2005, 07:50:30 AM by electrondady1 »

richhagen

  • Hero Member
  • *****
  • Posts: 1599
  • Country: us
Re: coil winder
« Reply #11 on: December 30, 2005, 07:55:08 AM »
Do I see a CNC coil winder in your future?  I did notice that one of the attachments made for my old atlas lathe was a coil winding attachment.  It used the threading attachment and gears to set the ratio down the x axis to the rate of revolution of the motor, so it might be a possible add on to a lathe that already has a threading attachment, although you would have to add a counter for each turn, or since they would be uniform, of each layer of wire.  I've just wound by hand for the stuff I've built to date.  Rich
« Last Edit: December 30, 2005, 07:55:08 AM by richhagen »
A Joule saved is a Joule made!

hvirtane

  • Hero Member
  • *****
  • Posts: 712
    • About Solar Cooking
Re: coil winder
« Reply #12 on: December 30, 2005, 07:58:27 AM »
That machine looks really good. Could you, please give more details.


Maybe you could, besides start selling coils, start selling those winding machines, too...


- Hannu

« Last Edit: December 30, 2005, 07:58:27 AM by hvirtane »

para t8

  • Newbie
  • *
  • Posts: 49
Re: coil winder
« Reply #13 on: December 30, 2005, 09:10:28 AM »
sweeeeet,nice winder,i made one its wood it dose ok,but your winder, is it for sale,lol.if you sold any coils what would you charge?lol.again,nice winder and good luck with your project.  happy new year       para t8
« Last Edit: December 30, 2005, 09:10:28 AM by para t8 »

DaveW

  • Jr. Member
  • **
  • Posts: 62
Re: coil winder
« Reply #14 on: December 30, 2005, 11:47:20 AM »
Please bear with me, this is my first time trying to post such and I'm unsure of the details on how to do it.

No, not commercial, just diabetic. Throwing coils by hand leaves deep grooves in my fingers and any cuts or scrapes take weeks to heal. So this machine was self-preservation. As to materials, most of this project is from my scrap bin.  The metal is mostly aluminum, since I can cut it (carefully!) with carbide blades. The base is two shelves flipped one on top of the other, most of the rest is old shelving and such cut to fit, drilled and tapped, and filed smooth. Several parts of this thing went through more than one iteration to work right, all told I have about a months worth of labor and design involved.


The wire guide has a slit to accept wire from the reel. Inside are two parts that form a Y to guide the wire to the center. All parts that touch the wire are made from Acetron-GP (zero molecular porosity Delrin) This doesn't mar the wire and nothing sticks to it - shellac or glue just pop off.


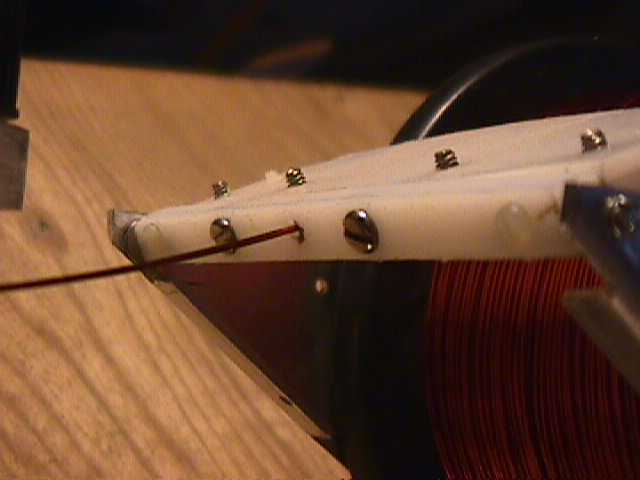
The output of the wire guide has a small hole that centers the wire for the next section.


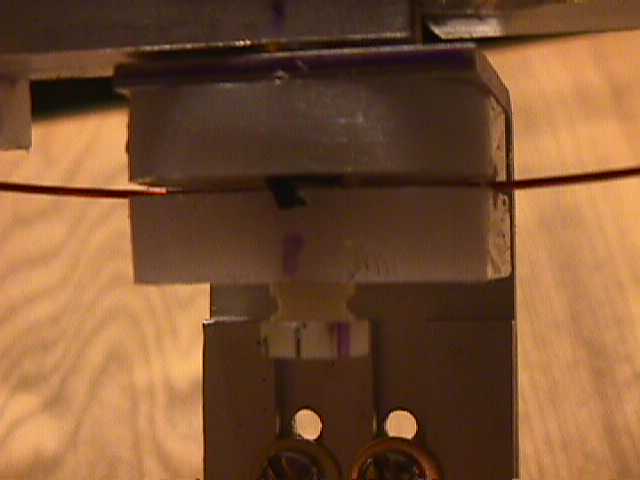
The tensioner is just two pieces of Acetron with a small hinge at the back and a spring loaded thumb screw at the front. Down the center of the two parts is a small vee groove to guide the wire to center, and both ends are beveled to help with alignment. My calibration was very scientific. I tightened the thumbscrew until each gauge of wire wound nicely, then checked the tension with a fish scale and made a hash mark on the thumbscrew so I could repeat the setting. I tried spool drag, but the wire tends to slip between turns and make for uneven tension when it pops out. So now my spring loaded spool drag just keeps the spool steady when I'm setting up for a new coil.


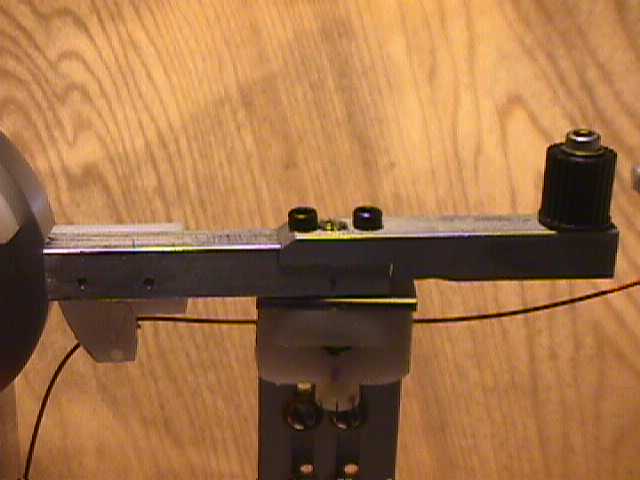
The guide bar pivots in the middle, the black knob allows for gentle side to side pressure to lay the wire in place on the jig, and the Acetron block controls where the wire is placed. I looked at several methods, but since I use this to wind transformer bobbins as well the mechanics of feed rate become complex when ranging from 22 ga to 8 ga round and square wire. Just the thickness of the enamel insulation variance is enough to cause trouble. This method works for anything less than commercial production.


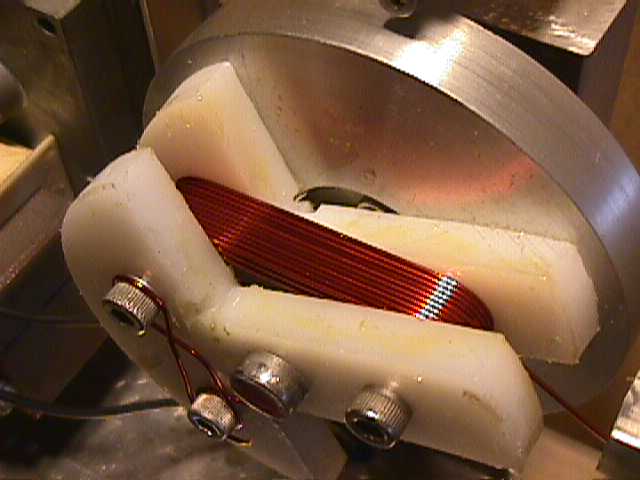
The wire spools nicely onto the jig. So far I have four jigs made for different sizes and shapes of coils, they all bolt onto the same back plate with different bolt patterns.


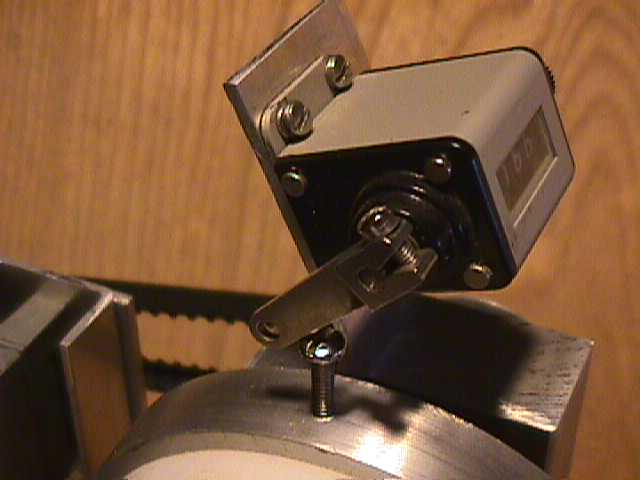
I used a mechanical counter triggered once a turn to count revolutions. This allows me to take a break for coffee and not lose my count.


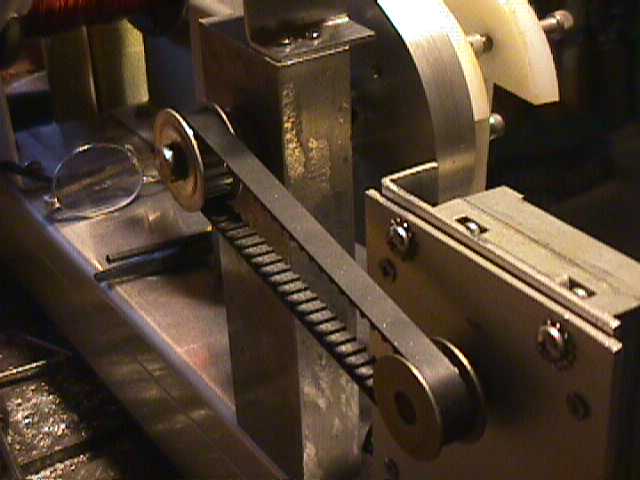
The motor is a custom ECM gearhead motor left over from a previous project. I have hundreds of these left over so was proud to find a use for one. The timing gears are from SDP-SI and reasonably priced. The XL belt and gears series is the smallest I have found that will take the strain of winding larger wire.


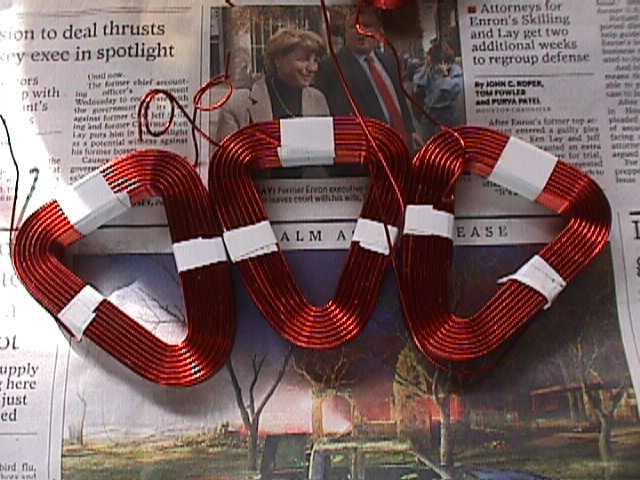
The coils now start and end in the same place, and fit as they should. It also has raised my voltage out by about 10 percent at the same speed. All in all, I'm happy with the results. For me, the process is as much fun as the product.
« Last Edit: December 30, 2005, 11:47:20 AM by DaveW »

electrondady1

  • SuperHero Member
  • ******
  • Posts: 3122
  • Country: ca
Re: coil winder
« Reply #15 on: December 30, 2005, 04:36:08 PM »
those are beautiful coils  i thought mine were dense  but i think you got me beat!
« Last Edit: December 30, 2005, 04:36:08 PM by electrondady1 »

Norm

  • Hero Member
  • *****
  • Posts: 1841
  • Country: us
  • Ohio's sharpest corner
counter for coil winder
« Reply #16 on: December 30, 2005, 05:16:31 PM »
  No turn counter yet?

http://www.fieldlines.com/story/2003/12/21/17710/268

  ....that took you to my old site and pushing the equals button


....then you said about soldering some wires to

the equals button ...which I showed how it is

even easier than that here....

http://www2.suite224.net/~peppysue/

...if it can't be soldered because it is an ink

and plastic circuit.

  Try it sometime Woof...it's so easy and if you

goof it only cost a $1 ....some tape and a little

tiny drill to drill the holes. Fun!

               ( :>) Norm.


« Last Edit: December 30, 2005, 05:16:31 PM by Norm »

ghurd

  • Super Hero Member Plus
  • *******
  • Posts: 8059
Re: coil winder
« Reply #17 on: December 30, 2005, 06:41:21 PM »
Nice!

Those look like they came from a factory.

Mine look like they came from a train crash.

G-
« Last Edit: December 30, 2005, 06:41:21 PM by ghurd »
www.ghurd.info<<<-----Information on my Controller

elvin1949

  • Hero Member
  • *****
  • Posts: 645
Re: coil winder
« Reply #18 on: December 30, 2005, 07:08:00 PM »
DaveW

 That is a beautiful machine and coil's.

I would almost trade my front row seat in hell for one of those.

later

elvin
« Last Edit: December 30, 2005, 07:08:00 PM by elvin1949 »

wooferhound

  • SuperHero Member
  • ******
  • Posts: 2288
  • Country: us
  • Huntsville Alabama U.S.A.
    • Woofer Hound Sound & Lighting Rentals
Re: coil winder
« Reply #19 on: December 30, 2005, 08:50:36 PM »
Excellent Post. The pictures and text look great on this end. Your project is an inspiration to me.
« Last Edit: December 30, 2005, 08:50:36 PM by wooferhound »

wooferhound

  • SuperHero Member
  • ******
  • Posts: 2288
  • Country: us
  • Huntsville Alabama U.S.A.
    • Woofer Hound Sound & Lighting Rentals
Re: counter for coil winder
« Reply #20 on: December 30, 2005, 08:59:14 PM »
Thanks Norm . . .


I love your low priced turn calculater. While I don't really wind a lotta coils, I love the simplicity. I have a $4 pedometer that I think I'm gonna use for my next counter.

« Last Edit: December 30, 2005, 08:59:14 PM by wooferhound »